
TRAKiT
®
User Guide
Release 18.1

TRAKiT User Guide 18.1
Proprietary.
May not be reproduced or distributed without written permission of CentralSquare Technologies.
Copyright 2018 CentralSquare Technologies. All rights reserved.
20181212JC Page ii
Nondisclosure Statement
CentralSquare Technologies
1000 Business Center Drive
Lake Mary, Florida 32746
TRAKiT Support: 1-800-292-4526, option 4
Website: http://www.centralsquare.com
This document, as well as the software described in it, is furnished under license and may be used only in
accordance with the terms of such license. No part of this document may be reproduced in any form or by
any means, stored in a database or retrieval system, or transmitted in any form or by any means, without
prior written permission of CentralSquare.
The content of this document is for information only and is subject to change without notice.
Trademarks
TRAKiT is a registered trademark.
All marks are the property of their respective owners.
©2018 CentralSquare Technologies. All rights reserved.

TRAKiT User Guide 18.1
Proprietary.
May not be reproduced or distributed without written permission of CentralSquare Technologies.
Copyright 2018 CentralSquare Technologies. All rights reserved.
20181212JC Page iii
Table of Contents
Introduction to TRAKiT
®
............................................................................................................................. 1
Overview .................................................................................................................................................. 1
About this Guide ...................................................................................................................................... 1
Client Support .......................................................................................................................................... 2
Logging In ................................................................................................................................................ 2
TRAKiT Interface ......................................................................................................................................... 3
Tabs ......................................................................................................................................................... 4
Information Panes .................................................................................................................................... 4
Personally Identifiable Information (PII) .............................................................................................. 5
Relationships Pane .................................................................................................................................. 6
Tree Tab ............................................................................................................................................. 6
Site Tab............................................................................................................................................... 6
Using the Tree and Site Tabs ............................................................................................................. 6
Navigation ................................................................................................................................................ 7
User Options ................................................................................................................................................ 8
Overview .................................................................................................................................................. 8
Profile ....................................................................................................................................................... 8
Workspace ............................................................................................................................................. 10
Favorites ................................................................................................................................................ 11
Preferences ............................................................................................................................................ 12
General ............................................................................................................................................. 12
Inspection ......................................................................................................................................... 13
Calendar ........................................................................................................................................... 14
Review .............................................................................................................................................. 15
Search .................................................................................................................................................... 16
Security .................................................................................................................................................. 17
About ...................................................................................................................................................... 18
Using the Workspace ................................................................................................................................ 19
Code Case ............................................................................................................................................. 20
Licenses ................................................................................................................................................. 21
Permits ................................................................................................................................................... 22
Projects .................................................................................................................................................. 23
Bulletins.................................................................................................................................................. 23
Dashboard ............................................................................................................................................. 24

TRAKiT User Guide 18.1
Proprietary.
May not be reproduced or distributed without written permission of CentralSquare Technologies.
Copyright 2018 CentralSquare Technologies. All rights reserved.
20181212JC Page iv
Follow ..................................................................................................................................................... 24
Configuring Follow ............................................................................................................................ 24
Following a Record ........................................................................................................................... 25
Stop Following a Record................................................................................................................... 26
GIS ......................................................................................................................................................... 27
RSS (Really Simple Syndication) Feed ................................................................................................. 27
Map ........................................................................................................................................................ 28
Action Center ......................................................................................................................................... 28
Action Center Functions ................................................................................................................... 29
Conditions .............................................................................................................................................. 29
Conditions Functions ........................................................................................................................ 30
Issues ..................................................................................................................................................... 30
Issues Functions ............................................................................................................................... 31
Inspection Center ................................................................................................................................... 31
Inspection Center Functions ............................................................................................................. 32
Review Center ....................................................................................................................................... 33
Review Center Functions.................................................................................................................. 33
My Tasks ................................................................................................................................................ 34
My Tasks Functions .......................................................................................................................... 34
GIS .............................................................................................................................................................. 35
Overview ................................................................................................................................................ 35
Getting Started ....................................................................................................................................... 35
Navigation Features ............................................................................................................................... 35
Magnification ..................................................................................................................................... 35
Navigate Tool .................................................................................................................................... 36
Zoom In Tool ..................................................................................................................................... 36
Zoom
‐
to
‐
Coordinates Tool ................................................................................................................ 36
Full Extent Tool ................................................................................................................................. 37
Measurement Features .......................................................................................................................... 37
Area Tool .......................................................................................................................................... 37
Distance Tool .................................................................................................................................... 38
Location Tool .................................................................................................................................... 38
Viewing Features ................................................................................................................................... 39
Table of Contents Tool ..................................................................................................................... 39
Overview Map Tool ........................................................................................................................... 40

TRAKiT User Guide 18.1
Proprietary.
May not be reproduced or distributed without written permission of CentralSquare Technologies.
Copyright 2018 CentralSquare Technologies. All rights reserved.
20181212JC Page v
ID Tool .............................................................................................................................................. 40
Selection Features ................................................................................................................................. 42
Single Select Tool ............................................................................................................................. 42
Single Selection Results ................................................................................................................... 43
Multi
‐
Select Tool ............................................................................................................................... 46
Multi
‐
Selection Results ..................................................................................................................... 47
Sketching Features ................................................................................................................................ 50
Sketch Tools ..................................................................................................................................... 50
Other Features ....................................................................................................................................... 51
Record Symbology ........................................................................................................................... 51
3D Views Tool ................................................................................................................................... 53
Bookmarks Tool ................................................................................................................................ 54
GeoCode Tool .................................................................................................................................. 54
Add GeoRecord Tool ........................................................................................................................ 55
Plot Inspections Tool ........................................................................................................................ 55
Clear Graphics Tool .......................................................................................................................... 56
Advanced GIS Search Tool .............................................................................................................. 56
Print Tool (GIS) ................................................................................................................................. 57
GIS Professional ............................................................................................................................... 57
Locating Records ...................................................................................................................................... 60
Overview ................................................................................................................................................ 60
Global Search ........................................................................................................................................ 60
Advanced Search ................................................................................................................................... 61
Ad Hoc Search .................................................................................................................................. 62
Advanced Search Tools.................................................................................................................... 65
Saving Searches ............................................................................................................................... 66
Using Saved Searches ..................................................................................................................... 66
Search Manager ............................................................................................................................... 68
Advanced GIS Search ...................................................................................................................... 70
Adding Records ........................................................................................................................................ 71
Overview ................................................................................................................................................ 71
GeoTRAK ............................................................................................................................................... 71
About GeoTRAK Records................................................................................................................. 71
Adding GeoTRAK Records ............................................................................................................... 72
Adding Activity Records ......................................................................................................................... 73

TRAKiT User Guide 18.1
Proprietary.
May not be reproduced or distributed without written permission of CentralSquare Technologies.
Copyright 2018 CentralSquare Technologies. All rights reserved.
20181212JC Page vi
Adding Activity Records Not Linked to a GeoTRAK Record ............................................................ 74
Add and Save Owner ........................................................................................................................ 75
Adding Subprojects and Subpermits ..................................................................................................... 75
Adding Records in AEC TRAK .............................................................................................................. 76
Adding AEC Records through the Contacts Pane ............................................................................ 77
Duplicating Records ............................................................................................................................... 78
Linking Records ........................................................................................................................................ 79
Overview ................................................................................................................................................ 79
Linking Records ..................................................................................................................................... 79
Breaking a Link ...................................................................................................................................... 81
Linking a Record to a GeoTRAK Record ............................................................................................... 82
Parent‐Child Relationship ...................................................................................................................... 83
Adding Linked Records..................................................................................................................... 83
Linking Existing Records .................................................................................................................. 84
Link Case Records ................................................................................................................................. 84
Adding Linked Case Records ........................................................................................................... 84
Associate Records with AEC Records ................................................................................................... 85
Locking Records ....................................................................................................................................... 86
Overview ................................................................................................................................................ 86
Locking a Record through an Activity .................................................................................................... 86
Locking a Record through GeoTRAK .................................................................................................... 86
Contacts ..................................................................................................................................................... 88
Overview ................................................................................................................................................ 88
Adding Contacts ..................................................................................................................................... 88
Using Search in AEC TRAK, LicenseTRAK, GeoTRAK ................................................................... 89
Duplicating Contact Information ....................................................................................................... 89
Using Association Icons.................................................................................................................... 90
Clearing a Contact ............................................................................................................................ 90
Reviews ...................................................................................................................................................... 91
Adding Reviews ..................................................................................................................................... 91
Editing Reviews ..................................................................................................................................... 92
Voiding Reviews .................................................................................................................................... 93
Deleting Reviews ................................................................................................................................... 93
Automating Emails by Module and Review Type .................................................................................. 93
Alternate Reviewer ................................................................................................................................. 93

TRAKiT User Guide 18.1
Proprietary.
May not be reproduced or distributed without written permission of CentralSquare Technologies.
Copyright 2018 CentralSquare Technologies. All rights reserved.
20181212JC Page vii
Plan Location ............................................................................................................................................. 95
Attachments .............................................................................................................................................. 96
Attaching Files ....................................................................................................................................... 97
Opening Attachments ............................................................................................................................ 98
Deleting Attachments ............................................................................................................................. 98
Sending an Attachment in an Email ....................................................................................................... 98
Additional Features ................................................................................................................................ 99
Saving the Sort Order ....................................................................................................................... 99
Valuations ................................................................................................................................................ 100
Adding Valuations ................................................................................................................................ 100
Deleting Valuations .............................................................................................................................. 101
Model Home Templates ....................................................................................................................... 101
Apply Model Home ......................................................................................................................... 101
Add Options .................................................................................................................................... 102
Configure Model Homes ................................................................................................................. 102
Model Home Calculations ............................................................................................................... 105
Admin Options ................................................................................................................................ 105
Fees .......................................................................................................................................................... 106
Assessing Fees .................................................................................................................................... 106
Deleting a Fee or Subfee ..................................................................................................................... 107
Applying a Credit .................................................................................................................................. 107
Overriding a Fee .................................................................................................................................. 108
Paying Fees or Subfees ....................................................................................................................... 108
Using a Cash Drawer ...................................................................................................................... 110
Using a Trust Account .................................................................................................................... 110
Invoicing................................................................................................................................................... 112
Generating an Invoice .......................................................................................................................... 112
Modifying an Invoice ............................................................................................................................ 113
Reprinting an Invoice ........................................................................................................................... 115
Invoice Summary ................................................................................................................................. 116
Cashiering ............................................................................................................................................ 116
Cashiering Receipts ............................................................................................................................. 119
Individual (Manual) Receipts .......................................................................................................... 119
Multiple (Autogen) Receipts ........................................................................................................... 120
Paying Fees from AEC TRAK .............................................................................................................. 120

TRAKiT User Guide 18.1
Proprietary.
May not be reproduced or distributed without written permission of CentralSquare Technologies.
Copyright 2018 CentralSquare Technologies. All rights reserved.
20181212JC Page viii
Unpaying Fees ..................................................................................................................................... 121
Collecting Deposits .............................................................................................................................. 122
Issuing a Refund .................................................................................................................................. 123
Printing a Receipt ................................................................................................................................. 124
Bonds ....................................................................................................................................................... 125
Adding Bonds ....................................................................................................................................... 125
Adding Details to Bonds....................................................................................................................... 125
Deleting Bonds ..................................................................................................................................... 126
Paying Bonds ....................................................................................................................................... 127
Printing a Receipt ................................................................................................................................. 127
Unpaying a Bond ................................................................................................................................. 128
Reducing a Bond ................................................................................................................................. 128
Releasing a Bond ................................................................................................................................. 128
Documents ............................................................................................................................................... 129
Print Tool .............................................................................................................................................. 129
Print Documents .................................................................................................................................. 130
Using a Signature Pad .................................................................................................................... 131
Inspections .............................................................................................................................................. 133
Scheduling Inspections ........................................................................................................................ 133
Using the Inspections Pane ............................................................................................................ 133
Using the Calendar ......................................................................................................................... 135
Using the Batch Scheduler ............................................................................................................. 137
Entering Inspection Results ................................................................................................................. 139
Voiding Inspections .............................................................................................................................. 140
Deleting Inspections ............................................................................................................................. 141
Chronology .............................................................................................................................................. 142
Adding Actions ..................................................................................................................................... 142
Using the Event Scheduler .................................................................................................................. 142
Voiding Action Items ............................................................................................................................ 143
Deleting Action Items ........................................................................................................................... 144
Violations ................................................................................................................................................. 145
Adding Violations ................................................................................................................................. 145
Editing Violations ................................................................................................................................. 146
Notes ........................................................................................................................................................ 147
Adding Notes ....................................................................................................................................... 147

TRAKiT User Guide 18.1
Proprietary.
May not be reproduced or distributed without written permission of CentralSquare Technologies.
Copyright 2018 CentralSquare Technologies. All rights reserved.
20181212JC Page ix
Viewing Notes ...................................................................................................................................... 147
Standard Notes .................................................................................................................................... 148
Conditions................................................................................................................................................ 150
Adding Conditions ................................................................................................................................ 150
Editing Conditions ................................................................................................................................ 151
Reordering Conditions ......................................................................................................................... 151
Voiding Conditions ............................................................................................................................... 152
Deleting Conditions .............................................................................................................................. 152
TRAKiT Checklists .................................................................................................................................. 153
Using Checklists .................................................................................................................................. 153
Checklist Features ............................................................................................................................... 154
ProjectTRAK Additional Features ......................................................................................................... 155
Triggers ................................................................................................................................................ 155
Synchronizing Project Details .............................................................................................................. 158
Synchronizing Projects ................................................................................................................... 158
Unsynchronizing Projects ............................................................................................................... 159
Advanced License Processing .............................................................................................................. 160
Accessing ALP for Batch Processing .................................................................................................. 160
Setting up Searches ............................................................................................................................. 160
Batch Processing ................................................................................................................................. 160
Renewing a Single License.................................................................................................................. 161
CRM TRAK ............................................................................................................................................... 163
Adding Issues ...................................................................................................................................... 163
Log & History Pane .............................................................................................................................. 164
Description & Resolution Pane ............................................................................................................ 164
Linking an Issue to a GeoTRAK Record .............................................................................................. 164
Reports ..................................................................................................................................................... 166
Using TRAKiT Reporting ...................................................................................................................... 166
Producing Reports .......................................................................................................................... 166
Navigating in Reports ..................................................................................................................... 167
Additional Tools .............................................................................................................................. 168
Using AnalyticsNow ............................................................................................................................. 168
Producing Reports with Cognos ..................................................................................................... 168
Reports List .......................................................................................................................................... 170
AEC TRAK ...................................................................................................................................... 170

TRAKiT User Guide 18.1
Proprietary.
May not be reproduced or distributed without written permission of CentralSquare Technologies.
Copyright 2018 CentralSquare Technologies. All rights reserved.
20181212JC Page x
Bonds .............................................................................................................................................. 170
Charts ............................................................................................................................................. 170
CodeTRAK ...................................................................................................................................... 170
CRM TRAK ..................................................................................................................................... 171
Financial ......................................................................................................................................... 171
GeoTRAK ....................................................................................................................................... 171
Inspections ...................................................................................................................................... 171
LicenseTRAK .................................................................................................................................. 172
PermitTRAK .................................................................................................................................... 172
Plan Locations ................................................................................................................................ 173
ProjectTRAK ................................................................................................................................... 173
System ............................................................................................................................................ 173
TimeTRAK ...................................................................................................................................... 173
Supporting Features and Functions ..................................................................................................... 174
Restrictions .......................................................................................................................................... 174
Adding Restrictions to a Property Record ...................................................................................... 174
Editing Restrictions on a Property Record ...................................................................................... 174
Viewing Restrictions ....................................................................................................................... 176
Removing Restrictions .................................................................................................................... 176
TimeTRAK............................................................................................................................................ 177
Entering Time ................................................................................................................................. 177
Validating Time Entries ................................................................................................................... 177
Trust Accounts ..................................................................................................................................... 178
Internet Links and Imaging................................................................................................................... 179
Glossary ................................................................................................................................................... 180

TRAKiT User Guide 18.1
Proprietary.
May not be reproduced or distributed without written permission of CentralSquare Technologies.
Copyright 2018 CentralSquare Technologies. All rights reserved.
20181212JC Page 1
Introduction to TRAKiT
®
Overview
TRAKiT
®
software applications work together to help you streamline department workflows. TRAKiT
enables agencies to automate the management of project development, permitting, code compliance,
citizen issues, and business/occupational licenses through its applications. The TRAKiT applications are:
•
TRAKiT, which includes the following modules:
○
GeoTRAK
○
GIS
○
ProjectTRAK
○
PermitTRAK
○
LicenseTRAK
○
CodeTRAK
○
CRM TRAK
○
AEC TRAK
•
eTRAKiT
•
CentralSquare Mobiles
•
VoiceTRAK
•
Mobile PDA
This user guide focuses on using TRAKiT and the TRAKiT modules.
About this Guide
This document uses stylistic conventions to enhance your access to information.
•
Button, tab, menu, and field names appear in bold formatting.
Example: Click OK.
•
Quoted material and emphasis appear in italic formatting.
Example: Location names must use the proper format.
•
Tips contain noncritical information to a procedure but are useful notes about special cases or
setup‐related variables, alternative methods, and benefits or suggested uses of program features.
Example:
Tip: Click Add to Favorites to add the selected report to your Favorites list.
TRAKiT User Guide 18.1
Proprietary
May not be reproduced or distributed without written permission of CentralSquare Technologies.
Copyright 2018 CentralSquare Technologies. All rights reserved.
20181212JC Page 2
Client Support
For support questions or issues, contact TRAKiT Support at 1-800-292-4526, option 4.
CentralSquare Technologies
1000 Business Center Drive
Lake Mary, Florida 32746
http://www.centralsquare.com
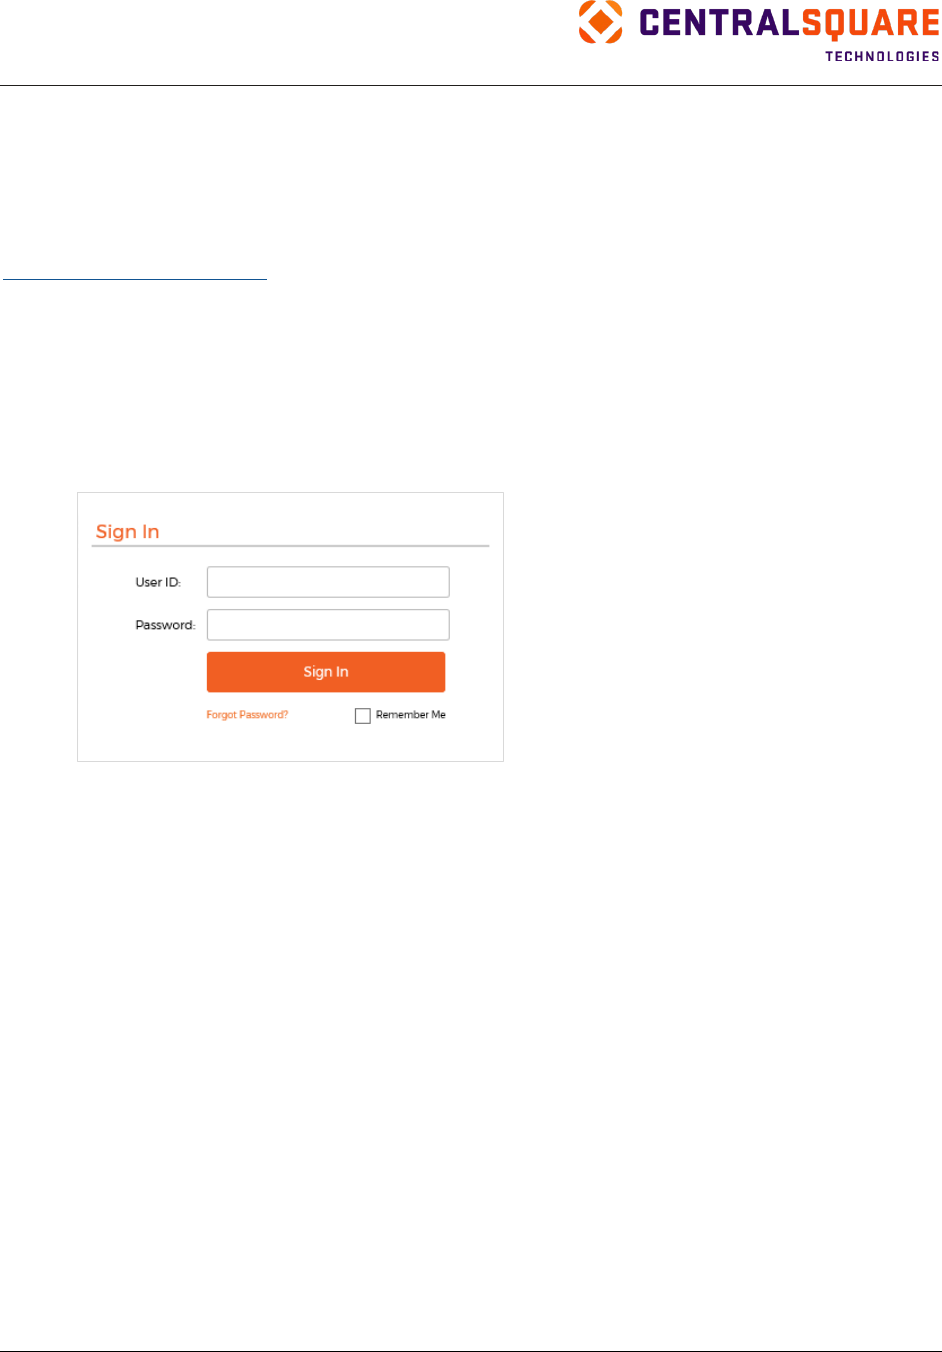
Logging In
To log in to TRAKiT, complete these steps:
1. In the User ID field, type your user ID. Your user ID is assigned by your system administrator.
2. In the Password field, type your password.
3. Click Sign In.
TRAKiT User Guide 18.1
Proprietary.
May not be reproduced or distributed without written permission of CentralSquare Technologies.
Copyright 2018 CentralSquare Technologies. All rights reserved.
20181212JC Page 3
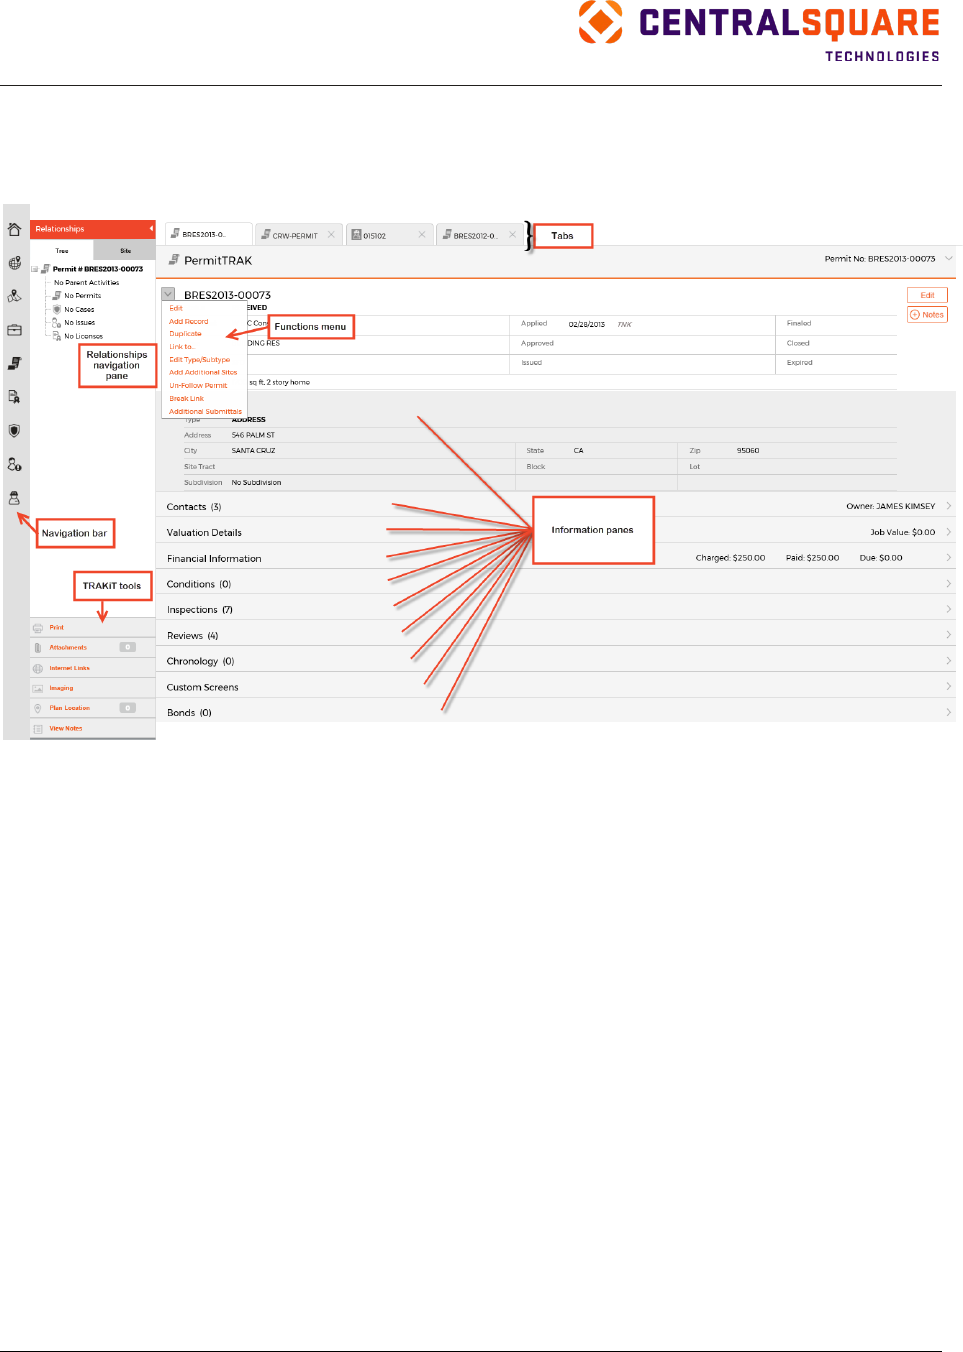
TRAKiT Interface
TRAKiT offers numerous navigational and functional elements to improve your access to database
information. The following diagrams illustrate common elements in the user interface (UI).
•
Tabs provide quick access to open records.
•
Information panes organize record data into functional areas. The available panes vary based on
the module.
•
Functions menus, sometimes called context menus, provide access to pane‐specific functions.
•
The Relationships pane provides links to related records, search results, and other modules.
•
TRAKiT tools provide quick access to common functions, such as printing documents, adding
attachments, and accessing internet links.
•
The navigation bar provides quick access to modules in TRAKiT. To open a module, click the
module icon.
TRAKiT User Guide 18.1
Proprietary
May not be reproduced or distributed without written permission of CentralSquare Technologies.
Copyright 2018 CentralSquare Technologies. All rights reserved.
20181212JC Page 4
Tabs
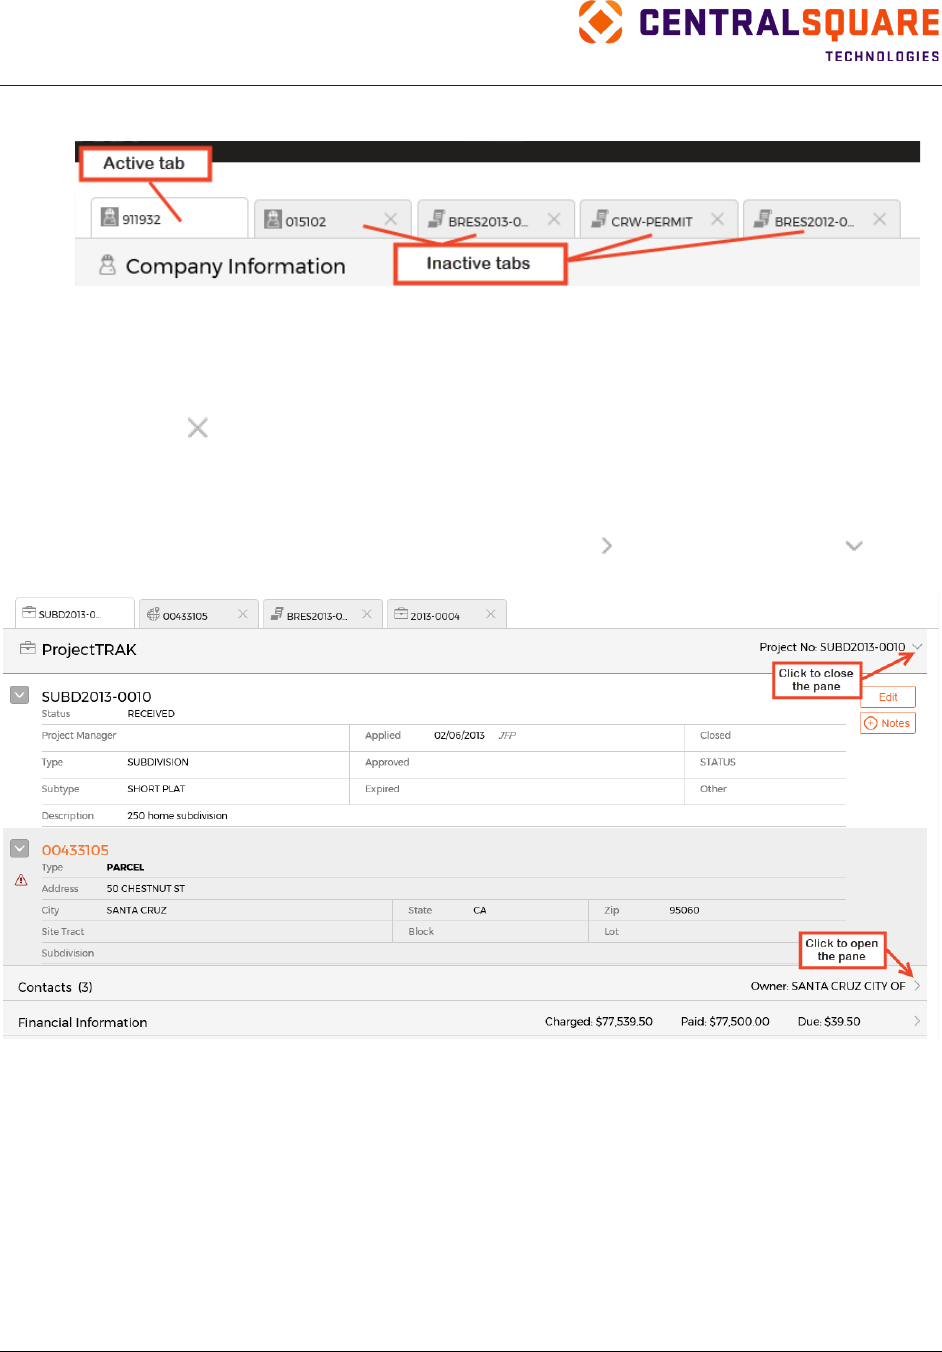
TRAKiT automatically displays the last five records you viewed. The tab for the active record is always on
the left.
Inactive tabs display other open records and appear to the right of the active tab. Click an inactive tab to
make it the active tab and view the record.
To close a tab, click . At least one tab must remain open. You cannot close the active tab.
Information Panes
Information panes group related fields into sections that are either displayed or hidden. The available
panes vary depending on the type of record you are viewing. Click to expand a pane. Click to
collapse a pane.
TRAKiT User Guide 18.1
Proprietary.
May not be reproduced or distributed without written permission of CentralSquare Technologies.
Copyright 2018 CentralSquare Technologies. All rights reserved.
20181212JC Page 5
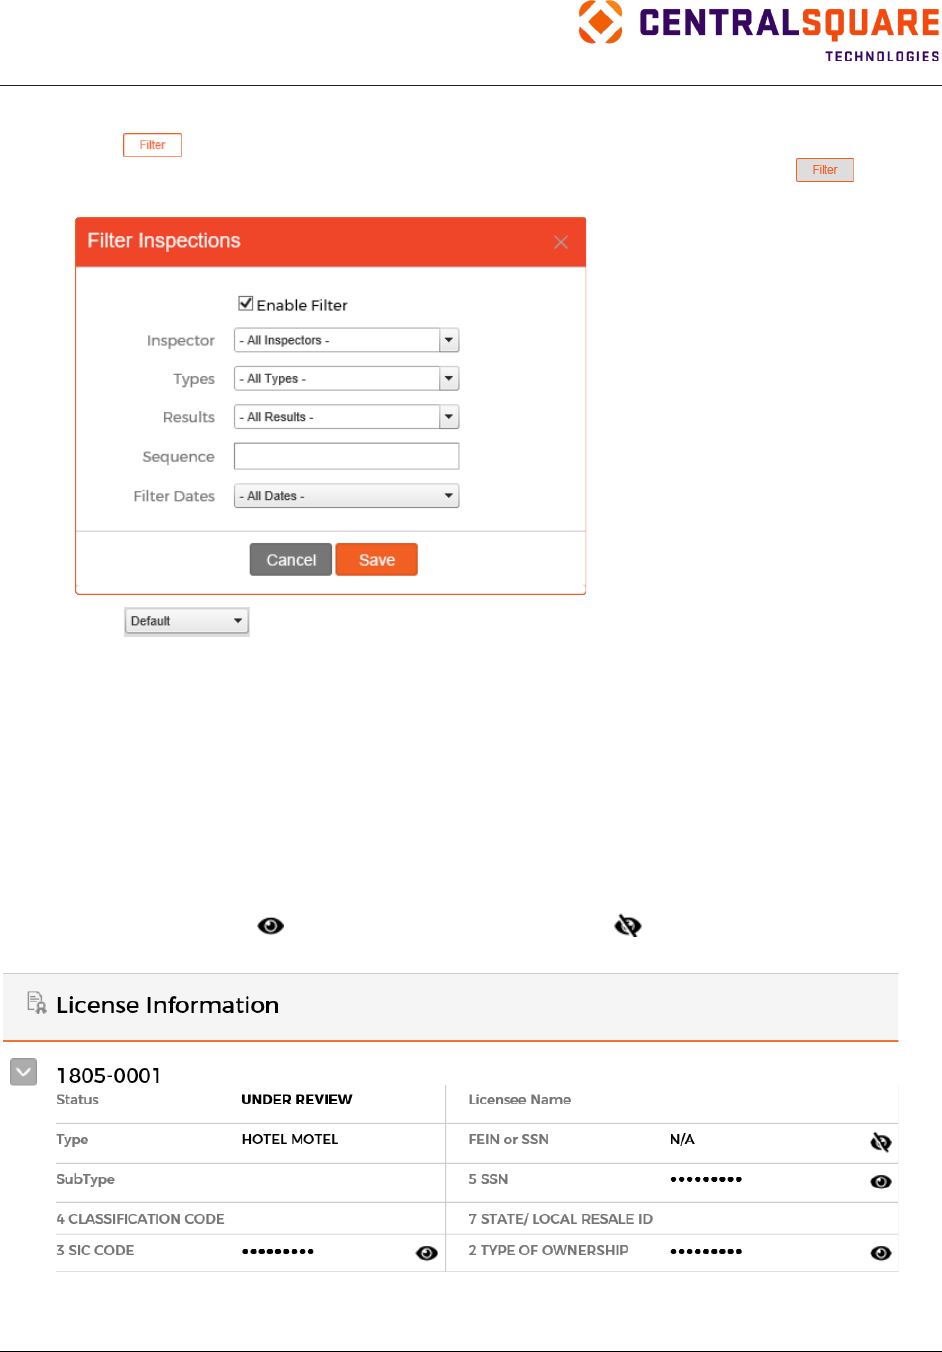
Some information panes include filter and sort options:
•
Click to enable filtering and select criteria for narrowing the results shown in the pane. The
Filter button stays highlighted while the filter is applied. To remove the filter, click and then
clear the Enable Filter option.
•
Click to sort the list in the information pane. Options vary depending on the
information pane and module.
Additional functions are available in some panes. For example, the Inspections pane includes buttons for
adding inspections. The Valuations pane includes options for adding valuations, applying a model home,
and adding model home options.
Personally Identifiable Information (PII)
Federal Employer Identification Numbers (FEIN) and Social Security Numbers (SSN) in the FEIN or SSN
field are masked on the LicenseTRAK and AEC TRAK main information panes. Also, depending on your
WUM settings, additional LicenseTRAK fields might be masked.
Masked fields appear as dots rather than characters. Users with appropriate privileges can view the value
in a masked field by clicking
and then mask the value by clicking
. When you unmask the value, if
the field is blank, N/A appears.
Note: Contact your system administrator for more information about user privileges and
LicenseTRAK fields that can be masked.
TRAKiT User Guide 18.1
Proprietary
May not be reproduced or distributed without written permission of CentralSquare Technologies.
Copyright 2018 CentralSquare Technologies. All rights reserved.
20181212JC Page 6
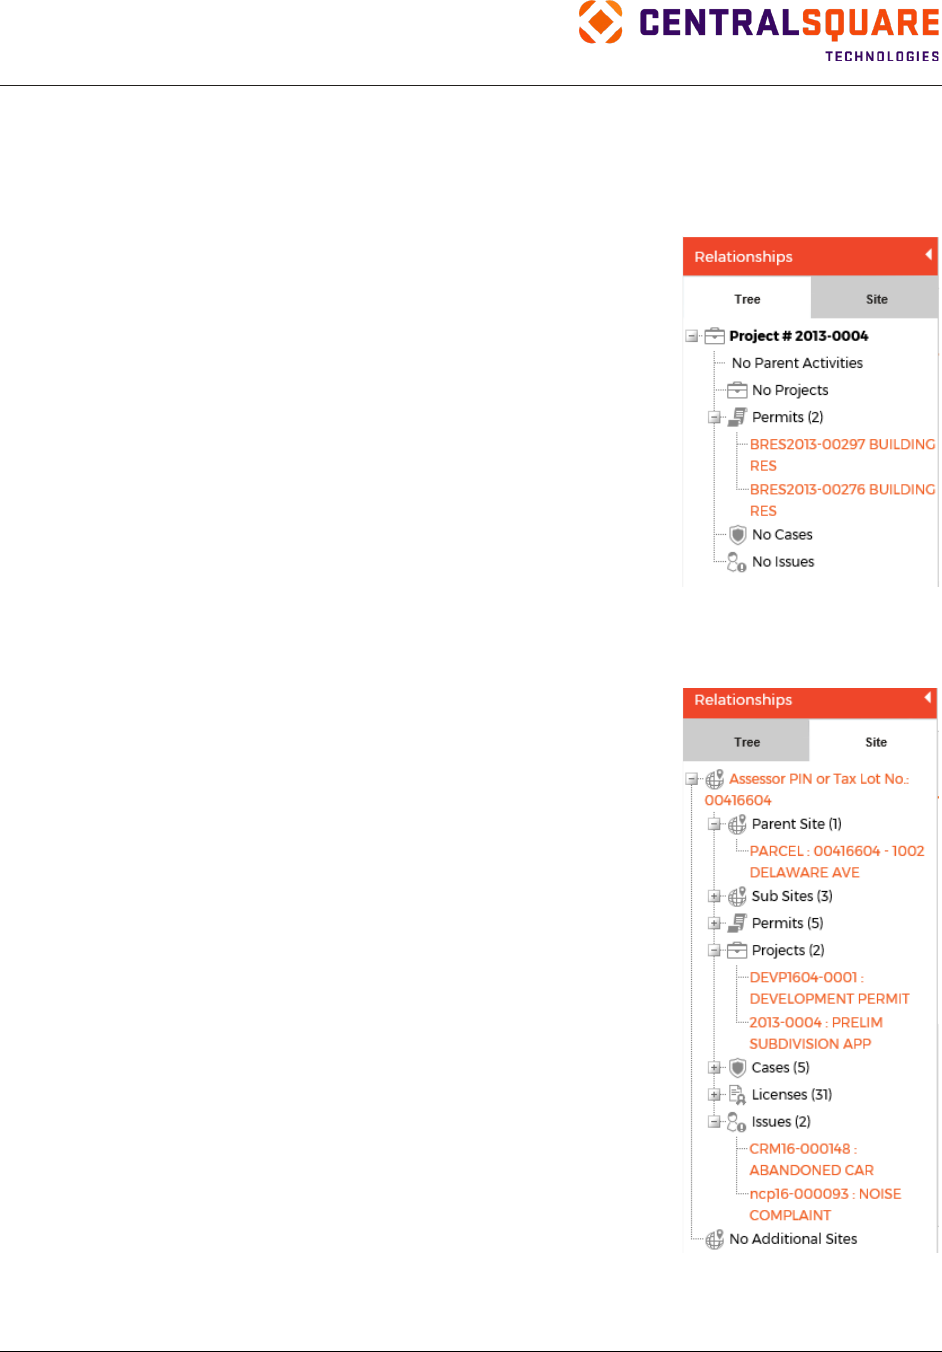
Relationships Pane
The Relationships pane provides links to related records.
Tree Tab
The Tree tab displays records related to the current record. It represents
other activities that are involved in the same process as the record. These
related records are not necessarily linked to the same site in GeoTRAK.
For example, a project for a new development might have a subpermit for
a new single family house on one lot in the development.
A permit can be linked to a parent permit, a parent project, subpermits,
subcases, and issues.
•
A project can be linked to a parent project, subpermits, subcases,
and issues.
•
A case can be linked to a parent project, a parent permit, cases,
and issues.
•
An issue can be linked to permits, projects, cases, and issues.
•
An AEC (architects, engineers, contractors) record can be linked
to a parent AEC record and sub‐AEC records.
•
An AEC record can be associated with permits, projects, cases, and licenses.
Site Tab
The Site tab displays records related to the site record in GeoTRAK as
well as additional sites to which the current record is linked. It represents
activities that involve the same GeoTRAK record as the current record.
These records are not necessarily involved in the same process as the
record. For example, the site might have a closed permit for the hot tub
installed by the previous owners, while the current record might be a
permit for a new garage on the same property five years later.
•
A permit, project, case, license, or issue might be linked to a site.
•
A permit, project, case, or license might be linked to additional
sites.
Using the Tree and Site Tabs
1.
Locate the permit, project, case, license, issue, or AEC record.
2.
Click the Tree or Site tab to view it.
3.
On the tab, you can take the following actions:
•
View a list of related records by clicking the plus sign next to a
category.
•
Navigate directly to a related record by clicking the record
number.
•
Point to a record link to see summary information.
Tip: A plus sign (+) next to a category indicates that it can be expanded; a minus sign (–) indicates
that it can be collapsed. If neither icon appears next to a category, the category does not have any
related records for that category.
TRAKiT User Guide 18.1
Proprietary.
May not be reproduced or distributed without written permission of CentralSquare Technologies.
Copyright 2018 CentralSquare Technologies. All rights reserved.
20181212JC Page 7
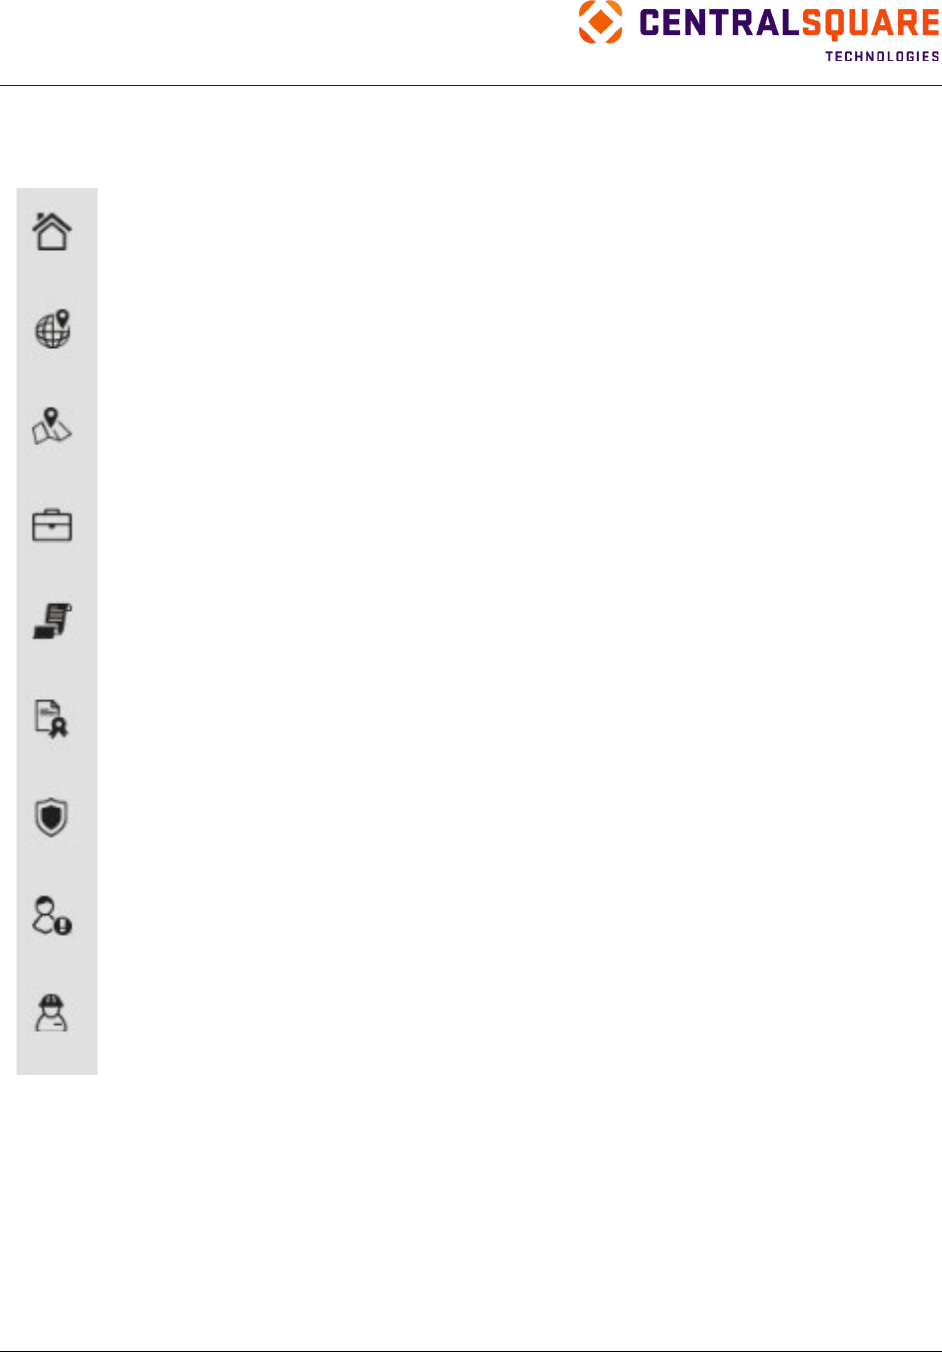
Navigation
The navigation bar at the far left of the UI provides quick access to the Workspace and TRAKiT modules.
Workspace—Opens your customized Workspace, which provides a summary view of recent
activity and includes links to frequently used records and information.
Geo—Opens the GeoTRAK module, which contains comprehensive land data and enables
you to view data related to a parcel, subdivision, etc., as well as owner information, and add or
link permits, projects, code cases, or licenses to a land record.
GIS—Opens the geographic information system (GIS) tools, which include a dynamic map and
tools for identifying land parcels, adding permits and other records to a land parcel, routing
inspections, measuring and drawing, saving bookmarks, and more.
Project—Opens the ProjectTRAK module, which manages the workflow for projects, including
applications, reviews, and inspections, and retains project history such as communications and
notes.
Permit—Opens the PermitTRAK module, which manages the workflow and information for
permits issued by your agency. Manage contacts, reviews, inspections, financial details,
relationships to other permits and projects, and more in this module.
License—Opens the LicenseTRAK module, which issues and tracks licenses such as
business, animal, and facilities licenses. LicenseTRAK records include details about
insurance, fees, contacts, and other relevant information.
Code Case—Opens the CodeTRAK module, which helps you manage incidents and activity
related to code enforcement cases. In CodeTRAK, you can maintain contact information,
attach documents and images, follow multiple violations on a code enforcement case, email
notifications, generate notices, and more.
CRM—Opens the CRM TRAK module, which provides tools for opening, tracking, managing,
and closing Citizen Response Management (CRM) issues.
AEC—Opens the AEC TRAK module, which manages data for architects, engineers, and
contractors (AEC), as well as surveyors and other professionals who work with your agency.
AEC records include information about insurance, fees, permits, licenses, and more.
TRAKiT User Guide 18.1
Proprietary
May not be reproduced or distributed without written permission of CentralSquare Technologies.
Copyright 2018 CentralSquare Technologies. All rights reserved.
20181212JC Page 8
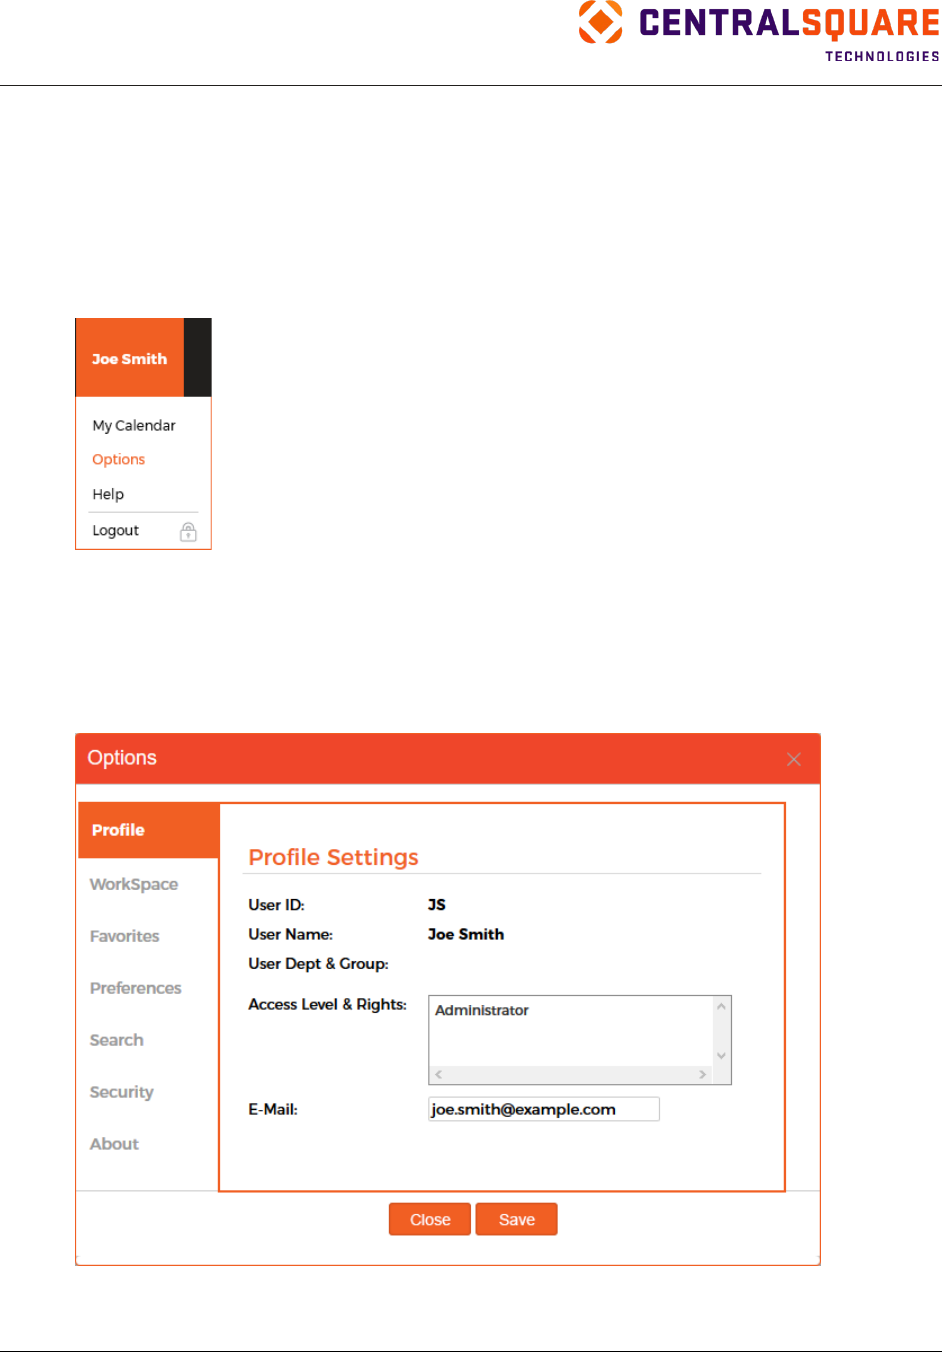
User Options
Overview
Use the Options dialog box to define your email address, customize your Workspace, set up favorites
links, set options related to inspections and GIS, set search preferences, and change your password.
To access the Options dialog box, point to your name in the TRAKiT application header and then click
Options.
Select options on each page in the dialog box and then click Save. If you do not want to save your
changes, click Close.
Profile
Use the Profile Settings page to view information about your profile and enter or change your email
address.
TRAKiT User Guide 18.1
Proprietary.
May not be reproduced or distributed without written permission of CentralSquare Technologies.
Copyright 2018 CentralSquare Technologies. All rights reserved.
20181212JC Page 9
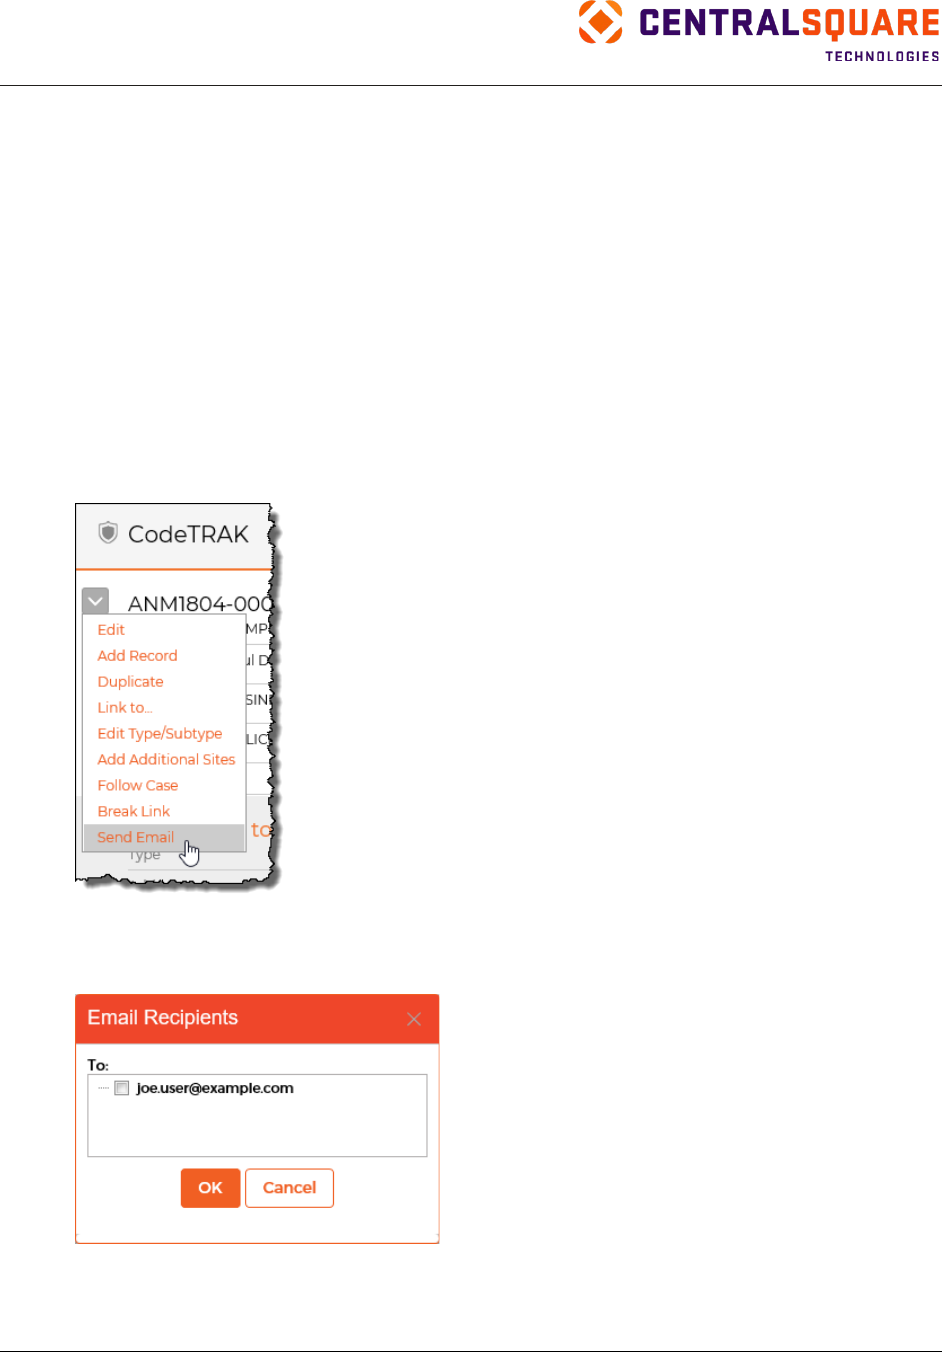
TRAKiT uses the email address you define in the Options dialog box to send email from you to TRAKiT
contacts directly from the TRAKiT application. Depending on your setup, your system might send certain
email messages automatically.
You can send email manually from a record’s main information pane or Contacts panes by using the
functions menu. Alternatively, you can click on an email address in any pane.
Note: TRAKiT does not keep a record of email that has been sent. Instead, copies are sent to the
email addresses that you define in your user email setup. If you want to add the email as an
attachment or save a note or chronology action to the record, you must perform those actions
manually.
To use the Send Email function, complete the following steps:
Note: Before you use this feature, add email addresses for any contacts you want to email.
1. Navigate to the activity record in GeoTRAK, ProjectTRAK, PermitTRAK, LicenseTRAK,
CodeTRAK, CRM TRAK, or AEC TRAK.
2. Point to the functions menu and click Send Email.
3. In the To field, select all the email addresses you want to send the email to. The list includes all of
the record’s contacts that have an email address defined. If you want to send the email to
someone other than a contact on the record, do not select any email addresses.
4. Click OK. A draft email opens in your default email application. The To field in the email shows
the users you selected. The Subject field reflects the activity record number and the site address
(if applicable). You can change these fields if you want to.
TRAKiT User Guide 18.1
Proprietary
May not be reproduced or distributed without written permission of CentralSquare Technologies.
Copyright 2018 CentralSquare Technologies. All rights reserved.
20181212JC Page 10
5. Type the email message and then send the email. Depending on the settings in your default
email application, the email is saved in your email application as a sent item.
Note: TRAKiT does not save any record of the sent email. If you want to add the email as an
attachment or save a note or chronology action to the record, you must complete those actions
manually.
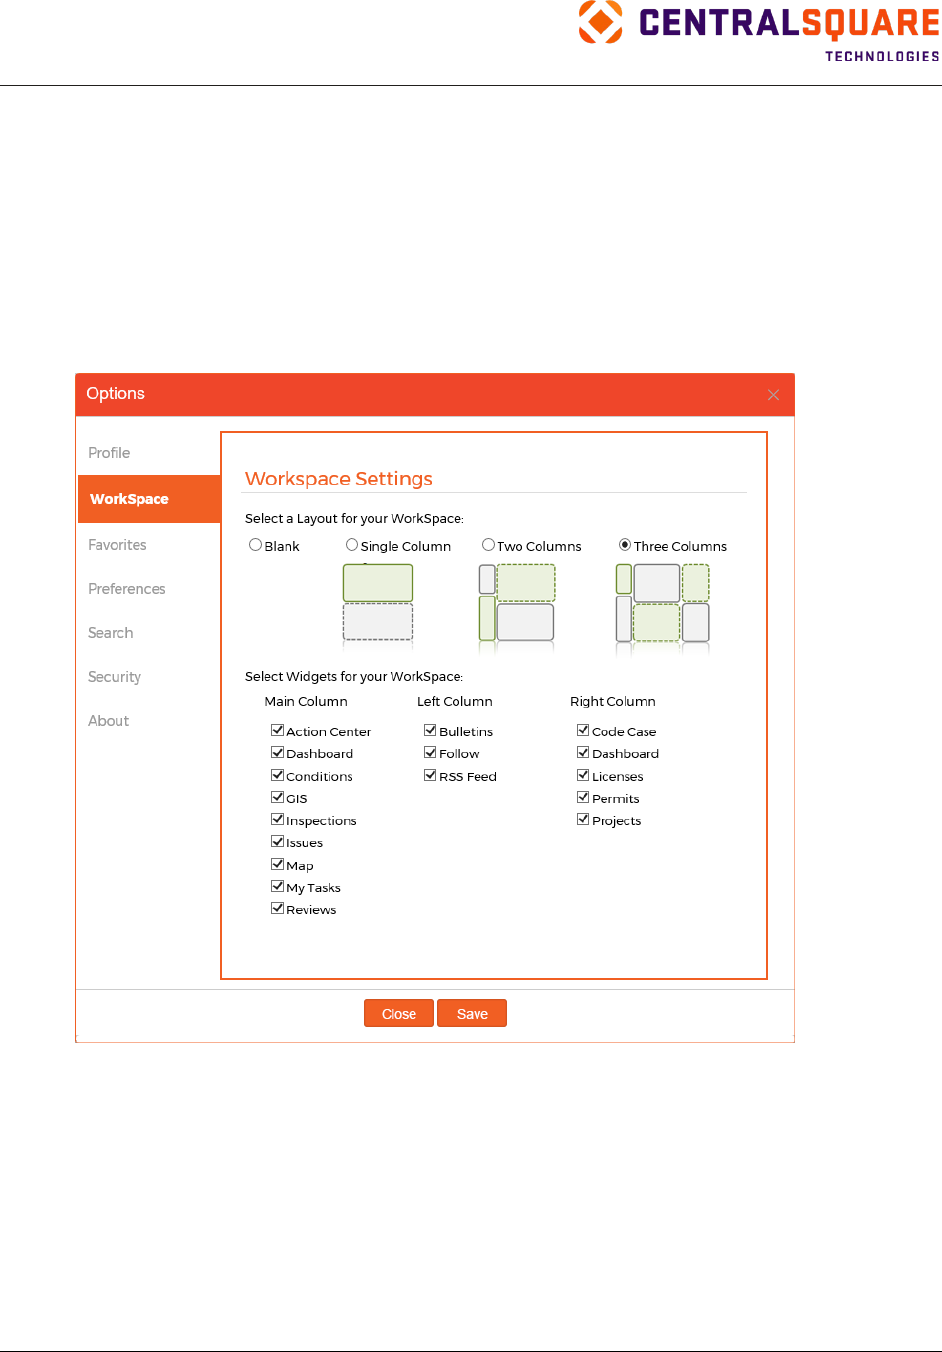
Workspace
Use the Workspace Settings page to customize the appearance of your Workspace. The Workspace
provides a central location from which you can perform your daily activities and review key information.
After you log in to TRAKiT, the Workspace appears.
On the Workspace Settings page, select the layout you want for your Workspace. You can choose blank
(no information panes), one (single) column, two columns, or three columns. Then select the information
panes you want to see in each area. Refer to “Using the Workspace” for details about each available
information pane.
TRAKiT User Guide 18.1
Proprietary.
May not be reproduced or distributed without written permission of CentralSquare Technologies.
Copyright 2018 CentralSquare Technologies. All rights reserved.
20181212JC Page 11
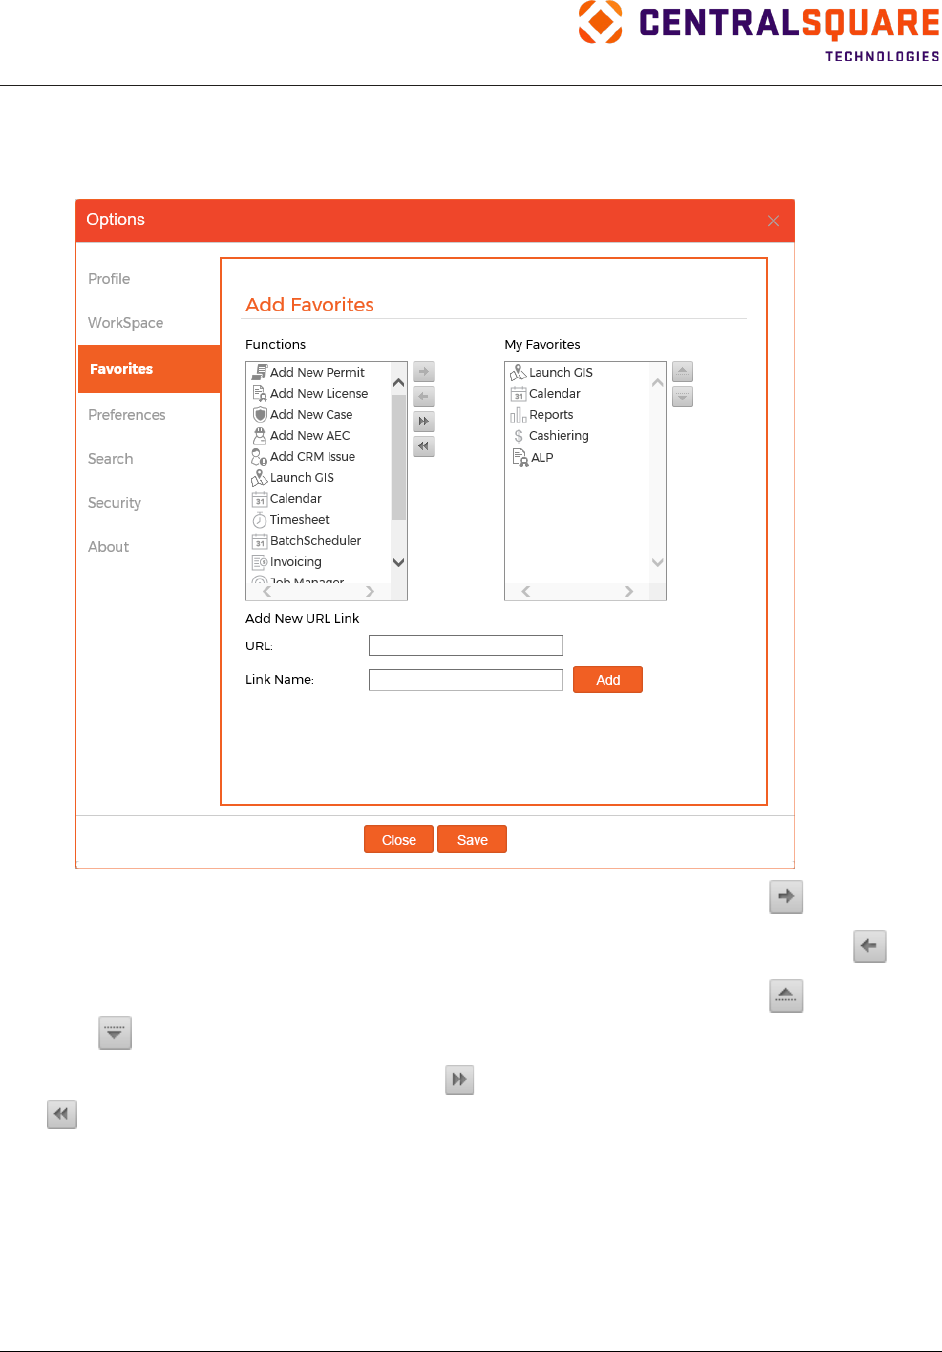
Favorites
Use the Add Favorites page to add, remove, and reorder links to frequently used areas in TRAKiT and
websites.
To add items to your Favorites list, select the item in the Functions list and then click .
To remove items from your Favorites list, select the item in the My Favorites list and then click .
To reorder items in your Favorites list, select the item you want to move and then use to move the
item up or to move the item down.
To add all functions to the My Favorites list, click . To remove all items from the My Favorites list,
click .
To access the favorites you set up, point to Favorites in the TRAKiT application header.
Note: Depending on your agency’s settings and your user privileges, some Favorites options might
not be available to you.
TRAKiT User Guide 18.1
Proprietary
May not be reproduced or distributed without written permission of CentralSquare Technologies.
Copyright 2018 CentralSquare Technologies. All rights reserved.
20181212JC Page 12
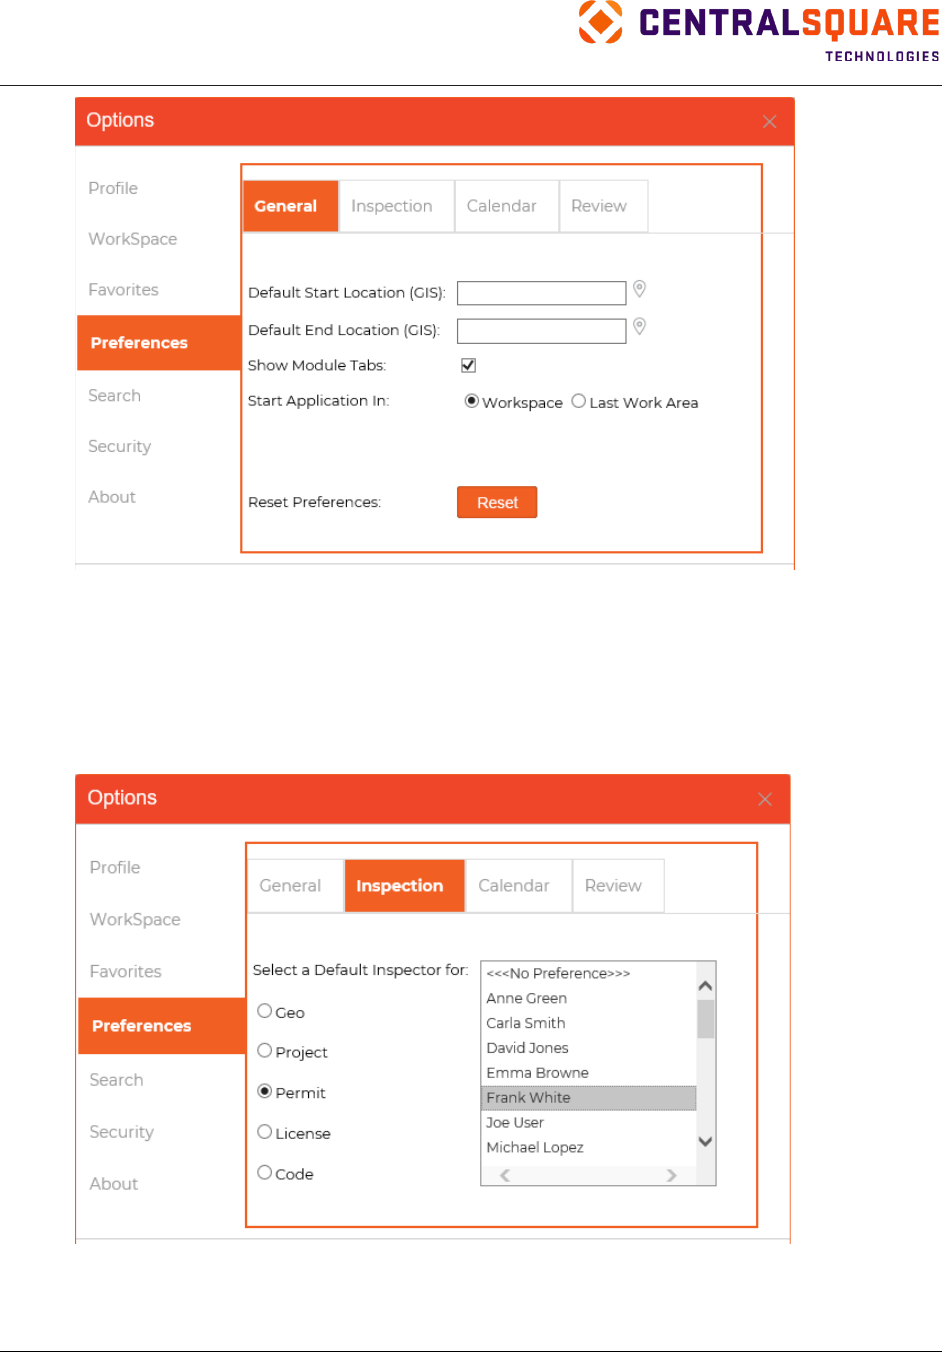
Preferences
This page includes the following tabs:
• General
• Inspection
• Calendar
• Review
General
Use the General Preferences page to:
•
Define beginning and ending addresses for routing in GIS.
Tip: For more information about TRAKiT routing, see “Route Inspections Tool.”
•
Enable or disable the Tabs feature. If this feature is enabled, tabs appear for the last five records
you viewed.
If you disable this feature, only the current record appears.
•
Indicate whether to show the Workspace or last work area when TRAKiT opens.
•
Reset preferences to default settings.
TRAKiT User Guide 18.1
Proprietary.
May not be reproduced or distributed without written permission of CentralSquare Technologies.
Copyright 2018 CentralSquare Technologies. All rights reserved.
20181212JC Page 13
Inspection
Use this tab to select a default inspector for each module that supports inspections. This inspector is
selected by default when you add an inspection, but you can change the inspector if needed.
Select a module and then select the default inspector for that module. Select another module and then
select the default inspector for that module. Continue until you have selected a default inspector for each
module. To use the default inspector for an inspection type, select No Preference.
TRAKiT User Guide 18.1
Proprietary
May not be reproduced or distributed without written permission of CentralSquare Technologies.
Copyright 2018 CentralSquare Technologies. All rights reserved.
20181212JC Page 14
Calendar
Use this tab to define the users who are listed on your TRAKiT Calendar.
Tip: For more information about the TRAKiT Calendar, see “Using the Calendar.”
Select all users whose schedule you want to be able to see.
In your calendar, the users you selected are listed in the Relationships pane. Select a user to see that
user’s calendar.
TRAKiT User Guide 18.1
Proprietary.
May not be reproduced or distributed without written permission of CentralSquare Technologies.
Copyright 2018 CentralSquare Technologies. All rights reserved.
20181212JC Page 15
Review
Use this tab to select a default reviewer for each module that supports reviews. This reviewer is selected
by default when you add a review, but you can change the reviewer if needed.
Select a module and then select the default reviewer for that module. Select another module and then
select the default reviewer for that module. Continue until you have selected a default reviewer for each
module. To use the default inspector for a review type, select No Preference.
TRAKiT User Guide 18.1
Proprietary
May not be reproduced or distributed without written permission of CentralSquare Technologies.
Copyright 2018 CentralSquare Technologies. All rights reserved.
20181212JC Page 16
Search
Use these options to set the following search preferences:
• # of Global Search Rows—Select the default maximum number of results returned when you
perform a global search.
• Default Search—Currently this option is not used.
TRAKiT User Guide 18.1
Proprietary.
May not be reproduced or distributed without written permission of CentralSquare Technologies.
Copyright 2018 CentralSquare Technologies. All rights reserved.
20181212JC Page 17
Security
Use the Reset Password page to change your password.
To change your TRAKiT password:
1.
Enter your current password.
2.
Enter your new password.
3.
Enter your new password again in the Confirm Password field.
4.
Click Update.
TRAKiT User Guide 18.1
Proprietary
May not be reproduced or distributed without written permission of CentralSquare Technologies.
Copyright 2018 CentralSquare Technologies. All rights reserved.
20181212JC Page 18
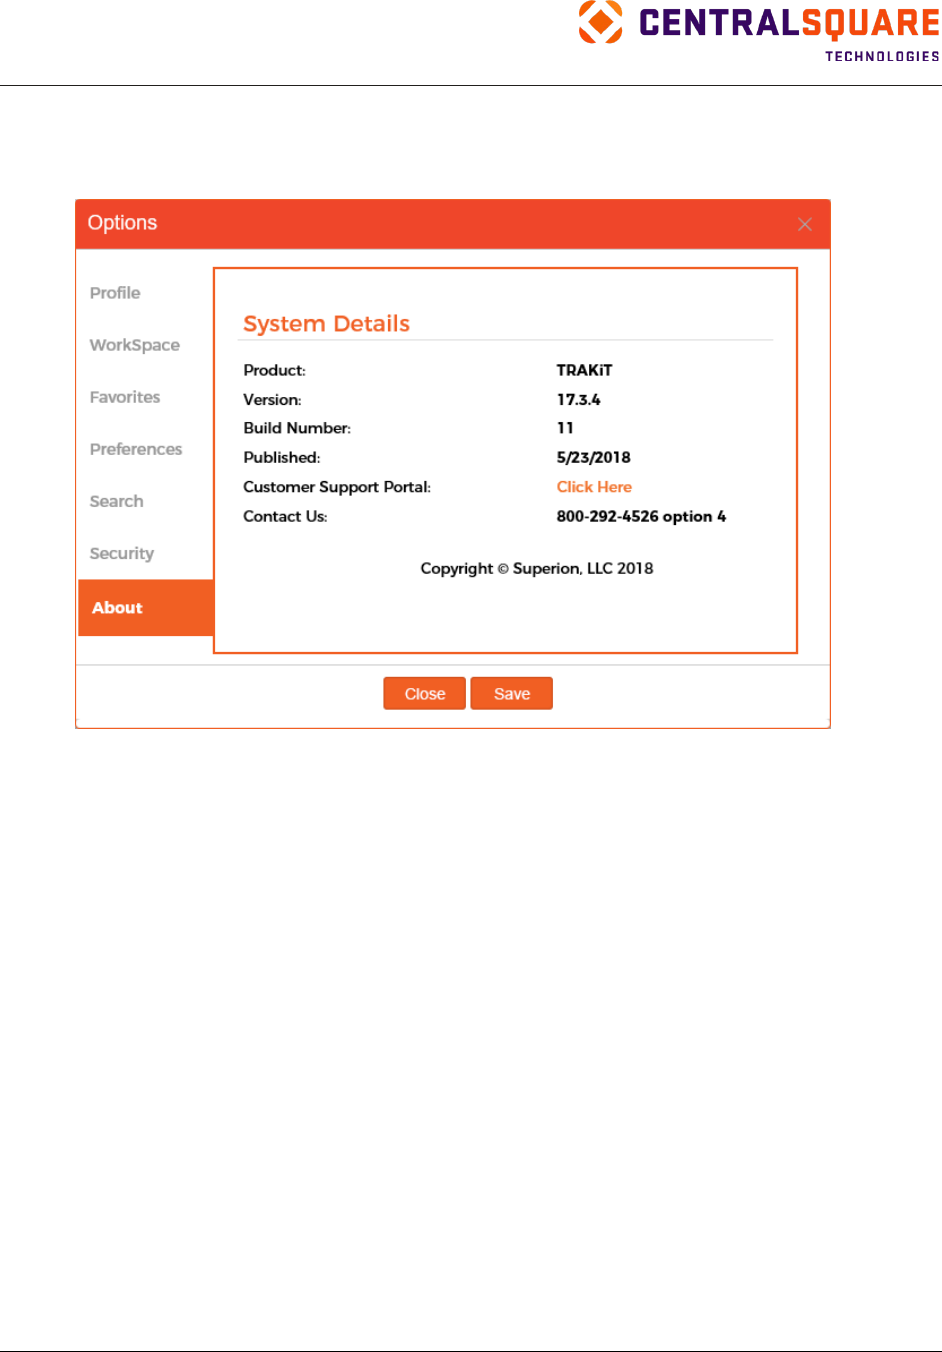
About
Use the System Details page to view information about the TRAKiT application and access the customer
support portal.

TRAKiT User Guide 18.1
Proprietary.
May not be reproduced or distributed without written permission of CentralSquare Technologies.
Copyright 2018 CentralSquare Technologies. All rights reserved.
20181212JC Page 19
Using the Workspace
The Workspace provides a central location from which you can perform your daily activities and review
key information. After you log in to TRAKiT, the Workspace appears. The Workspace can include the
following panes:
•
Action Center
•
Dashboard (can appear in the center, on the right, or both)
•
Conditions
•
GIS
•
Inspection Center
•
Issues
•
Map
•
My Tasks
•
Bulletins
•
Follow
•
RSS Feed
•
Code Case
•
Licenses
•
Permits
•
Projects
You can customize which panes appear on your Workspace by selecting information panes in User
Options > Workspace. Refer to “Workspace” for more information.
Tip: You can drag panes within a column to customize the order of panes.

TRAKiT User Guide 18.1
Proprietary
May not be reproduced or distributed without written permission of CentralSquare Technologies.
Copyright 2018 CentralSquare Technologies. All rights reserved.
20181212JC Page 20
Code Case
Tip: In the Code Case pane, an address in red text indicates an overdue case.
To customize the Code Case pane, complete the following steps:
1.
Click .
2.
In the Select Case Prefixes list, select one or more code case prefixes. Only code cases with the
selected prefixes will appear in your Workspace.
3.
In the Select Case Types list, select one or more case types. Only code cases of these types will
appear in your Workspace. To see all code cases, select All Types.
4.
In the Case Status list, select one or more statuses. Only code cases with the selected statuses
will appear in your Workspace.
5.
In the Officer list, select one or more officers. Only code cases with the selected officers will
appear in your Workspace.
6.
In the Case Date Range list, select a date range to use. Depending on your selection, you might
need to specify a date range in the View Within Date Range fields. Only code cases with a date
within this range will appear in your Workspace.
7.
In the Case Date Range Type list, select the date field you want to use for filtering (for example,
last action date or closed date).
8.
In the Sort View in Window field, select how you want your cases sorted.
9.
Click Save to save your selections. Click Cancel to close the dialog box without saving changes.
TRAKiT User Guide 18.1
Proprietary.
May not be reproduced or distributed without written permission of CentralSquare Technologies.
Copyright 2018 CentralSquare Technologies. All rights reserved.
20181212JC Page 21
Licenses
To customize the Licenses pane, complete the following steps:
1.
Click .
2.
In the Select Prefixes list, select one or more license prefixes. Only licenses with the selected
prefixes will appear in your Workspace.
3.
In the Select License Types list, select one or more license types. Only licenses of these types
will appear in your Workspace.
4.
In the License Status list, select one or more statuses. Only licenses with the selected statuses
will appear in your Workspace.
5.
In the License Date Range list, select a date range to use. Depending on your selection, you
might need to specify a date range in the View Within Date Range fields. Only licenses with a
date within this range will appear in your Workspace.
6.
In the License Date Range Type list, select the date field you want to use for filtering (for
example, applied date or expired date).
7.
In the Sort View in Window field, select how you want licenses sorted.
8.
Click Save to save your selections. Click Cancel to close the dialog box without saving changes.

TRAKiT User Guide 18.1
Proprietary
May not be reproduced or distributed without written permission of CentralSquare Technologies.
Copyright 2018 CentralSquare Technologies. All rights reserved.
20181212JC Page 22
Permits
To customize the Permits pane, complete the following steps:
1.
Click
.
2.
In the Select Permit Prefixes list, select one or more permit prefixes. Only permits with the
selected prefixes will appear in your Workspace.
3.
In the Select Permit Types list, select one or more permit types. Only permits of these types will
appear in your Workspace.
4.
In the Permit Status list, select one or more statuses. Only permits with the selected statuses will
appear in your Workspace.
5.
In the Permit Date Range list, select a date range to use. Depending on your selection, you
might need to specify a date range in the View Within Date Range fields. Only permits with a
date within this range will appear in your Workspace.
6.
In the Permit Date Range Type list, select the date field you want to use for filtering (for
example, applied date or expired date).
7.
In the Sort View in Window field, select how you want permits sorted.
8.
Click Save to save your selections. Click Cancel to close the dialog box without saving changes.
TRAKiT User Guide 18.1
Proprietary.
May not be reproduced or distributed without written permission of CentralSquare Technologies.
Copyright 2018 CentralSquare Technologies. All rights reserved.
20181212JC Page 23
Projects
To customize the Projects pane, complete the following steps:
1.
Click .
2.
In the Select Project Prefixes list, select one or more project prefixes. Only projects with the
selected prefixes will appear in your Workspace.
3.
In the Select Project Types list, select one or more project types. Only projects of these types
will appear in your Workspace.
4.
In the Project Status list, select one or more statuses. Only projects with the selected statuses
will appear in your Workspace.
5.
In the Project Date Range list, select a date range to use. Depending on your selection, you
might need to specify a date range in the View Within Date Range fields. Only projects with a
date within this range will appear in your Workspace.
6.
In the Project Date Range Type list, select the date field you want to use for filtering (for
example, applied date or expired date).
7.
In the Sort View in Window field, select how you want projects sorted.
8.
Click Save to save your selections. Click Cancel to close the dialog box without saving changes.
Bulletins
Bulletins provide the ability to display TRAKiT-wide information. Click to choose a sort order for the
Bulletins pane or to add a bulletin.
TRAKiT User Guide 18.1
Proprietary
May not be reproduced or distributed without written permission of CentralSquare Technologies.
Copyright 2018 CentralSquare Technologies. All rights reserved.
20181212JC Page 24
Dashboard
Dashboard provides at‐a‐glance access to TRAKiT data through live charts.
Tip: The Dashboard pane can appear in the middle column, the right column, or both columns.
To customize the Dashboard pane, complete the following steps:
1.
Click .
2.
Select the charts and graphs to display.
3.
Define the order of the charts and graphs by selecting an item and then clicking to move an
item up in the list or to move an item down in the list.
4.
Click Save to save your selections. Click Cancel to close the dialog box without saving changes.
You can perform the following actions from the Dashboard pane:
•
To scroll through the charts, click and .
•
To change the date range of the data in the chart, click on the date range drop‐down list below
the chart.
•
To display the title and total for a segment of the chart, point to that segment.
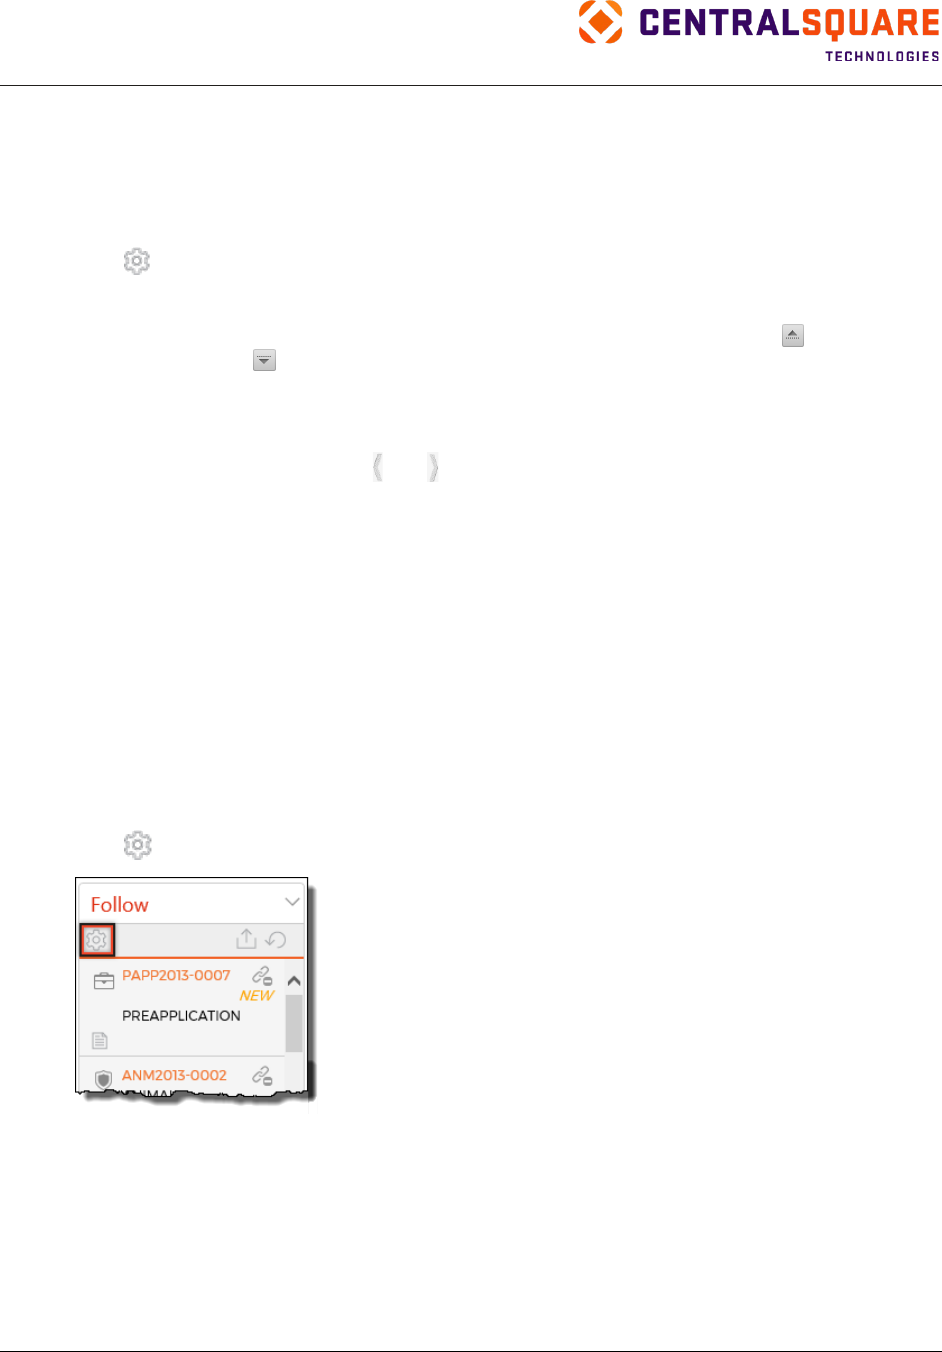
Follow
Use the Follow feature to maintain a list of records you frequently access or need to follow up on.
Depending on your WUM settings, a NEW indicator appears on records in the Follow pane when the
record is updated.
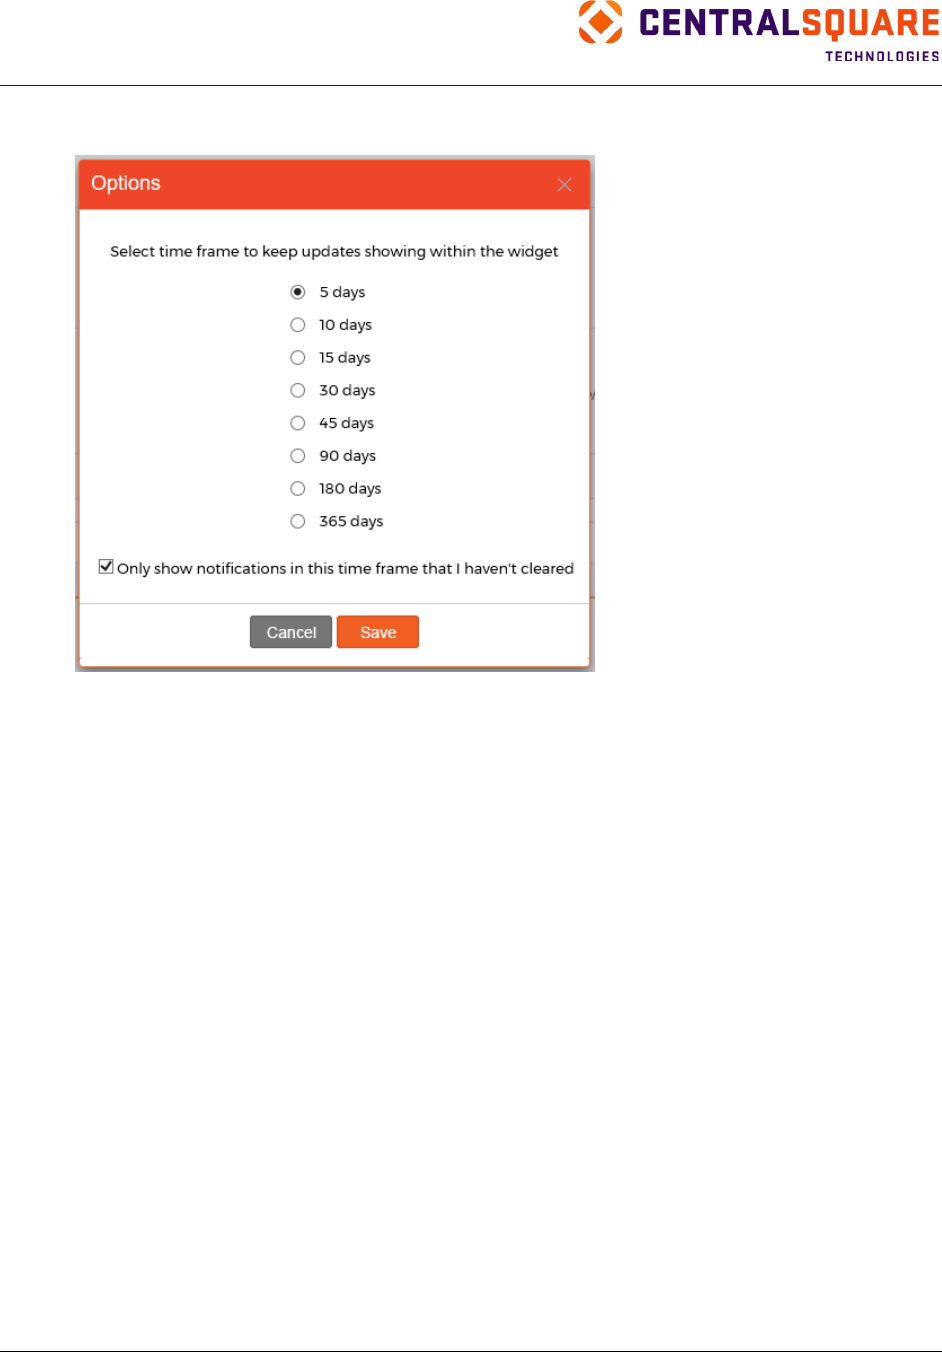
Configuring Follow
To customize the Follow pane, complete the following steps:
1.
Click .
TRAKiT User Guide 18.1
Proprietary.
May not be reproduced or distributed without written permission of CentralSquare Technologies.
Copyright 2018 CentralSquare Technologies. All rights reserved.
20181212JC Page 25
2.
Select a time frame. The time frame determines how long the NEW indicator appears in the
Follow pane.
3.
If you want to be able to clear the NEW indicator after you review updates, select the Only show
notifications in this time frame that I haven’t cleared option.
4.
Click Save to save your settings or click Cancel to close the dialog box without saving changes.
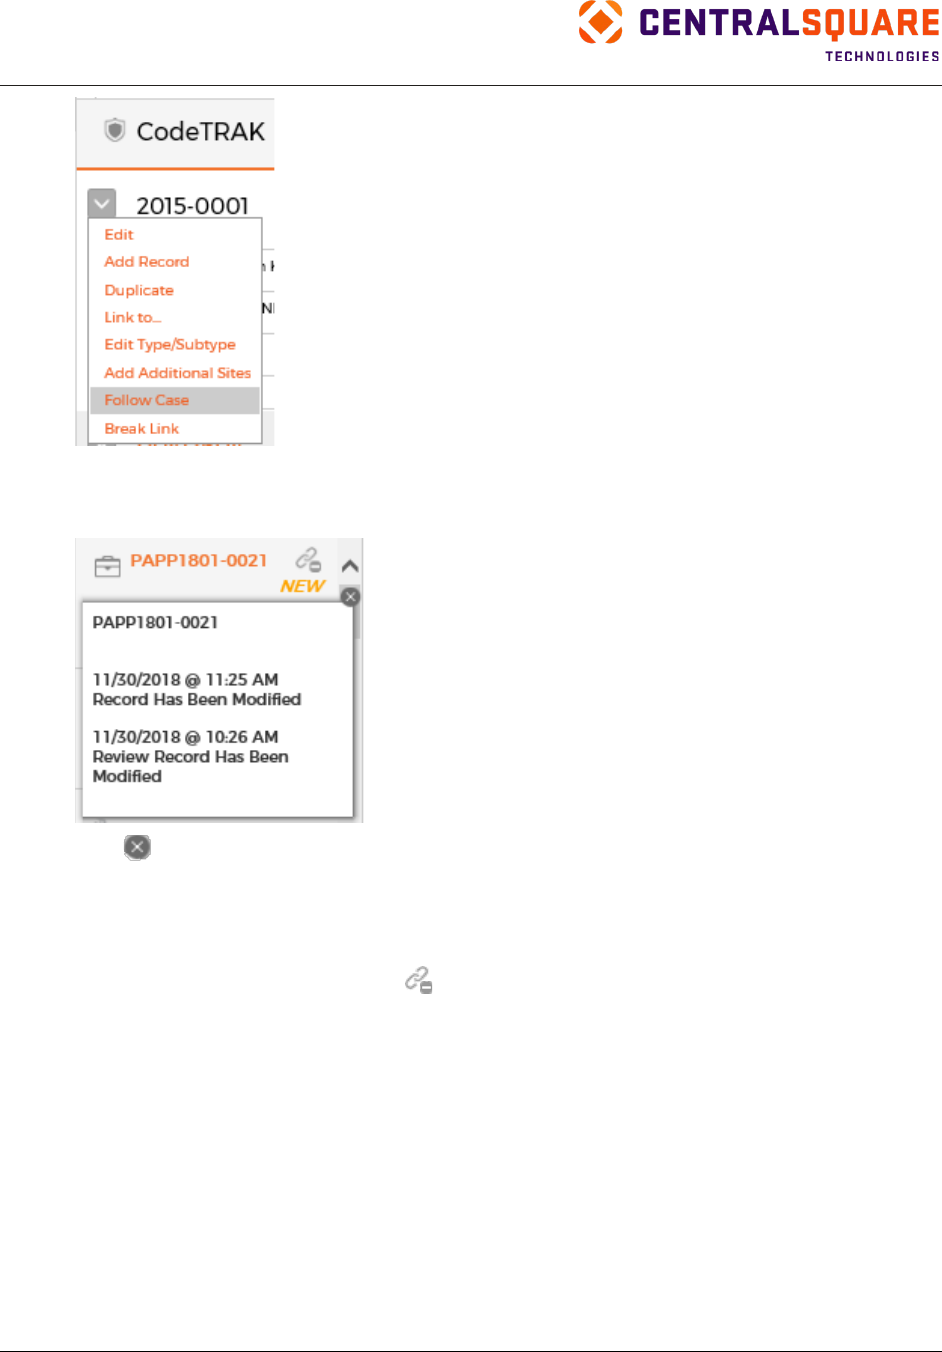
Following a Record
To follow a record, complete the following steps:
1.
Locate the record. See “Locating Records” for more information about searching for a record.
2.
On the functions menu, click Follow. This adds the record to your Follow list.
Note: The menu option varies by module. For example, in CodeTRAK, the option is Follow
Case. In GeoTRAK, the option is Follow GEO Record.
TRAKiT User Guide 18.1
Proprietary
May not be reproduced or distributed without written permission of CentralSquare Technologies.
Copyright 2018 CentralSquare Technologies. All rights reserved.
20181212JC Page 26
3.
Depending on your agency’s WUM settings, the NEW indicator appears on the record in the
Follow pane. Point to the word NEW or the record number to view a pop-up window with a
description of recent changes to the record and the related address.
4.
Click to close the pop-up window.
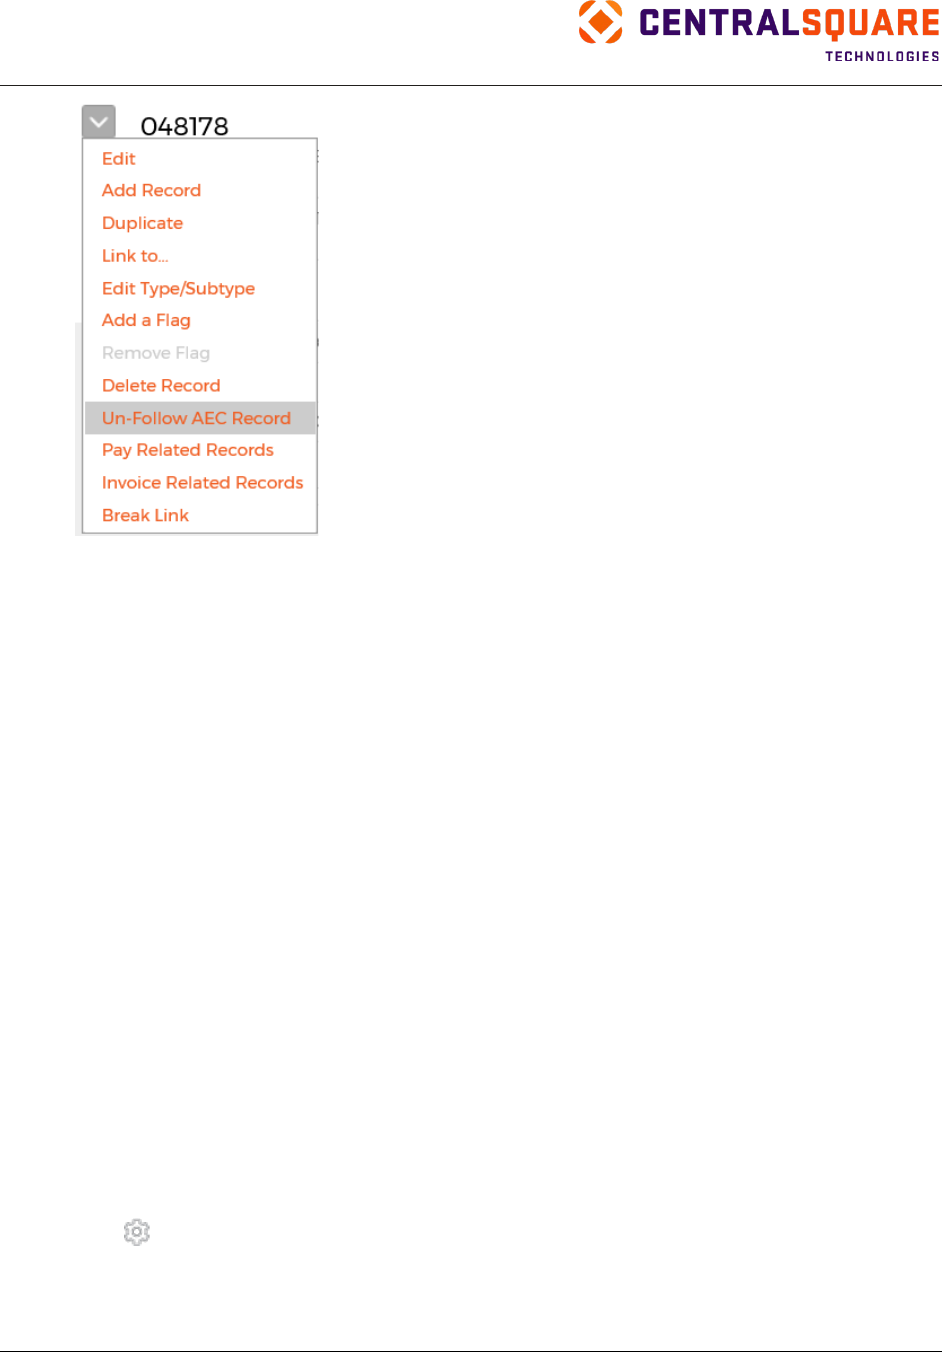
Stop Following a Record
Use one of the following methods to stop following a record.
•
In the Workspace Follow pane, click for the record you no longer want to follow.
•
Locate the record. From the functions menu, click Un-Follow.
Note: The menu option varies by module. For example, in AEC TRAK, the option is Un-Follow
AEC Record. In PermitTRAK, the option is Un-Follow Permit.
TRAKiT User Guide 18.1
Proprietary.
May not be reproduced or distributed without written permission of CentralSquare Technologies.
Copyright 2018 CentralSquare Technologies. All rights reserved.
20181212JC Page 27
GIS
Use the GIS pane to select an object (parcel, building, street, hydrant, and so on), view the record
information, and attach a new record (permit, project, case, license, or issue) to an object.
To add a record to a GIS object, complete the following steps:
1.
Locate the GIS object by navigating on the map.
2.
Select the GIS object.
3.
Click Add.
4.
In the Create New field, select the type of record to create from. The Add Record screen
changes based on your selection.
Note: The following steps might not be required.
5.
Select a record type from the Record Type field.
6.
Select a record subtype from the Record Subtype field.
7.
Select a prefix from the Prefix field.
8.
In the Description field, type a brief description.
9.
In the Number of Records field, select the number of records to add. Use this feature to add and
attach multiple records to the selected GIS object.
10.
Click Add.
RSS (Really Simple Syndication) Feed
To customize the RSS Feed pane, complete the following steps:
1.
Click .
2.
Enter the RSS URL.
3.
Click Save to save your changes. Click Cancel to close the dialog box without saving changes.
TRAKiT User Guide 18.1
Proprietary
May not be reproduced or distributed without written permission of CentralSquare Technologies.
Copyright 2018 CentralSquare Technologies. All rights reserved.
20181212JC Page 28
Map
The Map pane provides access to Google Maps
™
. Click a location on the map to search for records
attached to that address. Use the controls on the map to zoom in, zoom out, and switch between map
and satellite views.
Action Center
The Action Center pane provides a central location from which you can view and edit chronology action
items on any permit, project, case, or license.
To customize the Action Center pane, complete the following steps:
1.
Click .
2.
Select one or more users from the Staff Name list.
3.
Select one or more modules from the Groups list.
4.
Select one or more activities from the Types list.
5.
Select which activities to display by selecting an option in the Date Type field.
6.
Set a date range by either selecting a predefined range from the Date Range list or by manually
setting start and end dates.
7.
Select how you want your reviews sorted from the Sort By field.
8.
Click Save to save your selections. Click Cancel to close the dialog box without saving changes.
For more information about how to enter activity notes or details, see “Adding Actions.”
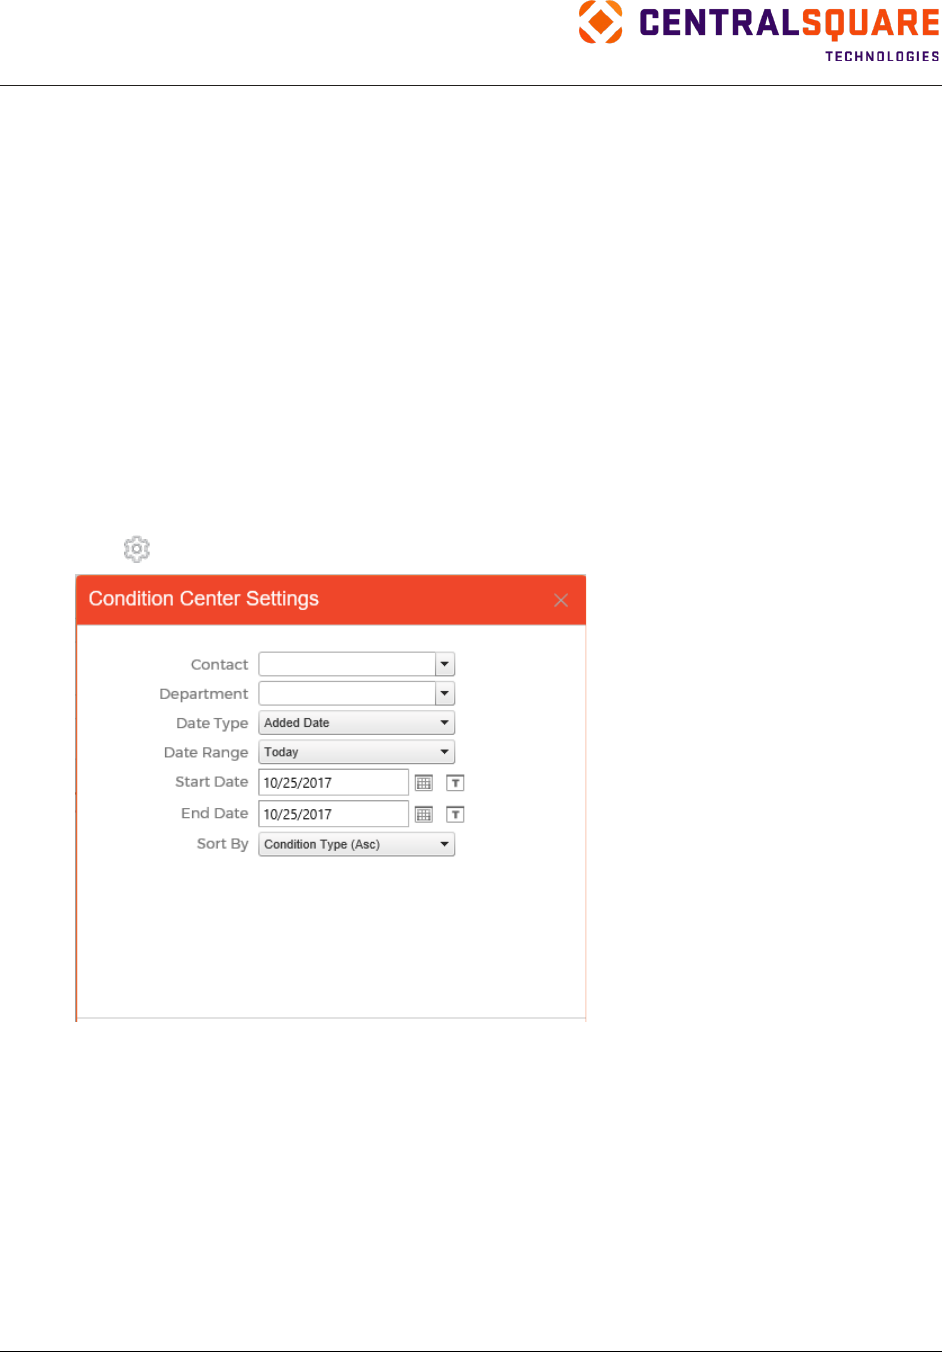
TRAKiT User Guide 18.1
Proprietary.
May not be reproduced or distributed without written permission of CentralSquare Technologies.
Copyright 2018 CentralSquare Technologies. All rights reserved.
20181212JC Page 29
Action Center Functions
You can access the following functions from the functions menu in the Action Center pane:
•
To modify the action, click Edit.
•
To view all activities on the record, click History.
•
To add an activity not previously listed, click Add Action.
•
To void an activity, click Void.
•
To add an attachment, click View/Add Attachments.
•
To print a Chronology-related document, click Print.
Conditions
The Conditions pane provides a central location from which you can view and edit conditions on any
permit, project, or license.
To customize the Conditions Center pane, complete the following steps:
1.
Click .
2.
Select one or more users from the Contact list.
3.
Select one or more departments from the Department list.
4.
Select which conditions to display by selecting a date in the Date Type field.
5.
Set a date range by either selecting a predefined range from the Date Range list or by manually
setting start and end dates.
6.
Select how you want your reviews sorted from the Sort By list.
7.
Click Save to save your selections. Click Cancel to close the dialog box without saving changes.
For more information about how to enter condition results/notes, see “Editing Conditions.”
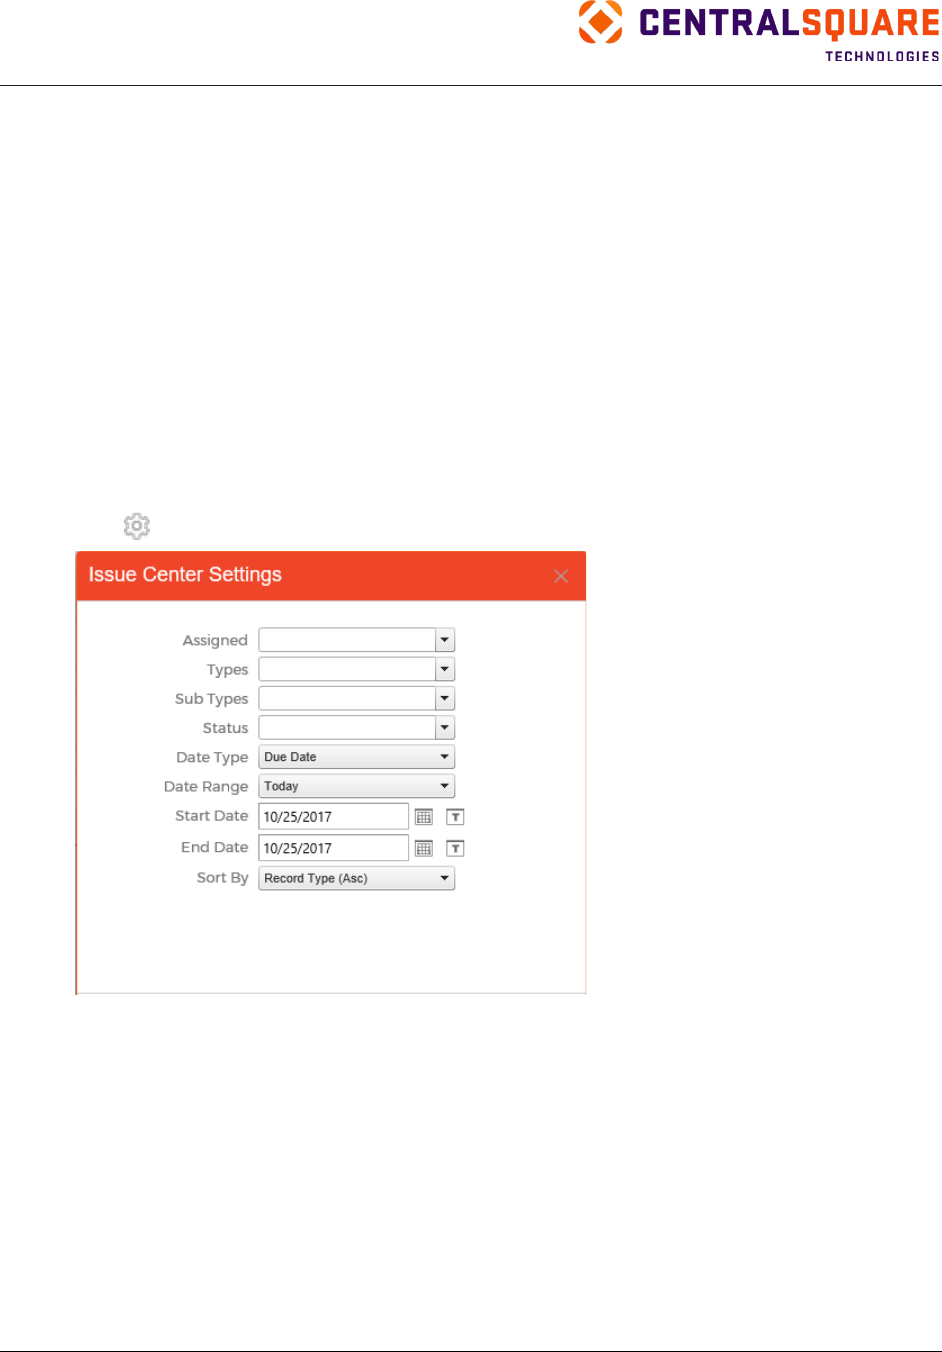
TRAKiT User Guide 18.1
Proprietary
May not be reproduced or distributed without written permission of CentralSquare Technologies.
Copyright 2018 CentralSquare Technologies. All rights reserved.
20181212JC Page 30
Conditions Functions
You can access the following functions from the functions menu in the Conditions pane:
•
To edit the record, click Edit.
•
To view all conditions on the record, click History.
•
To add a condition not previously listed, click Add.
•
To void a condition, click Void.
•
To add an attachment, click View/Add Attachments.
•
To print a Condition-related document, click Print.
Issues
The Issues pane provides a central location from which you can view and edit CRM TRAK issues.
To customize the Issues pane, complete the following steps:
1.
Click .
2.
Select one or more users from the Assigned list.
3.
Select one or more issue types from the Types list.
4.
Select one or more issue subtypes from the Sub Types list.
5.
Select one or more issue status values from the Status list.
6.
Select which issues to display by selecting a date in the Date Type list.
7.
Set a date range by either selecting a predefined range from the Date Range list or by manually
setting start and end dates.
8.
In the Sort By field, select a sort option.
9.
Click Save to save your selections. Click Cancel to close the dialog box without saving changes.
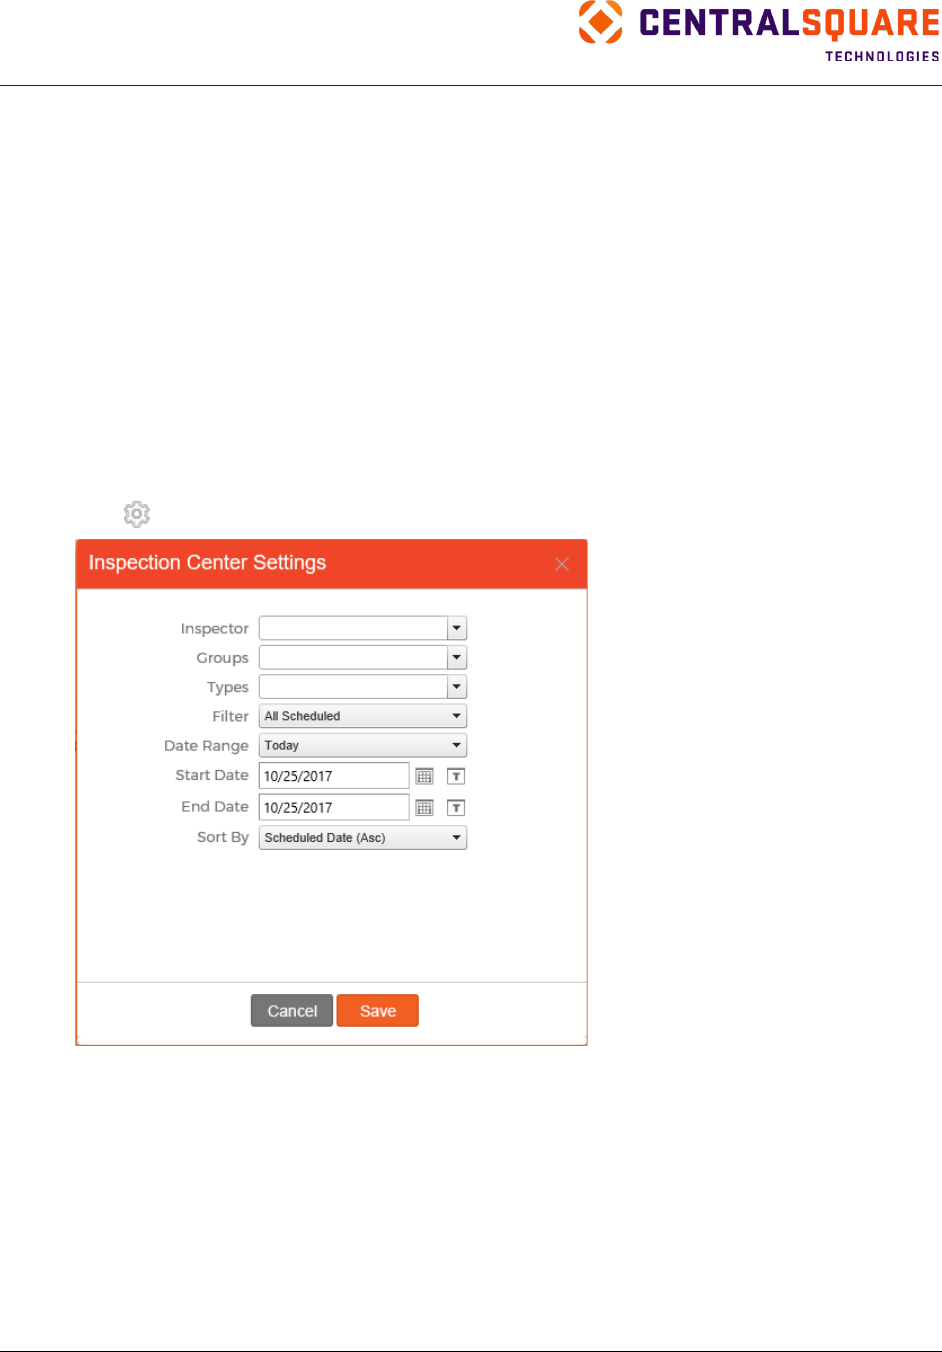
TRAKiT User Guide 18.1
Proprietary.
May not be reproduced or distributed without written permission of CentralSquare Technologies.
Copyright 2018 CentralSquare Technologies. All rights reserved.
20181212JC Page 31
Issues Functions
You can access the following functions from the functions menu in the Issues pane:
•
To edit the record, click Edit.
•
To view all activities on the record, click Issue History.
•
To add an issue not previously listed, click Add Another Issue.
•
To add an attachment, click View/Add Attachments.
•
To print an issue-related document, click Print.
Inspection Center
The Inspection Center pane provides a central location from which you can view and edit inspections on
any permit, project, case, or license.
To customize the Inspection Center pane, complete the following steps:
1.
Click .
2.
Select one or more inspectors from the Inspector list.
3.
Select one or more modules from the Groups list.
4.
Select one or more inspection types from the Types list.
5.
Select a filter option in the Filter list.
6.
Set a date range by either selecting a predefined range from the Date Range list or by manually
setting start and end dates.
7.
Select how you want your inspections sorted from the Sort By list.
8.
Click Save to save your selections. Click Cancel to close the dialog box without saving changes.
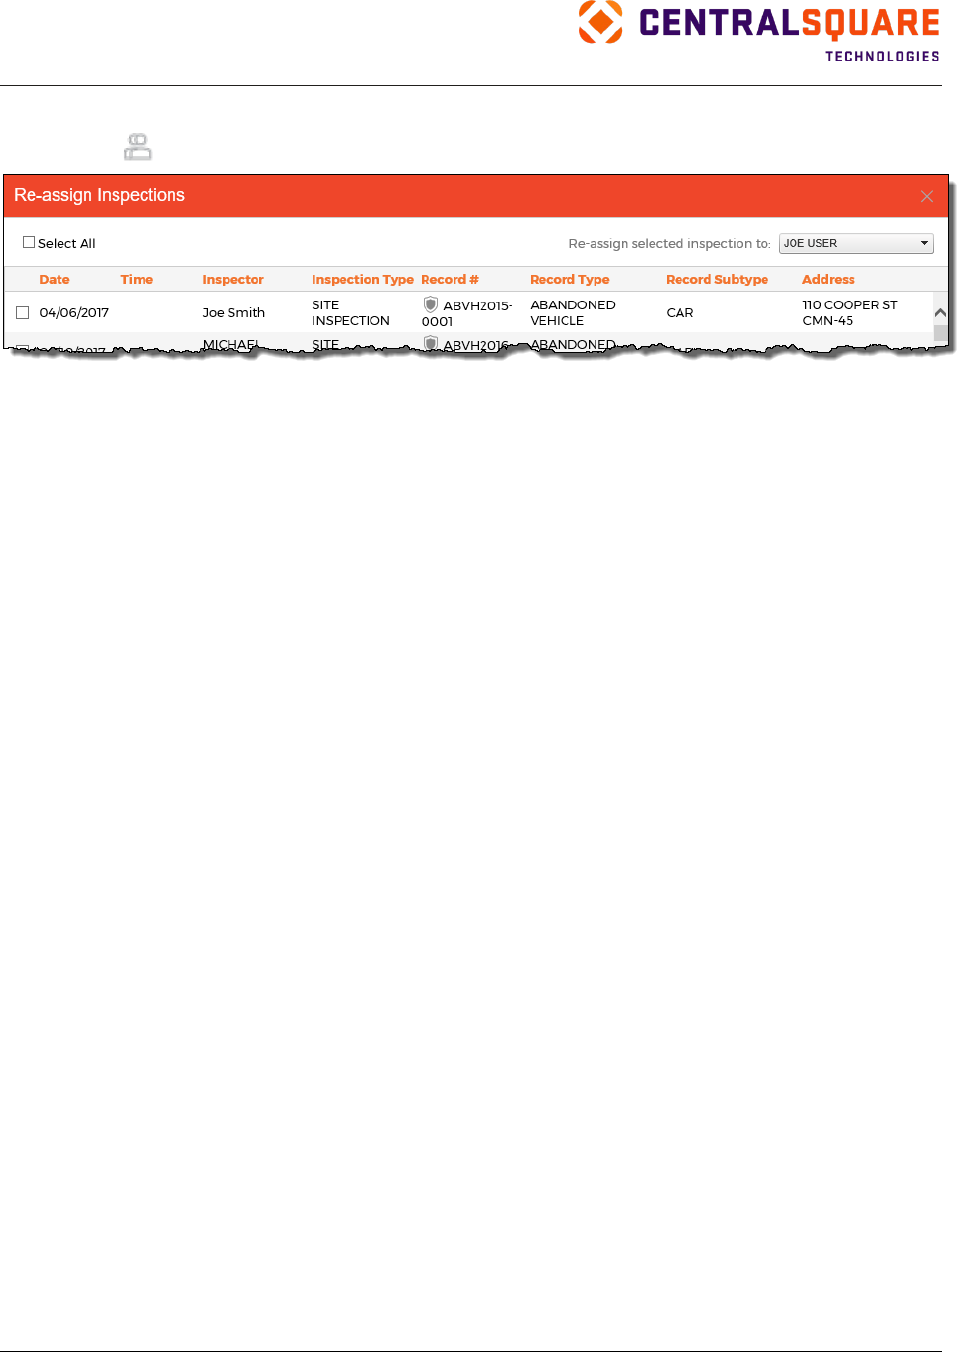
TRAKiT User Guide 18.1
Proprietary
May not be reproduced or distributed without written permission of CentralSquare Technologies.
Copyright 2018 CentralSquare Technologies. All rights reserved.
20181212JC Page 32
To reassign inspections to another inspector:
1.
Click .
2.
Select one or more inspections that you want to reassign.
3.
Select the inspector.
4.
Click Re‐assign.
Inspection Center Functions
You can access the following functions from the functions menu in the Inspection Center pane:
•
To edit the record, click Edit.
•
To view all inspections on the record, click Inspection History.
•
To add an inspection not previously scheduled, click Add Another Inspection.
•
To void an inspection, click Void Inspection.
•
To add an attachment, click View/Add Attachments.
•
To print an inspections-related document, click Print.
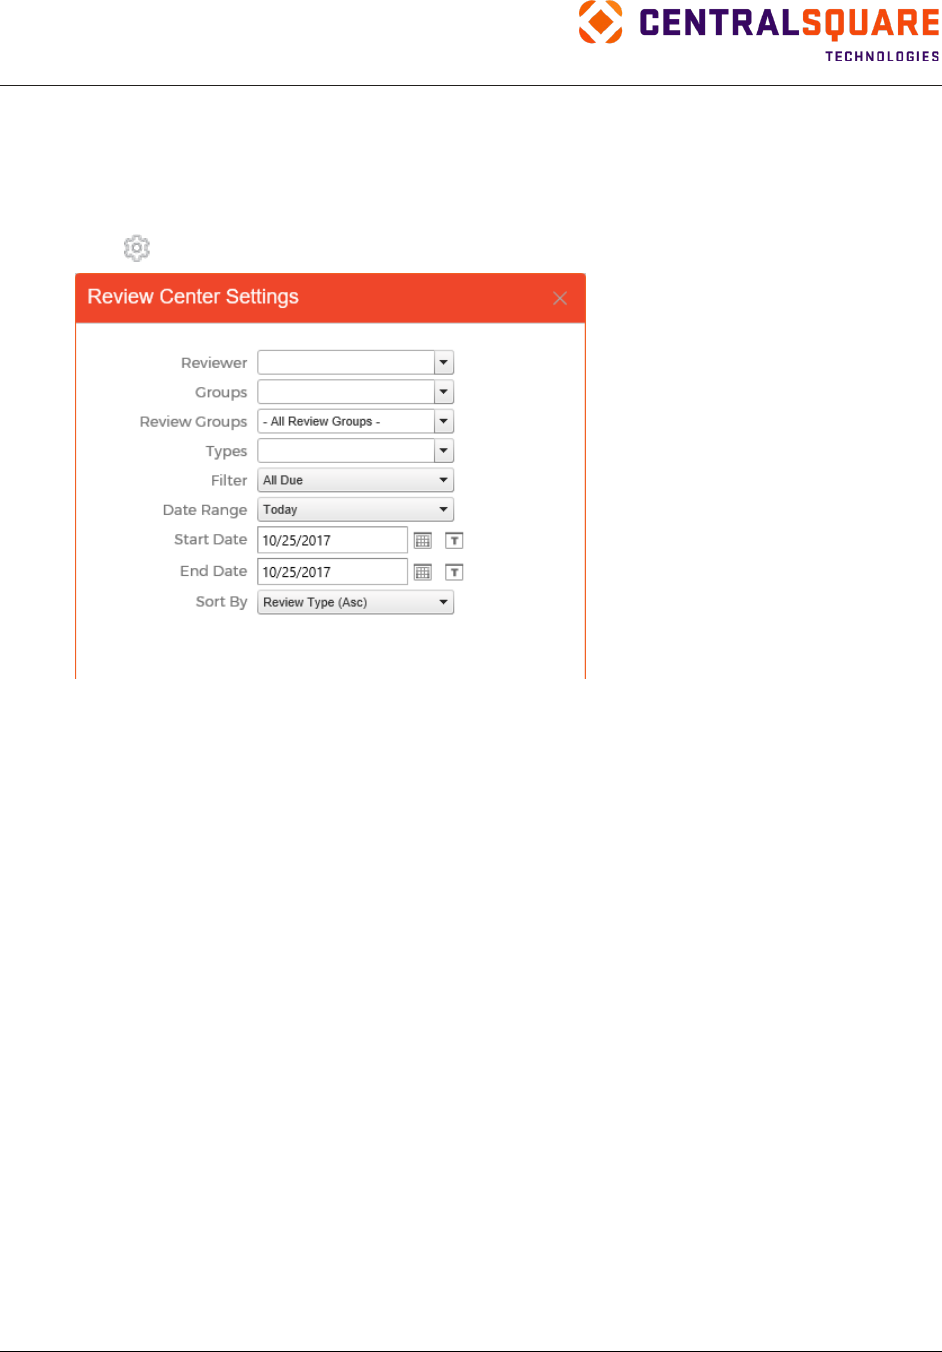
TRAKiT User Guide 18.1
Proprietary.
May not be reproduced or distributed without written permission of CentralSquare Technologies.
Copyright 2018 CentralSquare Technologies. All rights reserved.
20181212JC Page 33
Review Center
The Review Center pane provides a central location where you can view and edit reviews on any permit,
project, or license. The reviews that are listed depend on your Review Center settings.
To customize the Review Center pane, complete the following steps:
1.
Click .
2.
Select one or more reviewers from the Reviewer list.
3.
Select one or more modules from the Groups list.
4.
Select one or more review groups from the Review Groups list.
5.
Select one or more review types from the Types list.
6.
Select a filter option in the Filter list.
7.
Set a date range by either selecting a predefined range from the Date Range list or by manually
setting start and end dates.
8.
Select how you want your reviews sorted from the Sort By list.
9.
Click Save to save your selections. Click Cancel to close the dialog box without saving changes.
Review Center Functions
You can access the following functions from the functions menu in the Review Center pane:
•
To enter review results, click Edit. For more information about entering review results, see
“Editing Reviews.”
•
To view all reviews on the record, click Review History.
•
To add a review not previously listed, click Add Review.
•
To void a review, click Void Review.
•
To add an attachment, click View/Add Attachments.
•
To print a review-related document, click Print.
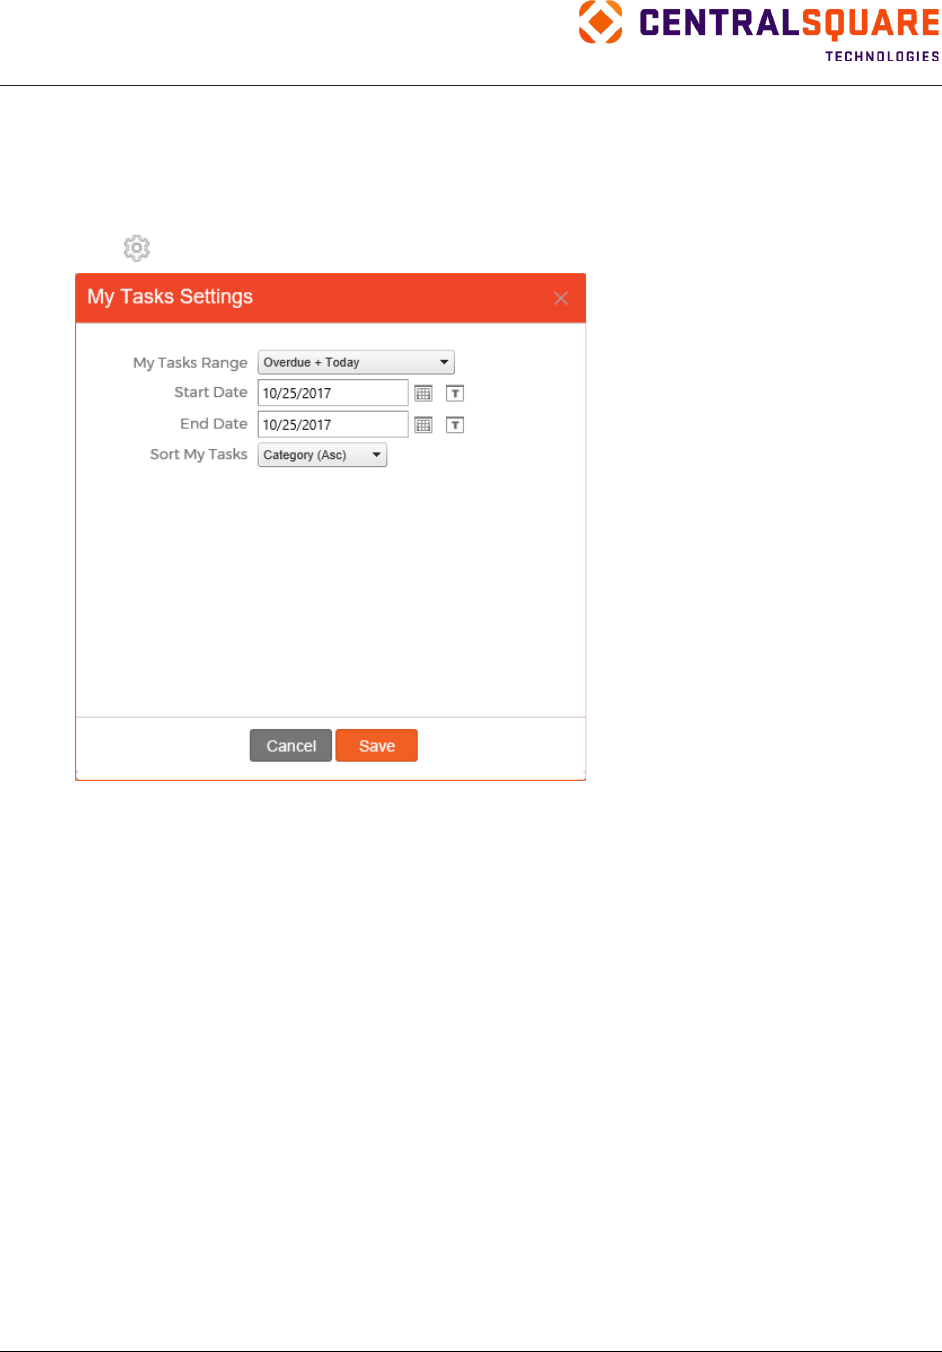
TRAKiT User Guide 18.1
Proprietary
May not be reproduced or distributed without written permission of CentralSquare Technologies.
Copyright 2018 CentralSquare Technologies. All rights reserved.
20181212JC Page 34
My Tasks
The My Tasks pane provides a central location from which you can view and edit conditions, inspections,
issues, and reviews in a single pane.
To customize the My Tasks pane, complete the following steps:
1.
Click .
2.
Select a date or date range from the My Tasks Range list.
3.
If you selected Overdue + Selected Dates, enter start and end dates.
4.
Select how you want your reviews sorted from the Sort My Tasks list.
5.
Click Save to save your selections. Click Cancel to close the dialog box without saving changes.
My Tasks Functions
You can access the following functions from the functions menu in the My Tasks pane:
•
To edit a task, click Edit.
•
To view task history, click History.
•
To add a task, click Add Another.
•
To void a task, click Void.
•
To add an attachment, click View/Add Attachments.
•
To print a related document, click Print.
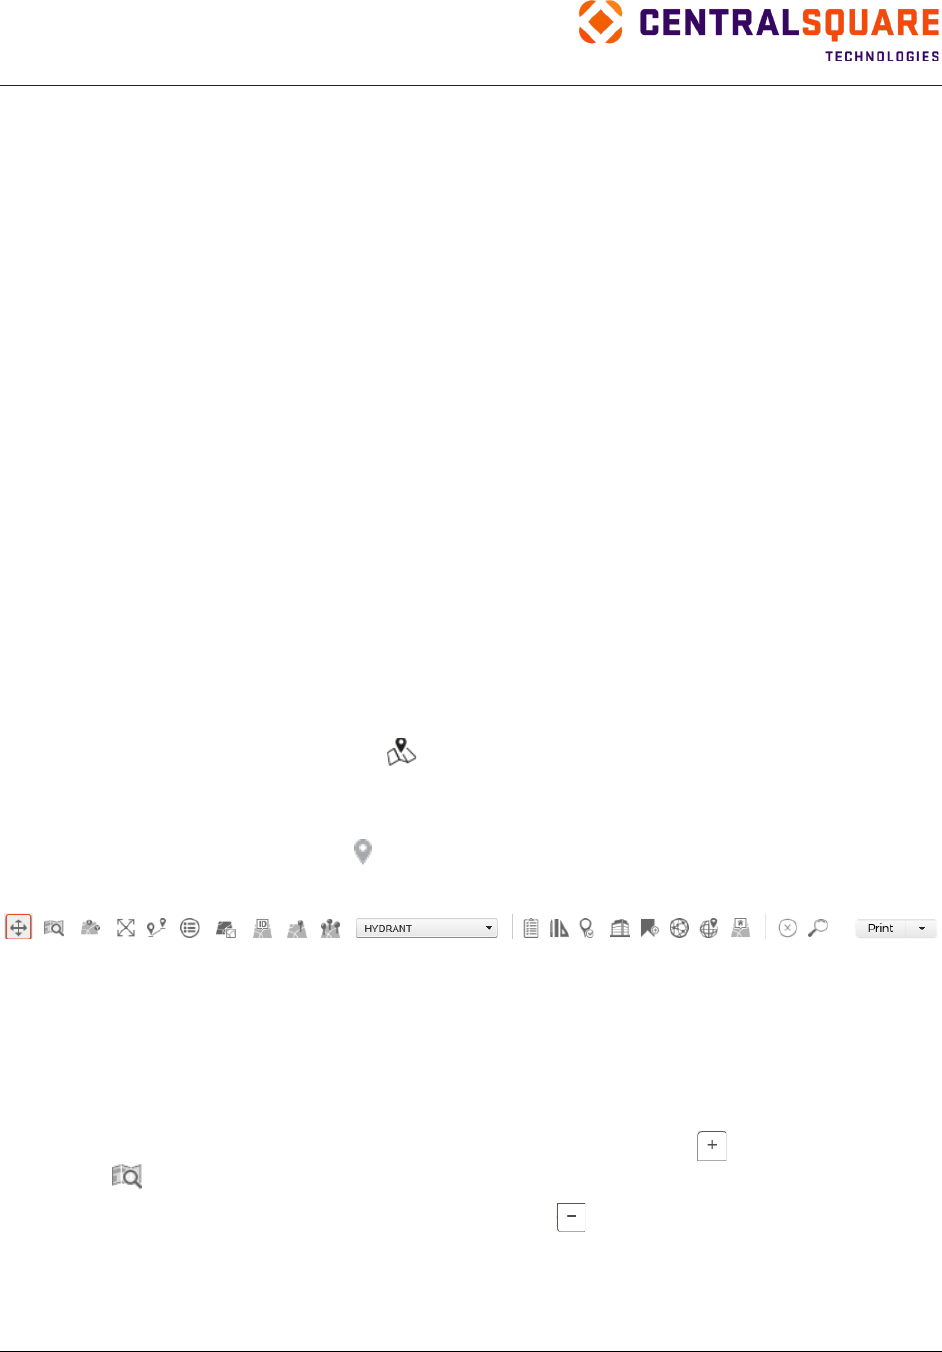
TRAKiT User Guide 18.1
Proprietary.
May not be reproduced or distributed without written permission of CentralSquare Technologies.
Copyright 2018 CentralSquare Technologies. All rights reserved.
20181212JC Page 35
GIS
Overview
GIS (geographic information system) is a spatial solution for working with TRAKiT records. Using an
interactive map, users can work with a variety of geographic features such as parcels, streets, hydrants,
addresses, billboards, cell towers, apartment units, and office suites.
Using GIS, you can:
•
Create activity records
•
Add attachments or restrictions
•
Create custom notices and reports, such as owner notification letters, for selected parcels
•
Print a quick map of an area of interest
•
Find the most efficient route between scheduled inspections and print directions utilizing a
Network Analyst Service
•
Query using advanced search plotting to simulate hot‐spot analysis of areas with dense activity
•
Query using advanced search charting to view a time line of permits issued by date
GIS is accessible through many of the TRAKiT features, including the navigation bar and individual
TRAKiT records. You can also add GIS to your Favorites list. Refer to the “Favorites” section.
Getting Started
To open TRAKiT GIS, use one of the following procedures:
•
In the TRAKiT navigation bar, click .
•
From a GeoTRAK record, point to the functions menu and then click Launch in GIS to open that
record in GIS.
•
In a search results listing, click next to a record to open that record in GIS.
Use the GIS toolbar to access GIS tools.
Navigation Features
Use navigation features to display different sections of a map at various magnification (zoom) levels.
Magnification
Change the magnification of the map using the following options:
•
Zoom In: Rotate the wheel button forward, double‐click the map, click , or use the Zoom In
tool .
•
Zoom Out: Rotate the wheel button backward or click .
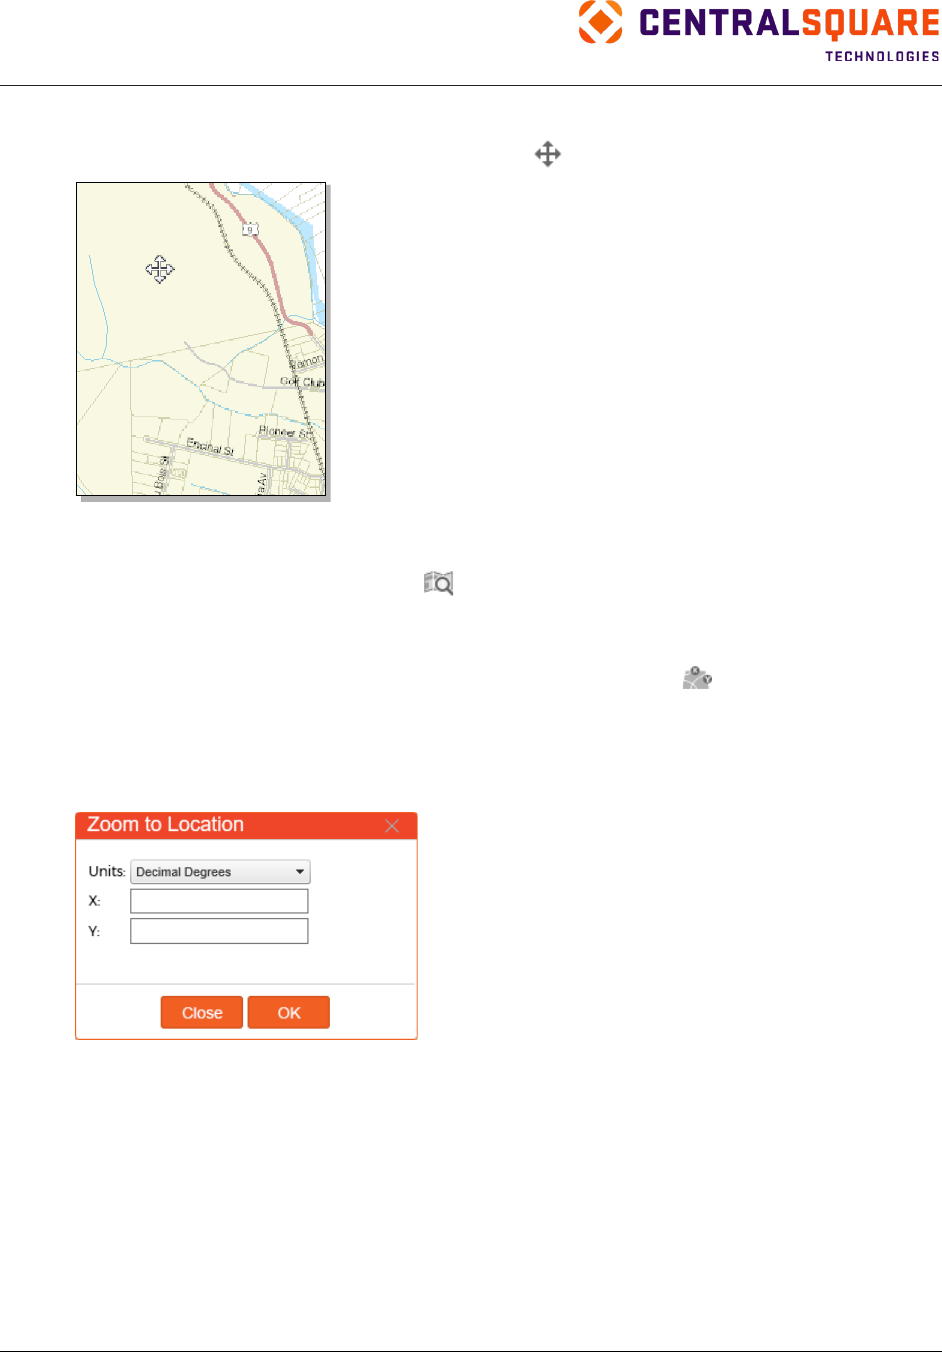
TRAKiT User Guide 18.1
Proprietary
May not be reproduced or distributed without written permission of CentralSquare Technologies.
Copyright 2018 CentralSquare Technologies. All rights reserved.
20181212JC Page 36
Navigate Tool
Display a different map section in panning mode by clicking and then dragging the map.
Zoom In Tool
Use the Zoom In tool to magnify an area. Click
and then drag to select an area on the map.
Zoom‐to‐Coordinates Tool
Zoom to exact coordinates on the map using the Zoom‐to‐Coordinates tool .
1.
In the pop‐up window, select the units to be used: Decimal Degrees or Map Units.
2.
Enter the longitude in the X field and the latitude in the Y field.
3.
Click OK to zoom the map to these exact coordinates.
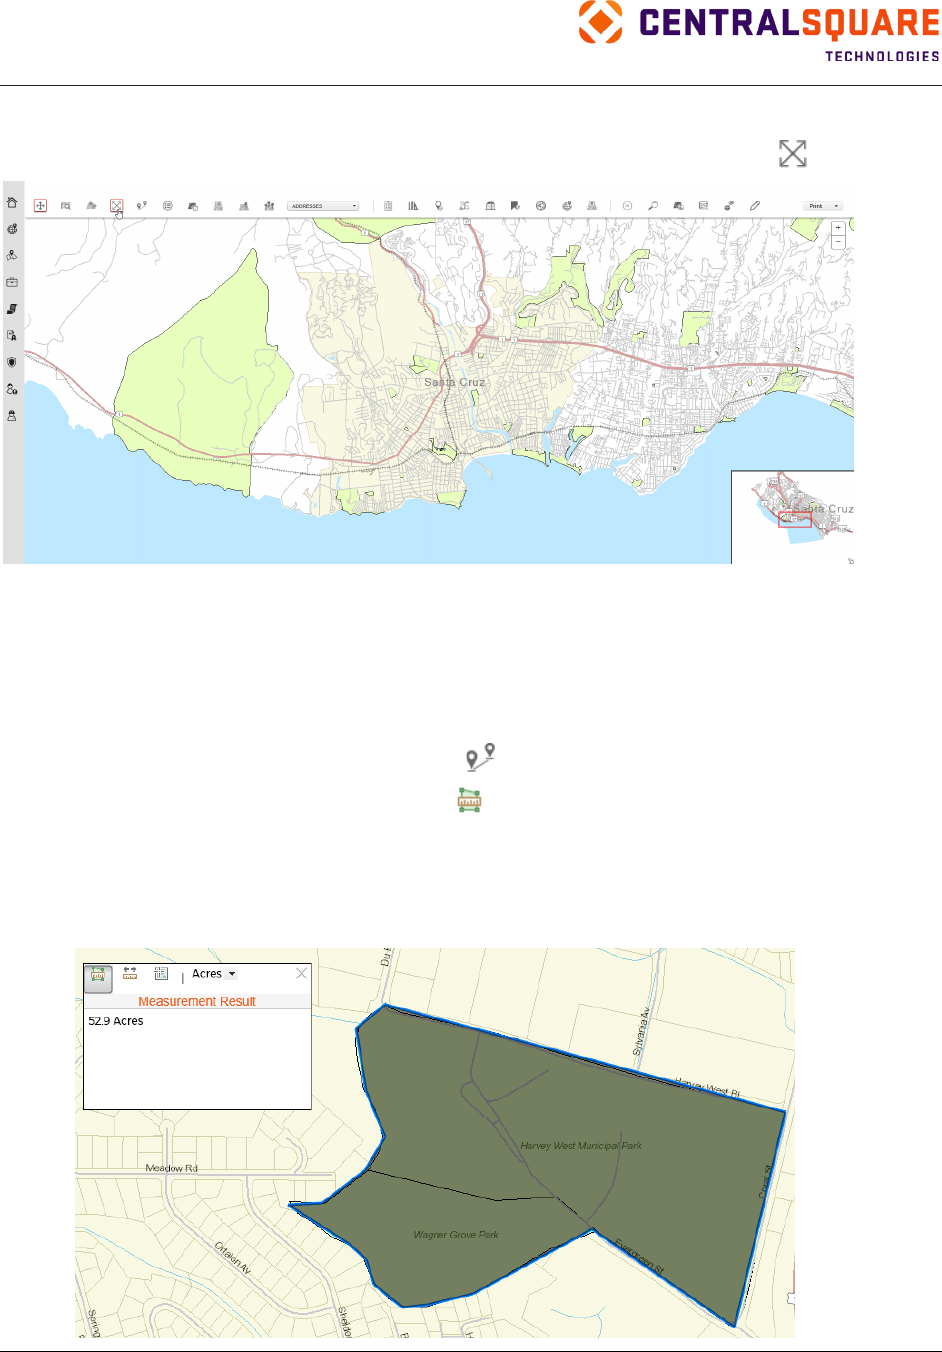
TRAKiT User Guide 18.1
Proprietary.
May not be reproduced or distributed without written permission of CentralSquare Technologies.
Copyright 2018 CentralSquare Technologies. All rights reserved.
20181212JC Page 37
Full Extent Tool
Reset the screen display to the full extent of the map by clicking on the Full Extent tool .
Measurement Features
Using measurement features, you can measure area and distance, as well as find the latitude and
longitude coordinates of an exact location on a map.
Area Tool
Measure an area by first selecting the Measure tool .
1.
In the pop‐up window, select the Area tool
and the unit of measurement.
2.
Click a point on the map to begin forming the area to measure. Click another point on the map to
establish a vertex and repeat until all vertices are added. Double‐click to complete the area
shape.
The measurement of the selected area appears in the pop-up window.

TRAKiT User Guide 18.1
Proprietary
May not be reproduced or distributed without written permission of CentralSquare Technologies.
Copyright 2018 CentralSquare Technologies. All rights reserved.
20181212JC Page 38
Distance Tool
Measure a distance by selecting the Measure tool
and then completing these steps:
1.
In the pop‐up window, select the Distance tool and the unit of measurement.
2.
Click on the map to select the beginning point of the measurement. Click additional points on the
map to add intermediate points to your line. Double-click on the map to select the ending point of
the measurement.
The length of the line appears in the pop-up window.
Location Tool
Find a location by first selecting the Measure tool .
1.
In the pop‐up window, select the Location tool and the unit of measurement.
2.
Click a point on the map.
The latitude and longitude of the selected point on the map appear in the pop-up window.

TRAKiT User Guide 18.1
Proprietary.
May not be reproduced or distributed without written permission of CentralSquare Technologies.
Copyright 2018 CentralSquare Technologies. All rights reserved.
20181212JC Page 39
Viewing Features
Viewing features enable you to display map information and map layers in different ways.
Table of Contents Tool
View a list of all of the layers in a map using the Table of Contents tool .
•
View map layers: Click the plus sign beside the map name to expand the layers.
•
Display map layers: Select the check box next to the layer name.
•
Hide map layers: Clear the check box next to the layer name.
Adding a Map Service
1.
In the TOC window, click .
2.
Enter the URL for a known map service and select the map to use.
3.
Click Close.
Note: With the TOC tool, map services are supported from the root Services folder or a designated
folder within the root directory. For example, a map service can be added using the following URLs,
where the folder Internal_Services is a custom directory name. The specific folder name must then be
added to the gisConfig file in the ArcGIS folder.
○
Root directory: http://gis101.trakit.com:6080/arcgis/rest/services
○
Designated folder: http://gis101.trakit.com:6080/arcgis/rest/services/Internal _Services
Tip: Added map services are only maintained during the current user session.
Removing a Map Service
1.
In the TOC window, click .
2.
Select the map that you want to remove from the list.
3.
Click OK.
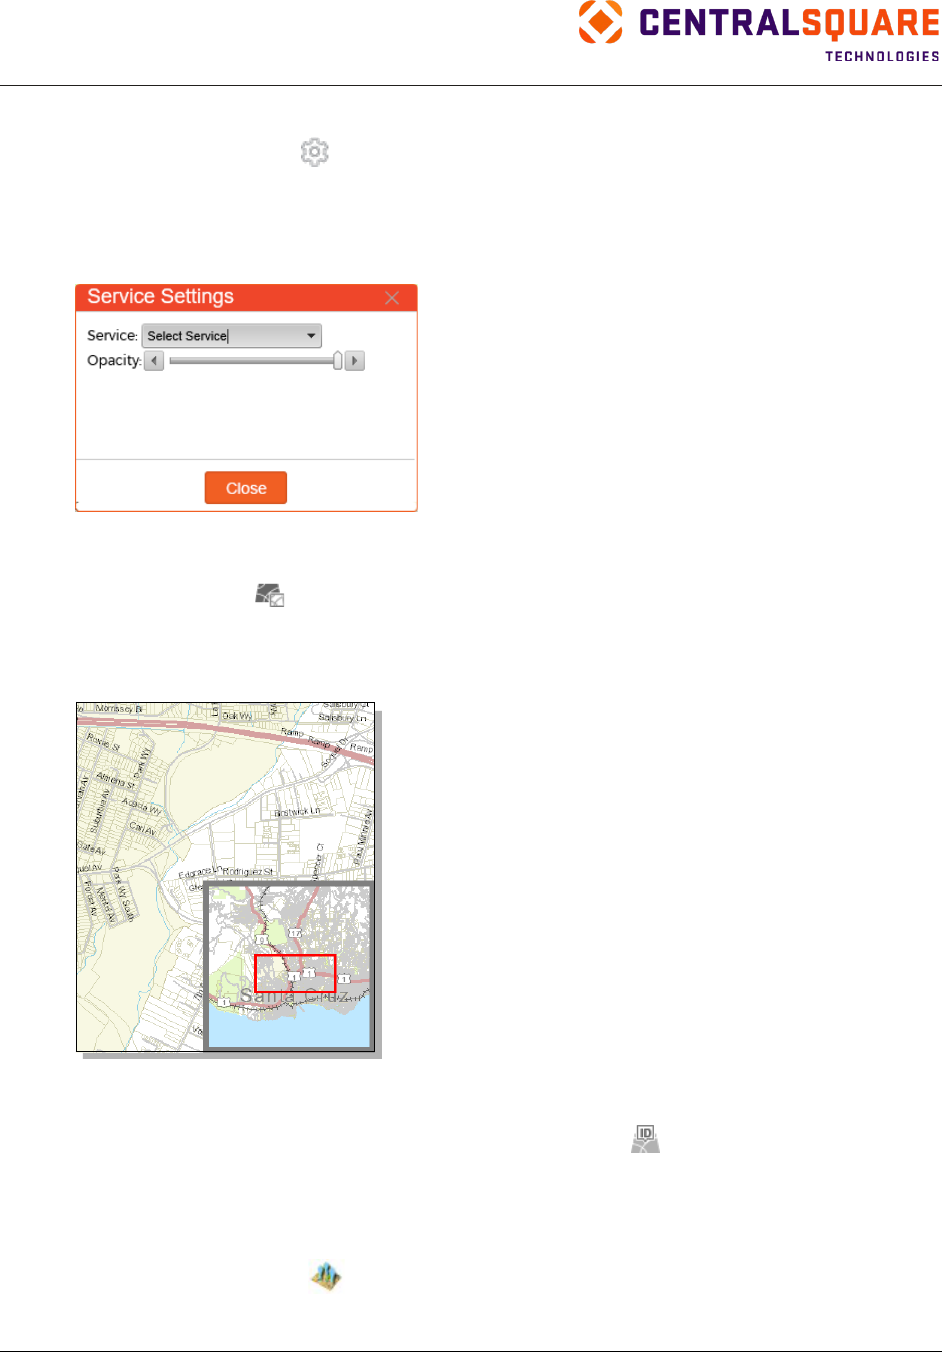
TRAKiT User Guide 18.1
Proprietary
May not be reproduced or distributed without written permission of CentralSquare Technologies.
Copyright 2018 CentralSquare Technologies. All rights reserved.
20181212JC Page 40
Adjusting Map Service Settings
1.
In the TOC window, click .
2.
Select a service.
3.
Move the slider to adjust the opacity of the map layer for the user view.
4.
Click Close.
Overview Map Tool
Use the Overview Map tool to show or hide a small overview map with a bounding box showing the
current view in the main map window.
As you move and zoom within the main map window, the overview window adjusts. You can also drag the
bounding box in the overview window to reposition the main map.
ID Tool
Display features associated with map layers using the Identify (ID) tool and clicking on the map. From
the pop-up window, you can:
•
Expand the listed layers to display the GIS attributes of the features.
•
Click a feature hyperlink to highlight the feature on the map.
•
Click the Multi Select icon to select surrounding features. Be sure to select a geotype feature:
Hydrant, Address, Street, Parcel.
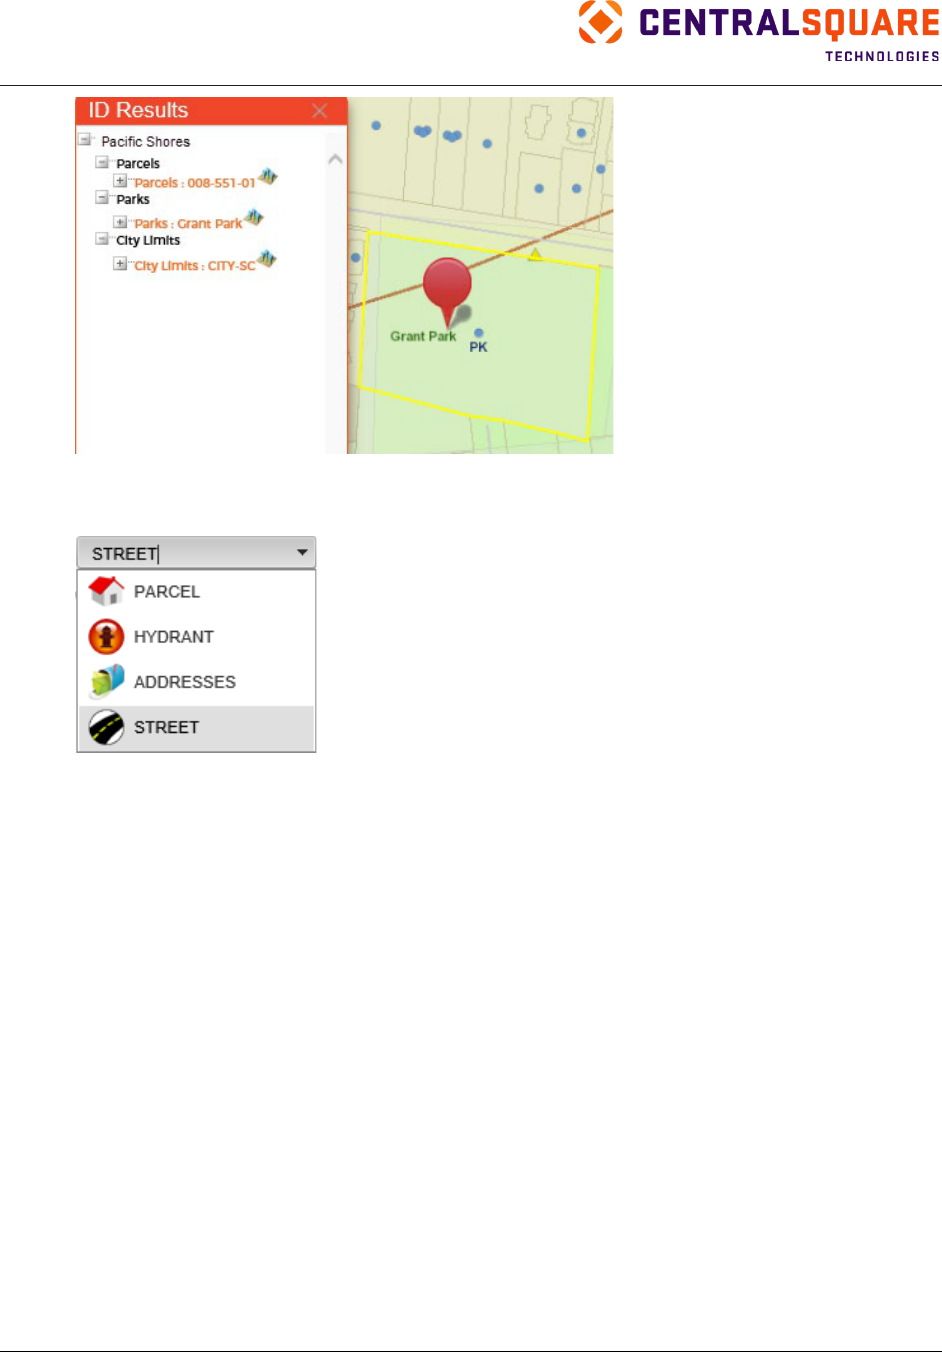
TRAKiT User Guide 18.1
Proprietary.
May not be reproduced or distributed without written permission of CentralSquare Technologies.
Copyright 2018 CentralSquare Technologies. All rights reserved.
20181212JC Page 41
To use the Multi Select tool, complete the following steps:
1.
From the geotype feature list, select the geotype feature you want to work with.
2.
In the Select By Feature window:
a. Select an option in the Selection Method field. The options are:
•
Intersect With—Select surrounding features that intersect with the selected feature
•
Buffer—Select features that are within a specific area around the selected feature
b. Select an option in the Selection Type field. The options are:
•
New—Create a new selection
•
Add To—Supplement previous selections
•
Remove From—Subtract from a previous selection
c. If you selected Buffer in the Selection Method field, type the distance and select a unit of
measurement for the buffer area.
d. Click OK. The Multi Selection Results window appears.
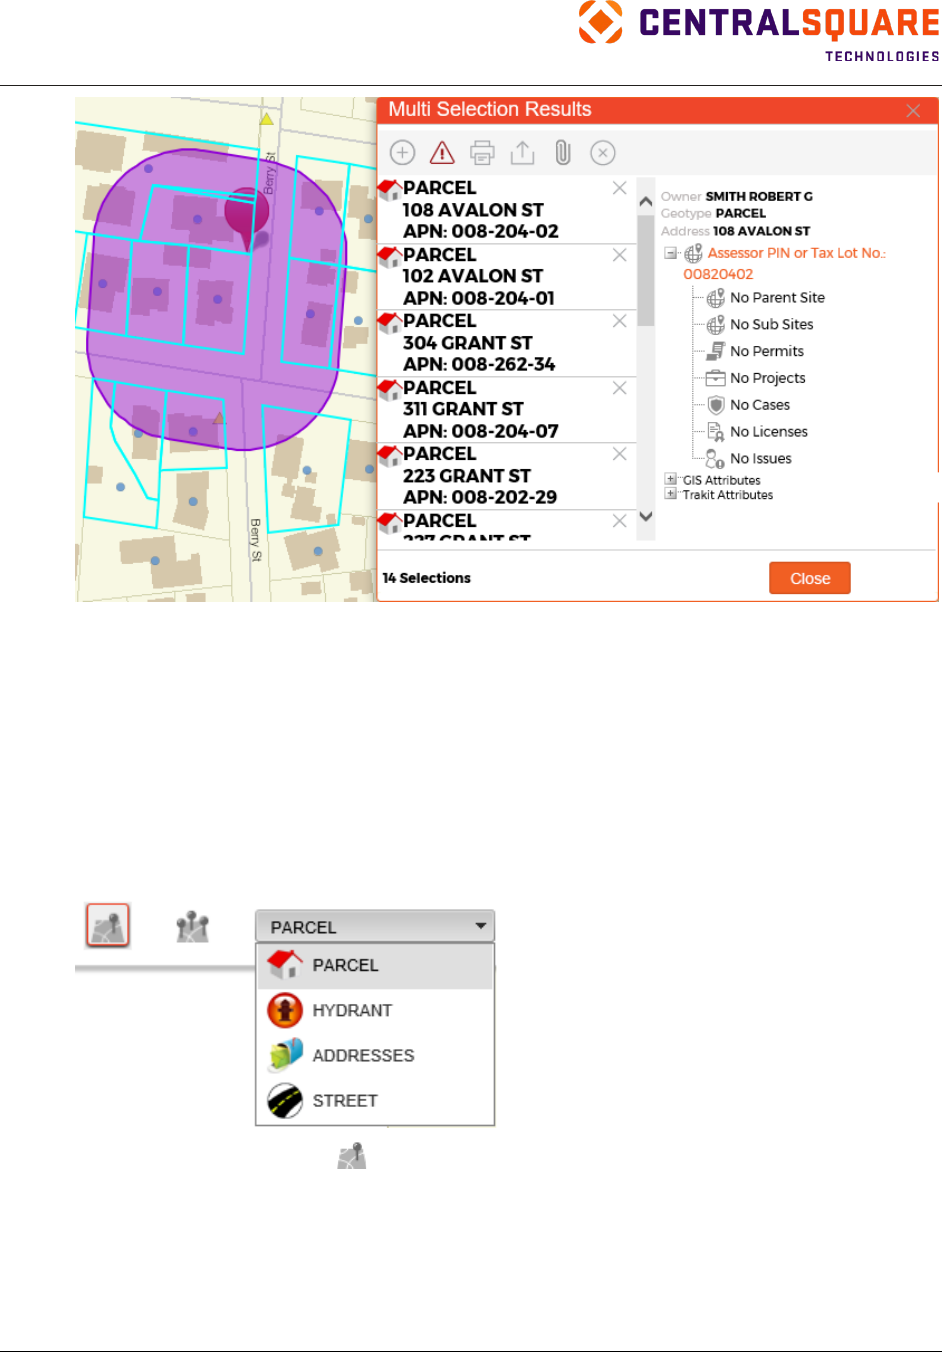
TRAKiT User Guide 18.1
Proprietary
May not be reproduced or distributed without written permission of CentralSquare Technologies.
Copyright 2018 CentralSquare Technologies. All rights reserved.
20181212JC Page 42
From the Multi Selection Results window, you can work with selection results and related records. Refer
to “Multi‐Selection Results” for more information.
Selection Features
Selection features show geometric shapes that identify a set of features.
Single Select Tool
1.
Zoom to an area of interest on the map.
2.
Select the geotype feature you want to select from the feature list.
3.
Select the Single Select tool . The pop‐up window appears.
4.
On the map, click a feature to select it. The feature you select must be the type of feature
selected in step 2. The selection is highlighted on the map and details about the selection appear
in the pop-up window.
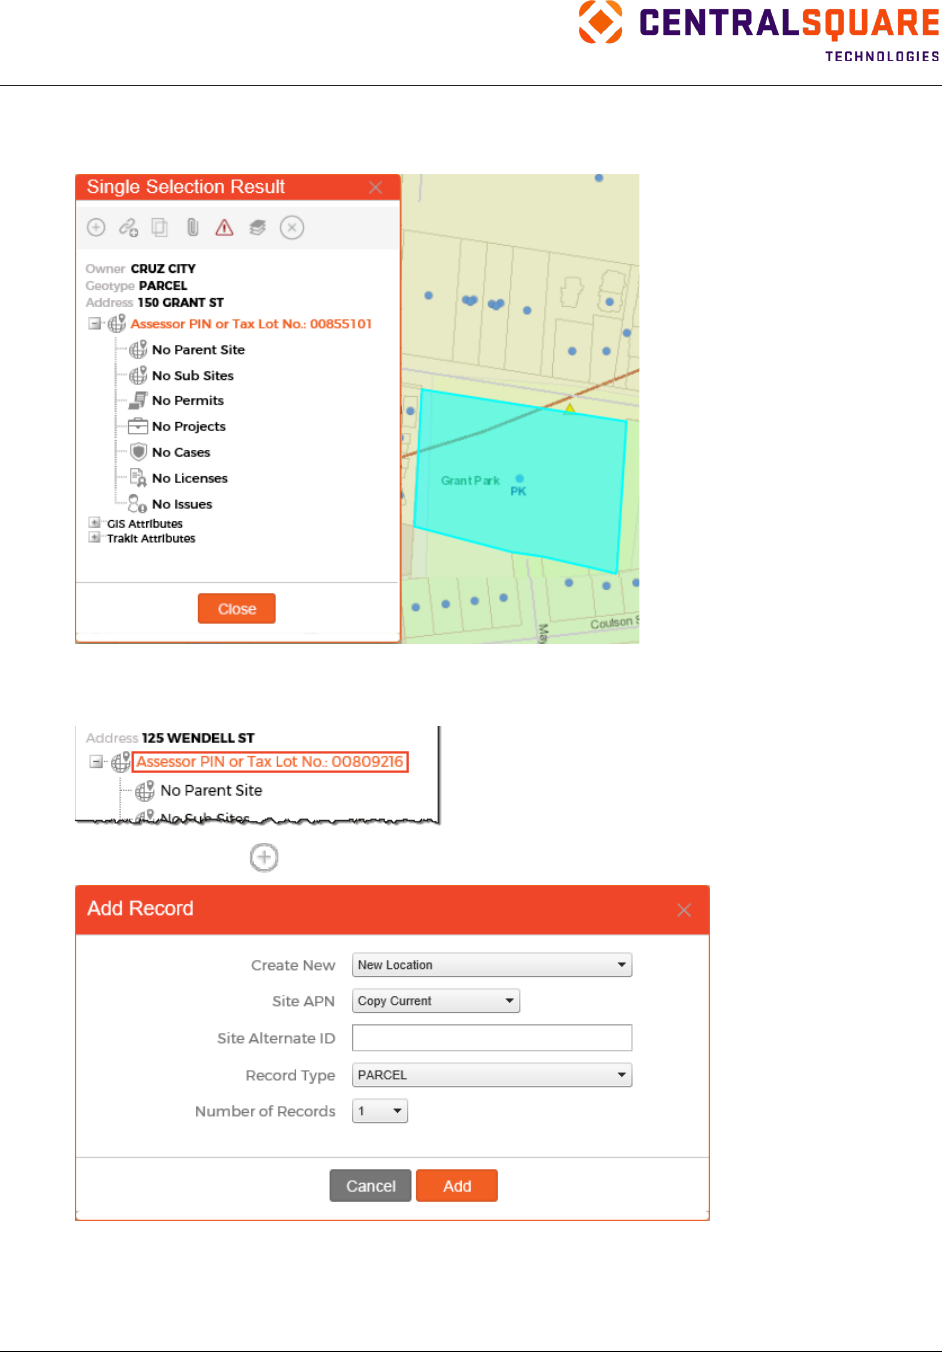
TRAKiT User Guide 18.1
Proprietary.
May not be reproduced or distributed without written permission of CentralSquare Technologies.
Copyright 2018 CentralSquare Technologies. All rights reserved.
20181212JC Page 43
Single Selection Results
The Single Selection Result window appears after you select a feature using the single select tool.
From the Single Selection Result window, you can:
•
Click a link to open a related record.
•
Add a record. Click
and then select options for the new record.
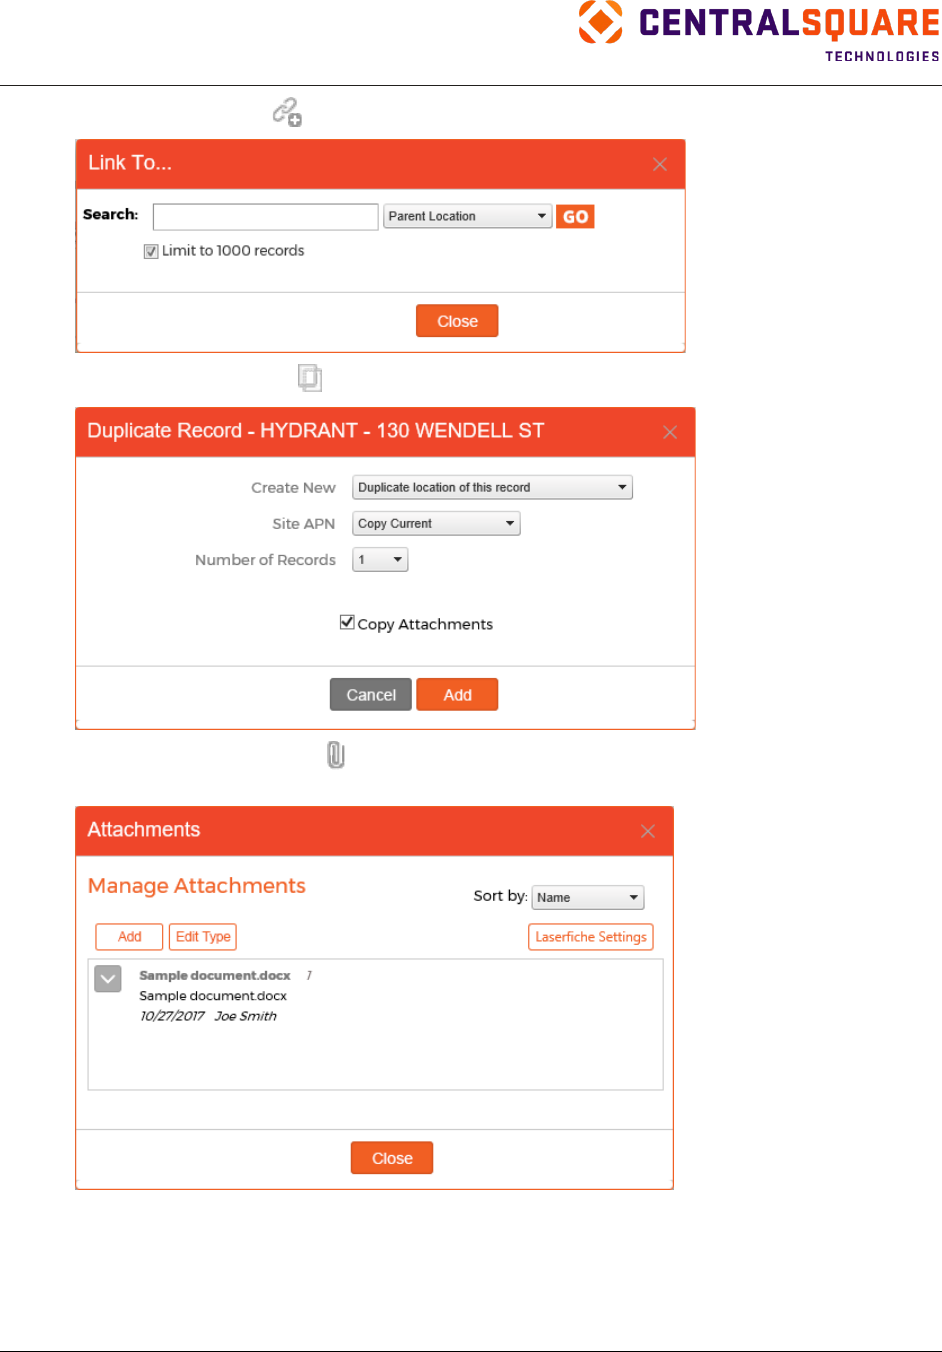
TRAKiT User Guide 18.1
Proprietary
May not be reproduced or distributed without written permission of CentralSquare Technologies.
Copyright 2018 CentralSquare Technologies. All rights reserved.
20181212JC Page 44
•
Link to a record. Click
, search for the record to link to, and select where to link the record.
•
Duplicate a record. Click and then select options for copying the current geotype record.
•
Manage attachments. Click
to add an attachment, change settings on existing attachments,
or change settings for your document management system.
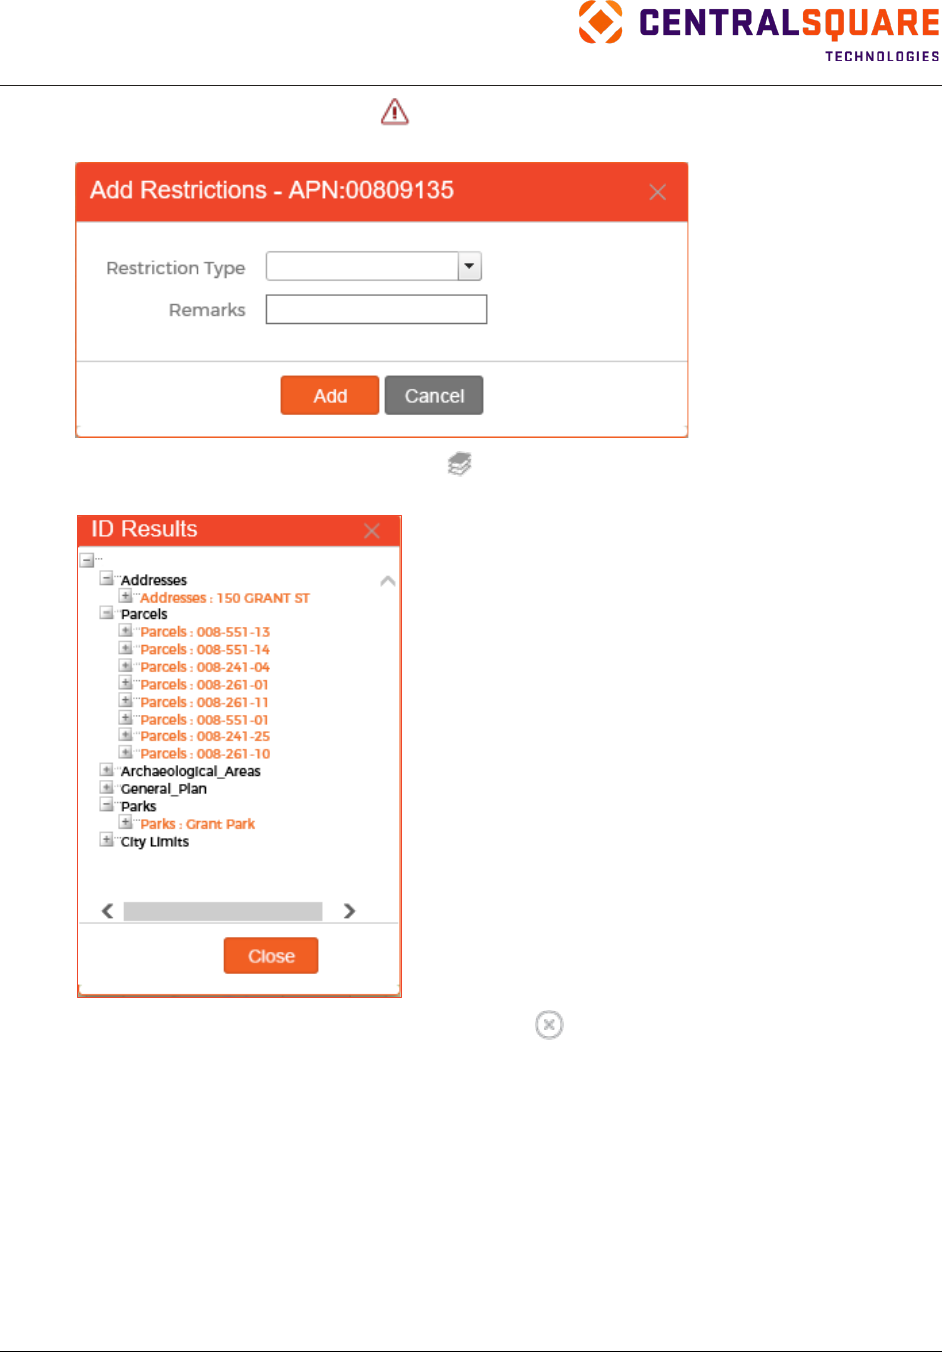
TRAKiT User Guide 18.1
Proprietary.
May not be reproduced or distributed without written permission of CentralSquare Technologies.
Copyright 2018 CentralSquare Technologies. All rights reserved.
20181212JC Page 45
•
Add a restriction to a record. Click
and then select a restriction type and type related remarks.
For more information about restrictions, see “Restrictions.”
•
Drill down to view additional details. Click
and then expand each layer to show the GIS
details.
•
Clear the active selections from the map by clicking
.
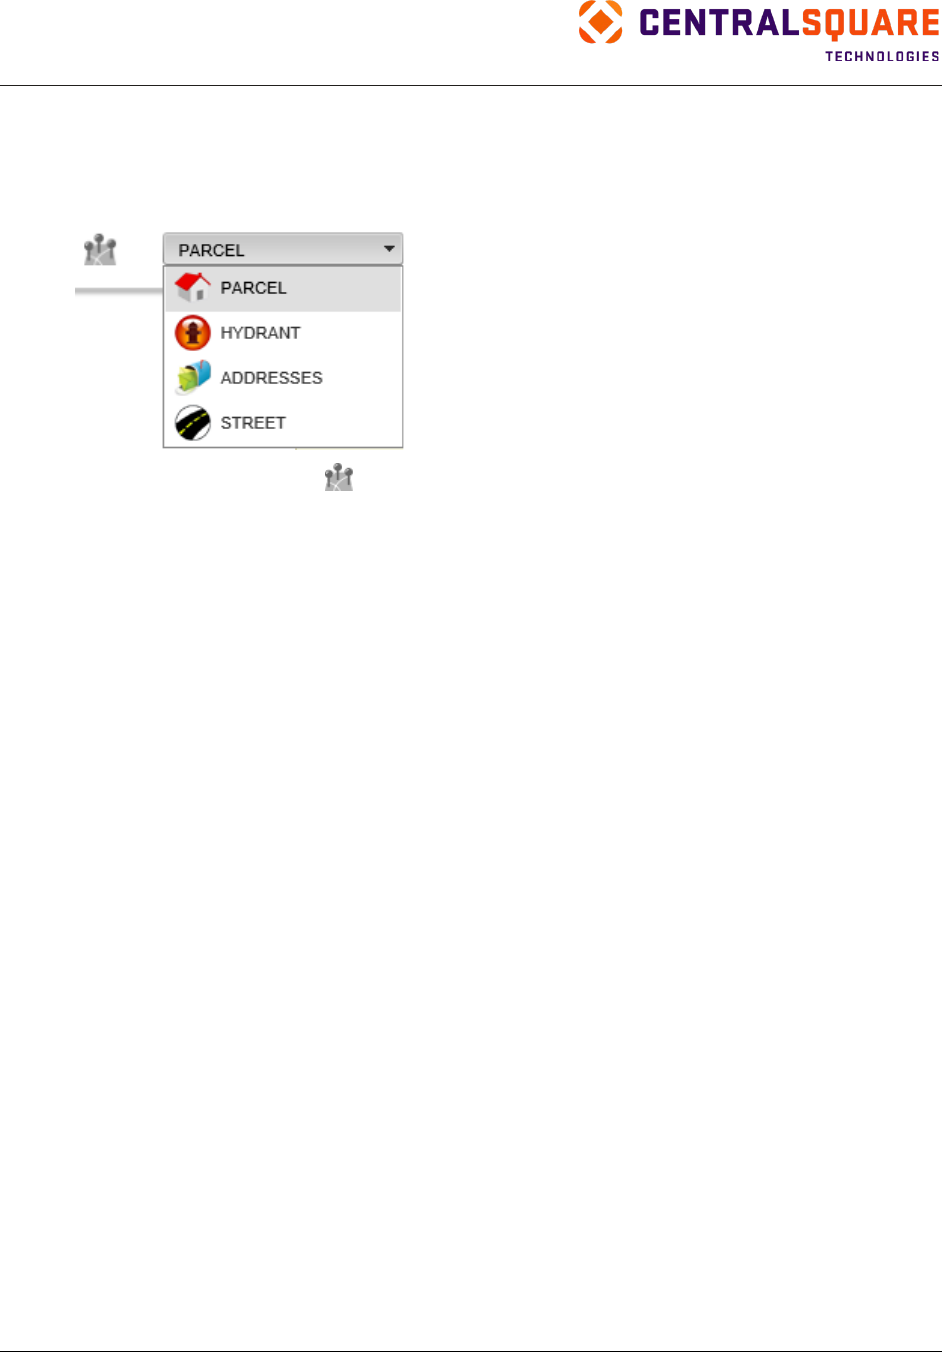
TRAKiT User Guide 18.1
Proprietary
May not be reproduced or distributed without written permission of CentralSquare Technologies.
Copyright 2018 CentralSquare Technologies. All rights reserved.
20181212JC Page 46
Multi‐Select Tool
1.
Zoom to an area of interest on the map.
2.
From the geotype feature list, select the geotype feature you want to work with.
3.
Select the Multi‐Select tool
. The pop‐up window appears.
4.
In the Multi Select window:
a. Select an option in the Selection Method field. The options are:
•
Rectangle—Click a point on the map to use as the upper left corner of the area and then
drag to include the entire area you want to select.
•
Point: Click on the map.
•
Polygon: Click a point on the map and drag to define the shape. Click for each additional
vertex. Double‐click to complete the polygon.
•
Line: Click a point on the map for the beginning point of the line. Click to add additional
points on the line. Double-click to end the line.
•
Buffer: Enter the distance of the buffer in the Distance field, select the measurement unit,
and click a feature on the map.
•
Radius: Enter the distance of the radius in the Distance field, select the measurement
unit, and click a point on the map.
•
Circle: Click a point on the map to establish the center of the circle and drag to establish
the area.
•
Ellipse: Click a point on the map to establish the center of the ellipse and drag to
establish the area.
•
Freehand Polygon: Click a point on the map to establish one corner of the polygon and
drag to complete the shape.
•
Freehand Polyline: Click a point on the map for the beginning point of the line and drag to
complete the line.
•
Travel Time: Enter the number of minutes and click on the map to view the buffer area.
•
Note: A Network Analyst Service, for example Esri or Drivetime, must be active to use
this feature.
•
Buffer Polygon: Enter the distance of the buffer, click for each vertex, and double‐click to
finish the shape.
•
Buffer Line: Enter the distance for the buffer, click for each point, and double‐click to
finish.
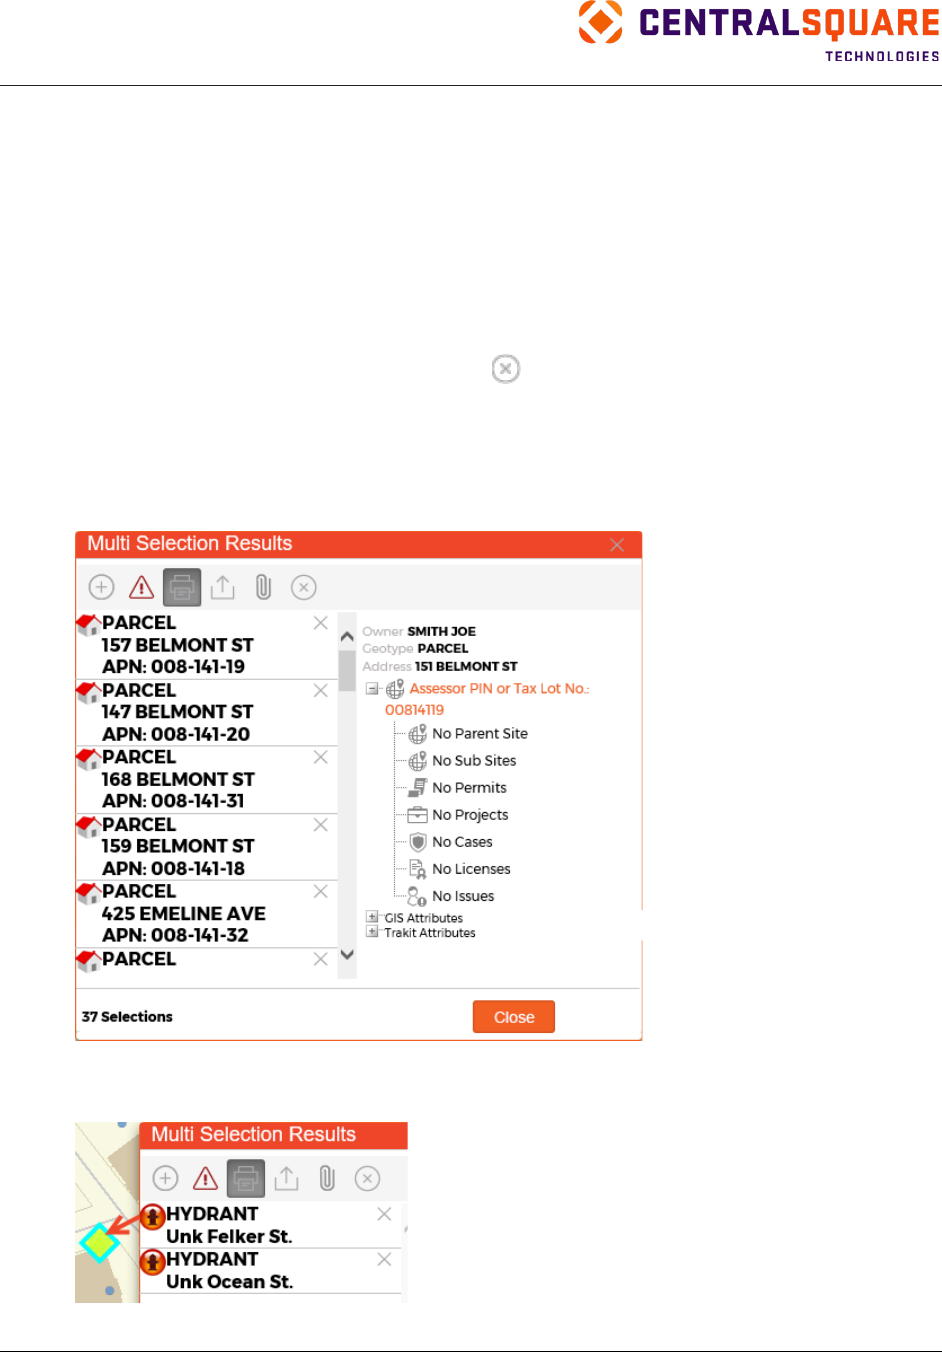
TRAKiT User Guide 18.1
Proprietary.
May not be reproduced or distributed without written permission of CentralSquare Technologies.
Copyright 2018 CentralSquare Technologies. All rights reserved.
20181212JC Page 47
b. Select an option in the Selection Type field. The options are:
•
New—Create a new selection
•
Add To—Supplement previous selections
•
Remove From—Subtract from a previous selection
c. Enter the distance and unit of measurement if applicable to your selection method.
5.
On the map, click a feature to select it. The feature you select must be the type of feature
selected in step 2. The selection is highlighted on the map and details about the selection appear
in the pop-up window.
Tip: To disable features, click Clear Selection
in the Multi Selection Results window before
exiting the Multi Select tool.
Multi‐Selection Results
The Multi Selection Results window displays the features that are within the area you selected using the
Multi Select tool.
From the Multi Selection Results window, you can:
•
Zoom to an individual geotype by clicking the icon in the results listing.
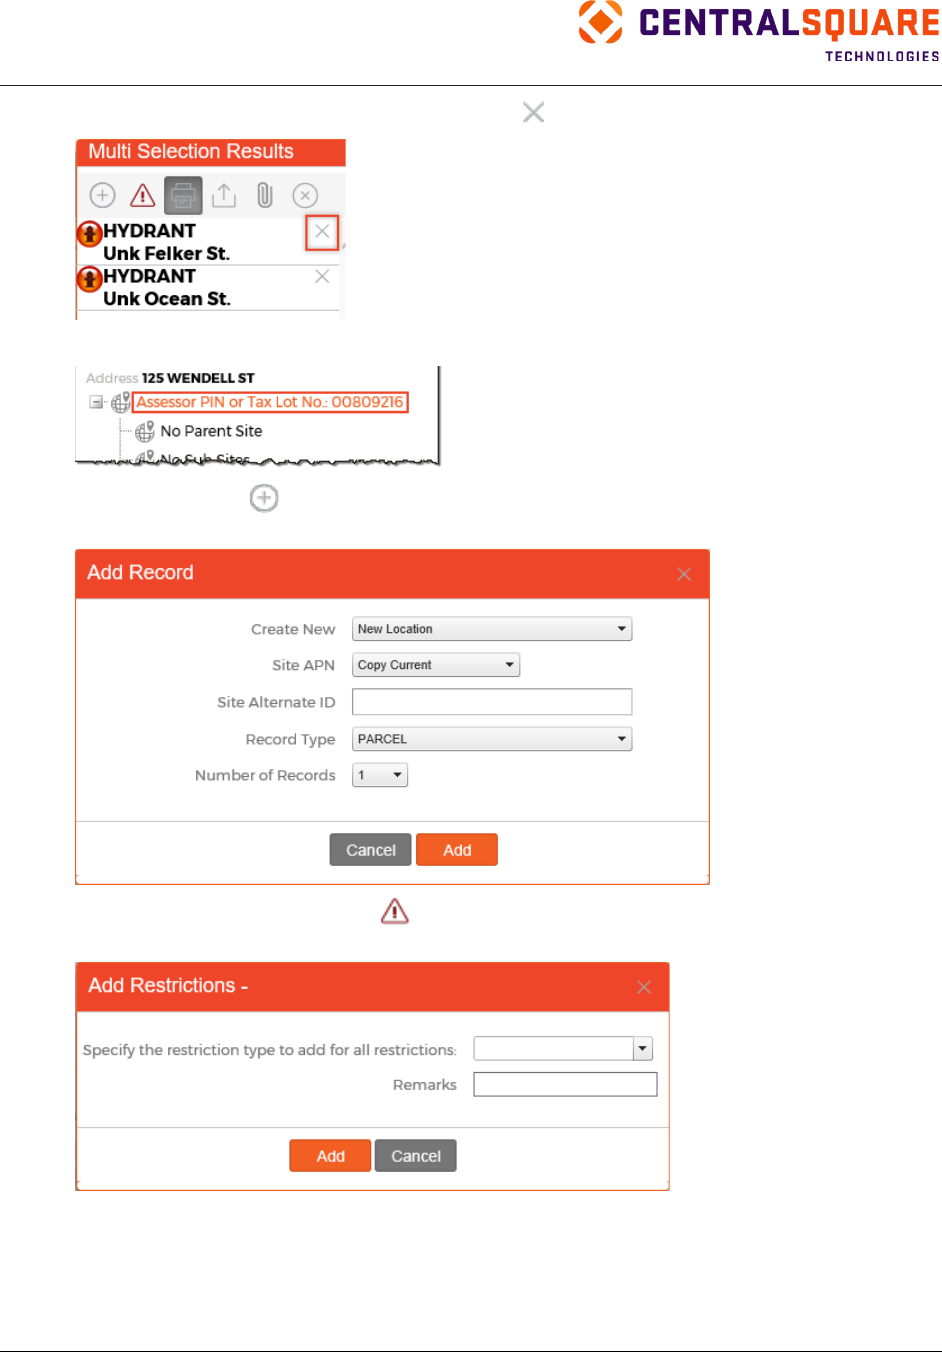
TRAKiT User Guide 18.1
Proprietary
May not be reproduced or distributed without written permission of CentralSquare Technologies.
Copyright 2018 CentralSquare Technologies. All rights reserved.
20181212JC Page 48
•
Clear a geotype from the results listing by clicking
.
•
Click a link to open a related record.
•
Add a record. Click
and then select options for the new record. For more information about
adding records, see “Adding Activity Records.”
•
Add a restriction to a record. Click
and then select a restriction type and type related remarks.
For more information about restrictions, see “Restrictions.”
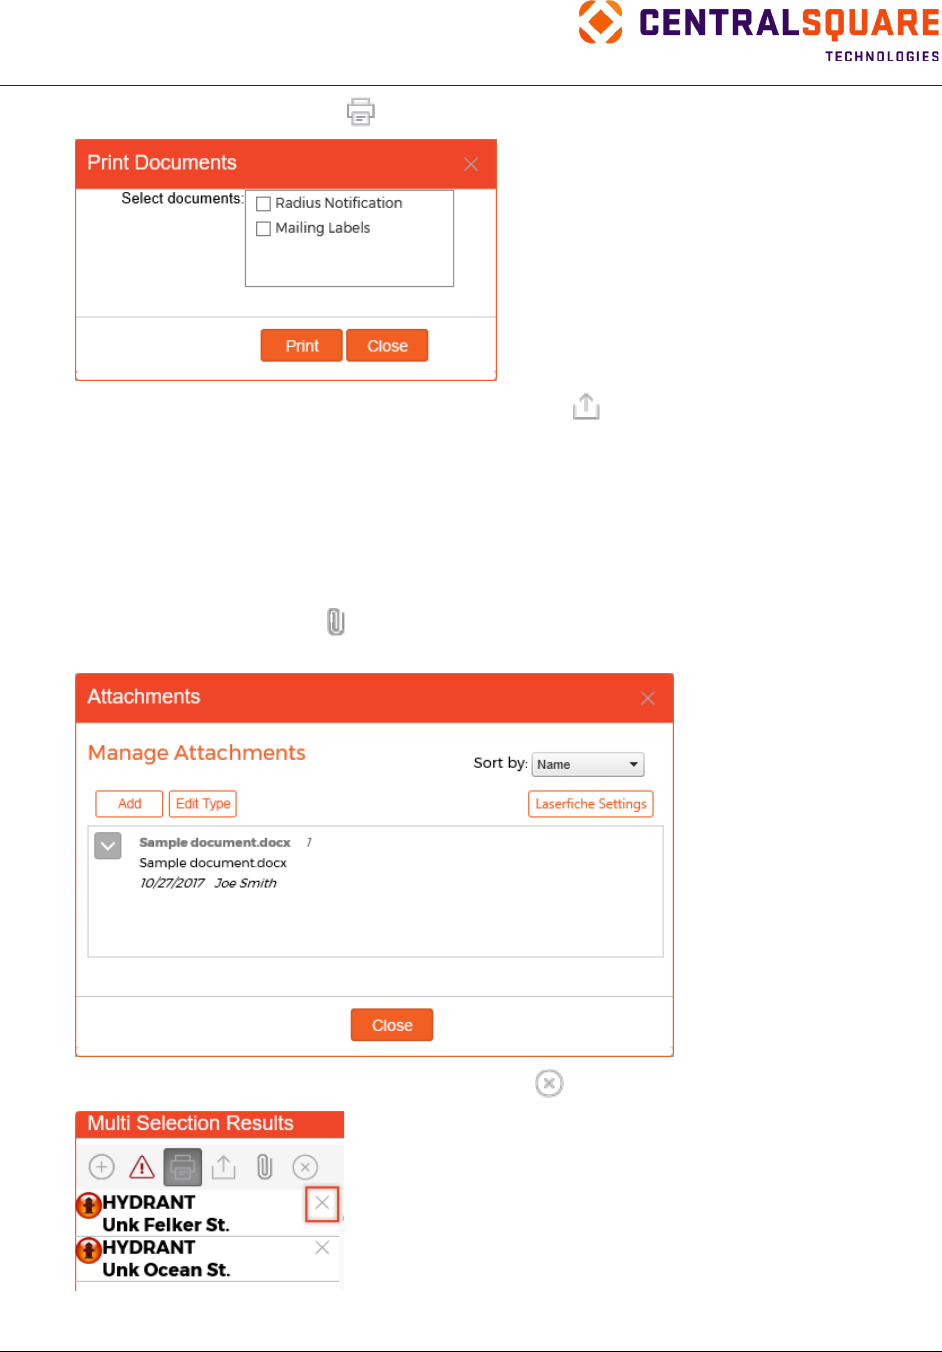
TRAKiT User Guide 18.1
Proprietary.
May not be reproduced or distributed without written permission of CentralSquare Technologies.
Copyright 2018 CentralSquare Technologies. All rights reserved.
20181212JC Page 49
•
Print related documents. Click
and then select the document(s) to print.
•
Export selection results to a Microsoft
®
Excel
®
file. Click
and then follow the directions
provided by your internet browser.
Note: When you use the Export function, the following message might appear in Microsoft Excel:
“The file format and extension of 'dataTableToExcel.xls' don't match. The file could be corrupted
or unsafe. Unless you trust its source, don't open it. Do you want to open it anyway?"
Microsoft Excel displays this message as a security measure against potentially harmful files.
Because TRAKiT is a trusted source, click Yes to continue with the export.
•
Manage attachments. Click
to add an attachment, change settings on existing attachments,
or change settings for your document management system.
•
Clear the active selections from the map by clicking
.
TRAKiT User Guide 18.1
Proprietary
May not be reproduced or distributed without written permission of CentralSquare Technologies.
Copyright 2018 CentralSquare Technologies. All rights reserved.
20181212JC Page 50
Sketching Features
Use sketching features to add, save, and edit shapes or drawings that enhance GIS data.
Sketch Tools
To use the Sketch tools, click
.
The Sketch window includes the following functions:
•
Save Sketch: Enter a name for the sketch, and select the icon again to save the sketch into
the user folder on the server.
•
Open Sketch: In the Open Sketch dialog box, you can open a saved sketch, delete a saved
sketch, or attach the sketch to a record.
•
Clear Sketch: Click to erase all active sketches on the map.
•
Edit Sketch: Select the shape to edit. The Edit Sketch window appears. Editing options
include shape, color, line color, and line width. Global editing options include:
○
Refresh sketch
○
Delete sketch
○
Save sketch
Additionally, you can move the vertices on the sketch by dragging them and you can add notes to
the sketch.
To add a sketch, complete the following steps.
In the Sketch dialog box, make the following selections:
1.
In the Sketch dialog box, make the following selections:
•
Shape—Select a shape.
•
Color—Select a fill color. This option is not available if you selected Polyline, Freehand
Polyline, or Text in the Shape field.
•
Line Color—Select a line color. This option is not available if you selected Pushpin or Text in
the Shape field.
•
Line Width: Select a line width. This option is not available if you selected Pushpin or Text
in the Shape field.
2.
Sketch a shape on the map. See the “Multi‐Select Tool” section for details about drawing most
shapes. If you selected Pushpin, Arrow, Triangle, or Text in the Shape field, single‐click on the
map to place the shape.
3.
Text: Select size, color, and font. Enter the text to appear on the map. Click anywhere on the
shape to display the notes.
Note: Text notes do not appear on printed maps.
4.
Click Close when sketches are complete.
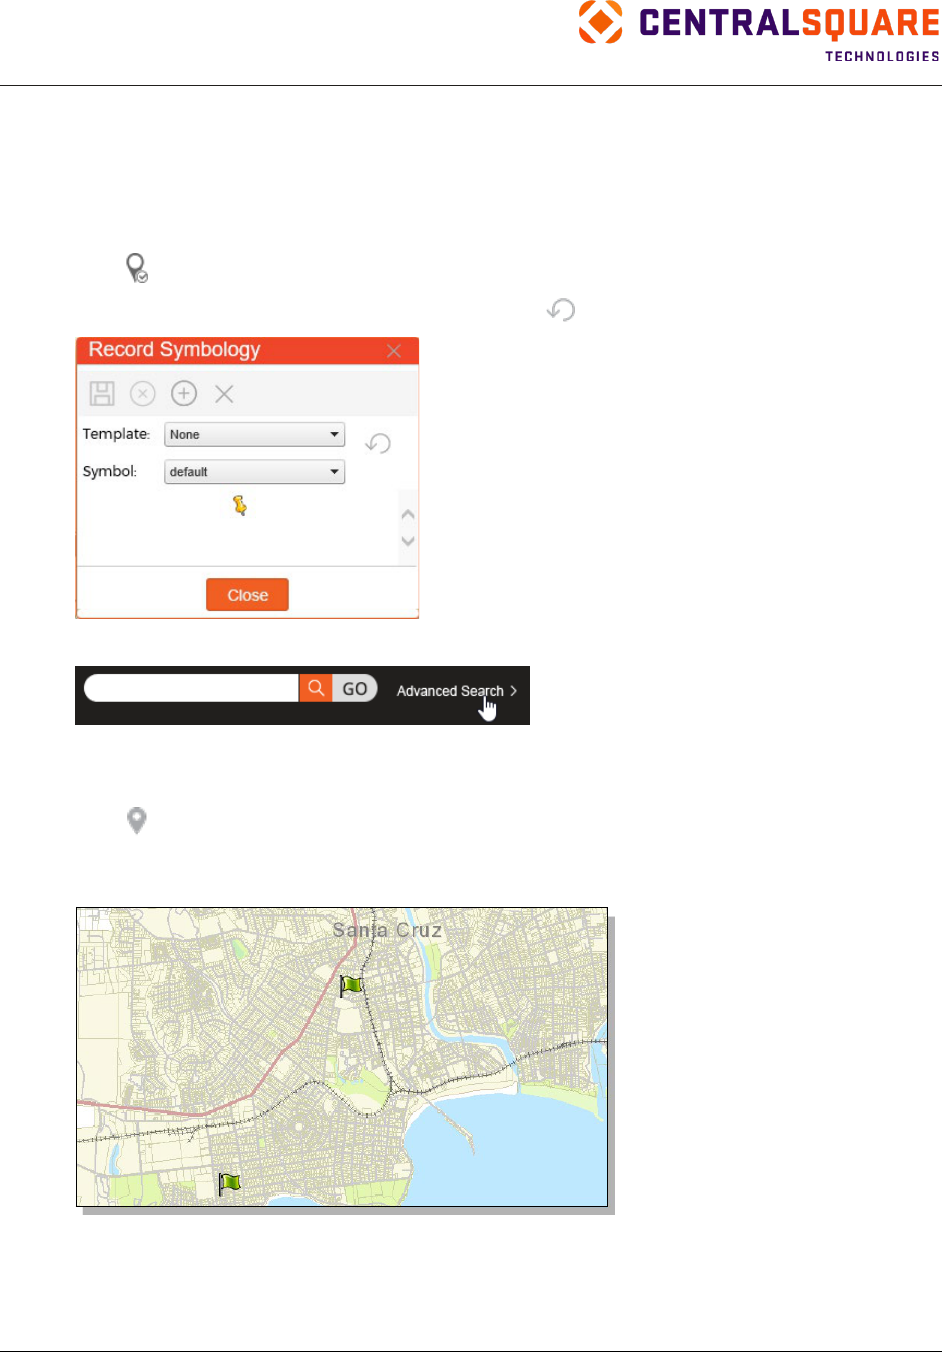
TRAKiT User Guide 18.1
Proprietary.
May not be reproduced or distributed without written permission of CentralSquare Technologies.
Copyright 2018 CentralSquare Technologies. All rights reserved.
20181212JC Page 51
Other Features
Record Symbology
Use this tool to change the pushpin symbol that is used when you select Plot on Map from the advanced
search results window. It can also be used after the search results have been plotted on the map.
1.
Click
to add a pushpin. The Record Symbology window appears.
2.
Select the desired symbol from the list and then click
.
3.
Point to Advanced Search and select a search from the menu.
4.
If necessary, choose the search parameters.
5.
Click Search. A list of records appears.
6.
Click
to display the record pushpins. You can save the results as a sketch.
Tip: Select the Full Extent tool to zoom out and see the pushpins that were placed on the map.
When you print the map, pushpins are included on the printed map.
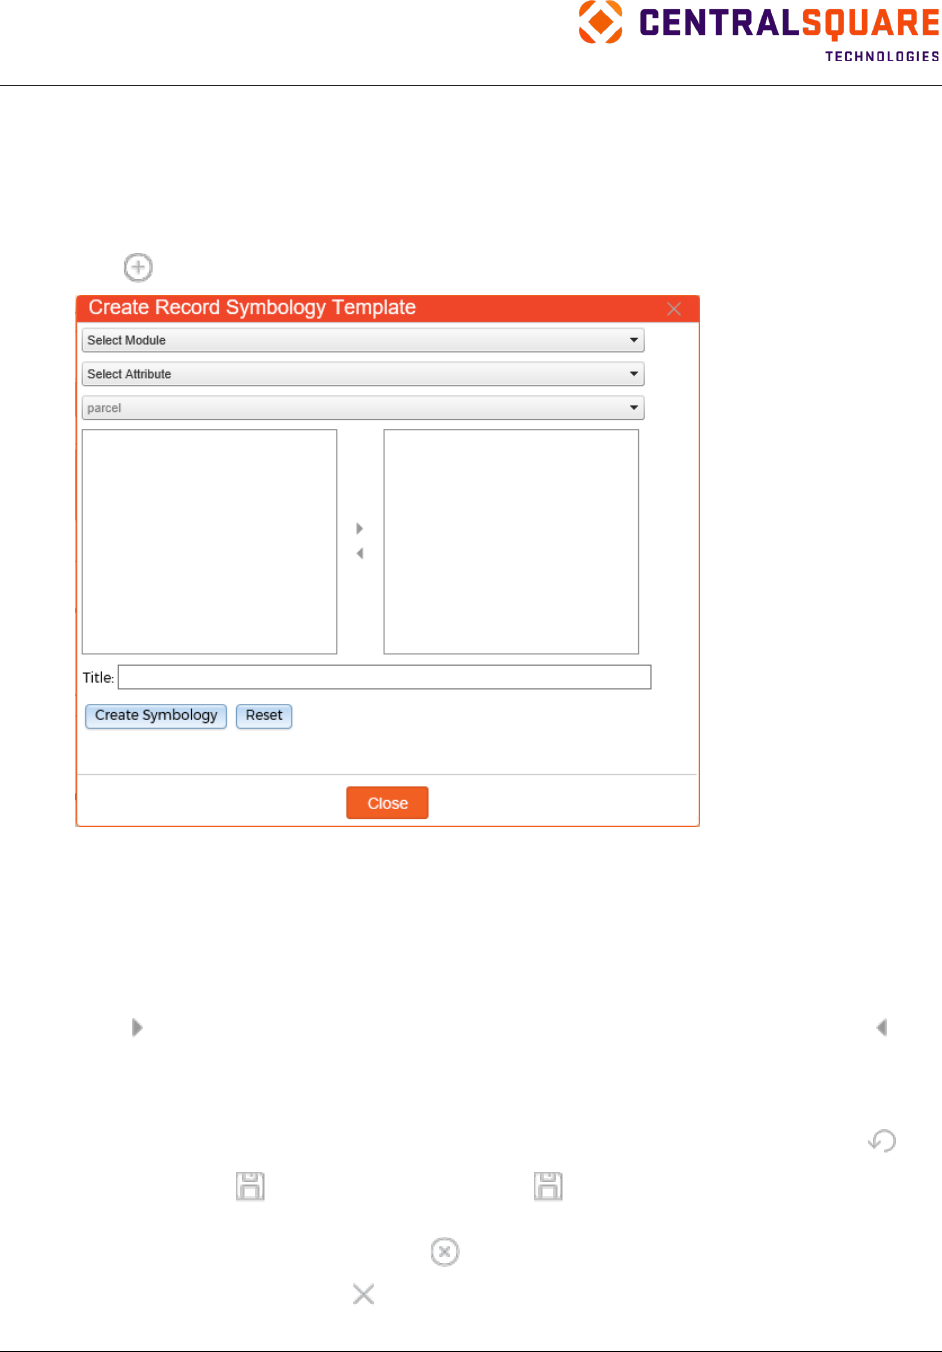
TRAKiT User Guide 18.1
Proprietary
May not be reproduced or distributed without written permission of CentralSquare Technologies.
Copyright 2018 CentralSquare Technologies. All rights reserved.
20181212JC Page 52
Pushpin Tool Symbology Templates
From the Record Symbology dialog box, you can save a sketch, clear records, add record symbology
templates, delete record symbology templates, and refresh symbology.
To add a record symbology template so that specific record types are associated with user‐selected
icons, complete the following steps:
1.
Click
.
2.
Select the module for the record.
3.
Select the module‐related attribute.
4.
Select the icon to be used.
Note: To add a custom icon, save the icon as a PNG file in the arcGIS\icons folder.
5.
Select the status or type to be represented by the icon.
6.
Click
to move the relationship into the selection box. To remove the relationship, click
.
7.
Enter a title for the template.
8.
Click Create Symbology to create the template.
To activate the template, select the template in the Record Symbology dialog box and then click
.
To save as a sketch, click
, enter a name, and then click
to save the sketch to the user folder on
the server.
To clear the active pushpins from the map, click
.
To select and remove a template, click
. In the dialog box, select one or more templates to delete and
then click Delete Symbology Template(s).
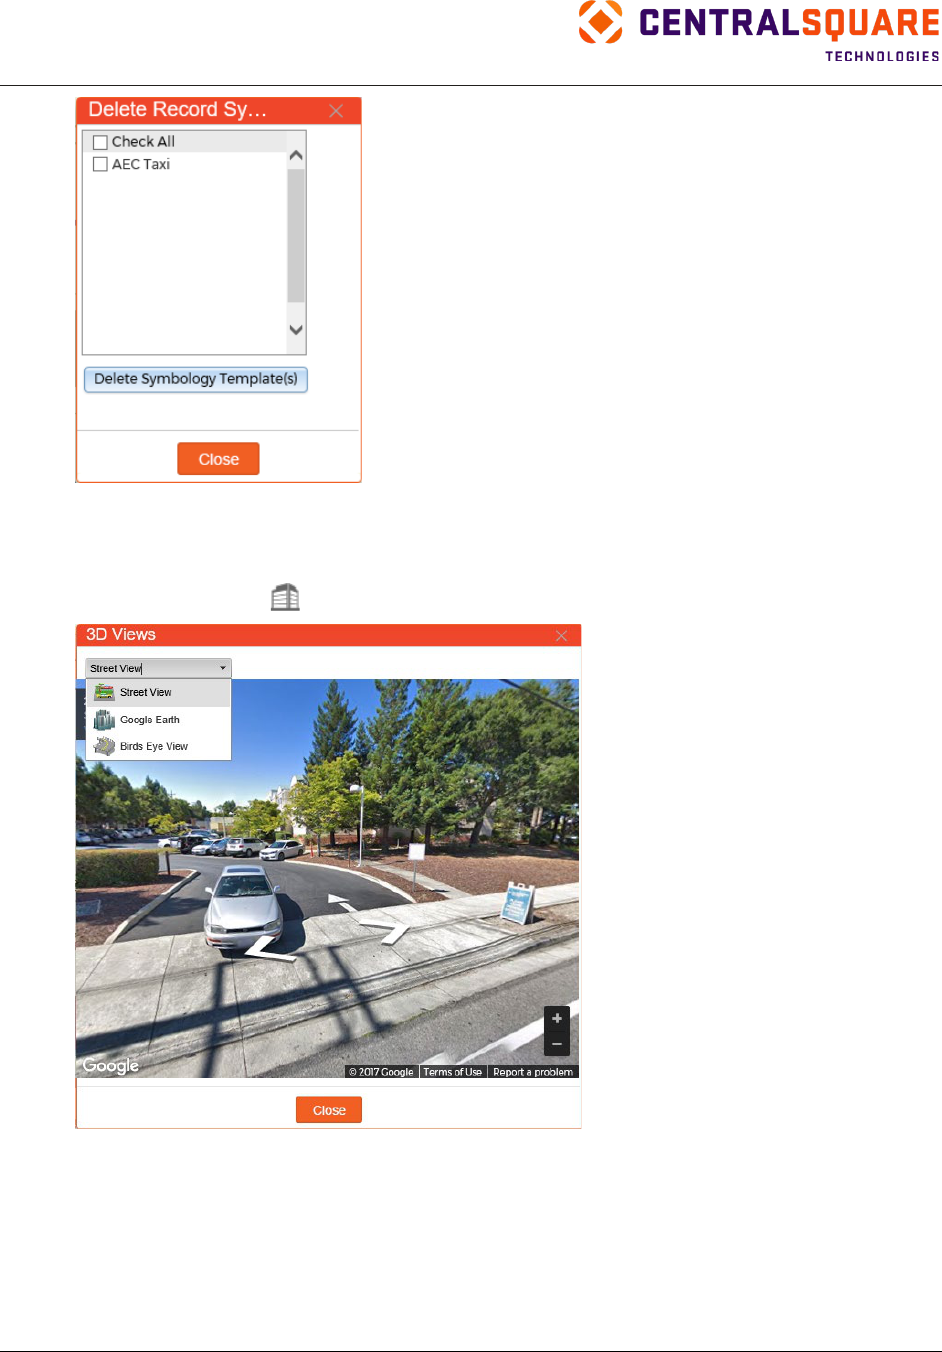
TRAKiT User Guide 18.1
Proprietary.
May not be reproduced or distributed without written permission of CentralSquare Technologies.
Copyright 2018 CentralSquare Technologies. All rights reserved.
20181212JC Page 53
3D Views Tool
Use this tool to view 3D maps in Google Street View
™
and Bing
™
Bird’s Eye View.
To view a location in 3D, click
. In the dialog box, select the view. On the map, click a location.
Tip: When using Google Street View, click close to a visible road. Clicking too far away from a road
might prevent Google Street View from loading the location.
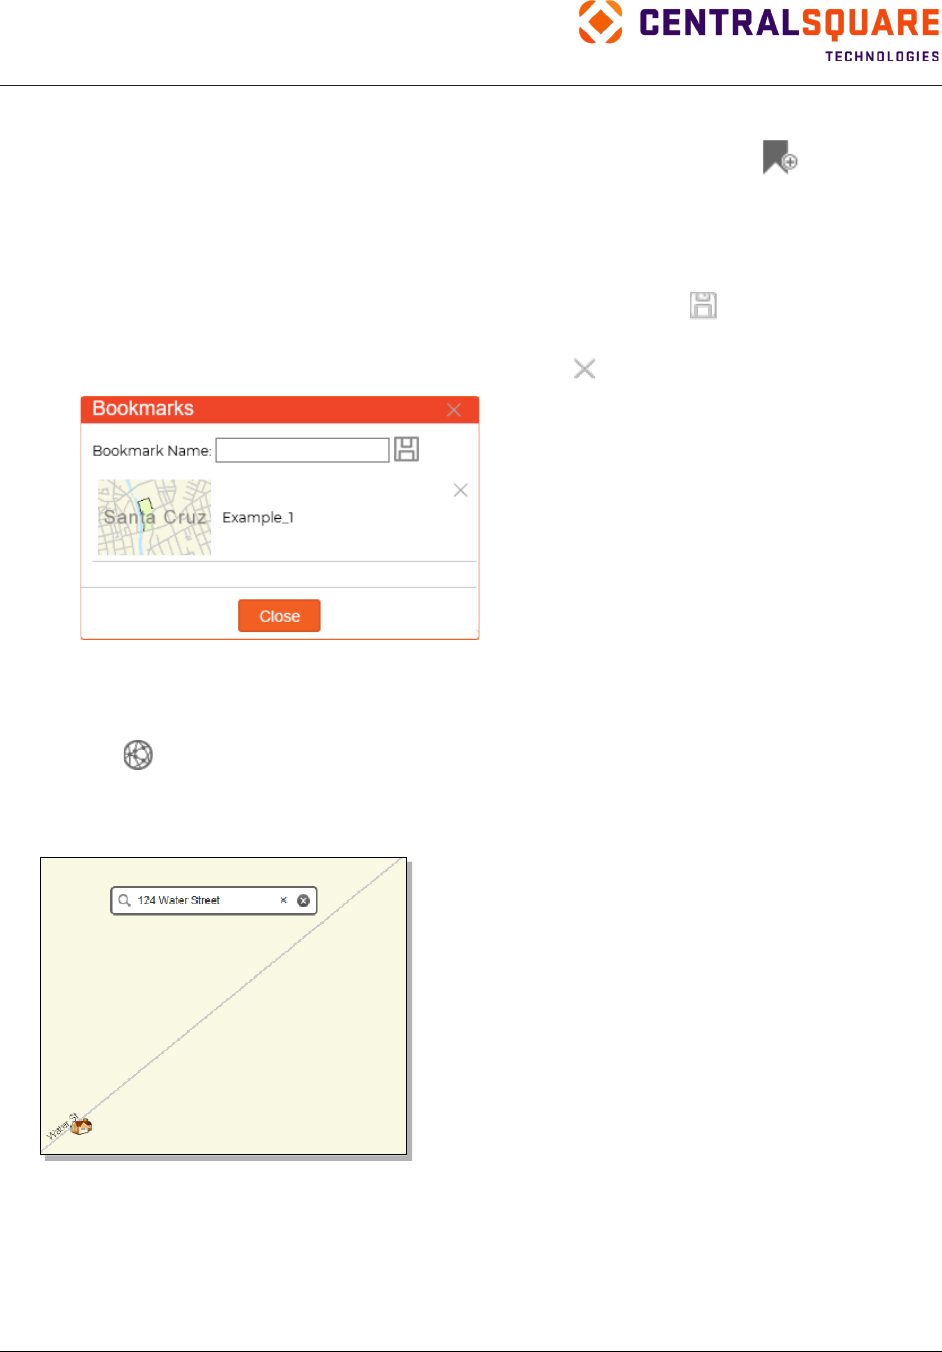
TRAKiT User Guide 18.1
Proprietary
May not be reproduced or distributed without written permission of CentralSquare Technologies.
Copyright 2018 CentralSquare Technologies. All rights reserved.
20181212JC Page 54
Bookmarks Tool
Use the Bookmarks tool to save a specific map location and magnification level. Click
to open the
Bookmarks dialog box. From this dialog box, you can:
•
View a bookmark. Click a bookmark in the list. The map view zooms to the location and
magnification of the bookmark.
•
Add a bookmark. Find the area on the map and adjust to the zoom level you want. In the
Bookmarks dialog box, type a name for the bookmark and then click
. The current map view
and name appear in the bookmark list.
•
Delete a bookmark. In the Bookmarks dialog box, click
next to the bookmark name.
GeoCode Tool
Use the GeoCode tool to zoom to a street address. Complete the following steps:
1.
Click .
2.
Enter the street address, including number and street name.
3.
Press Enter.
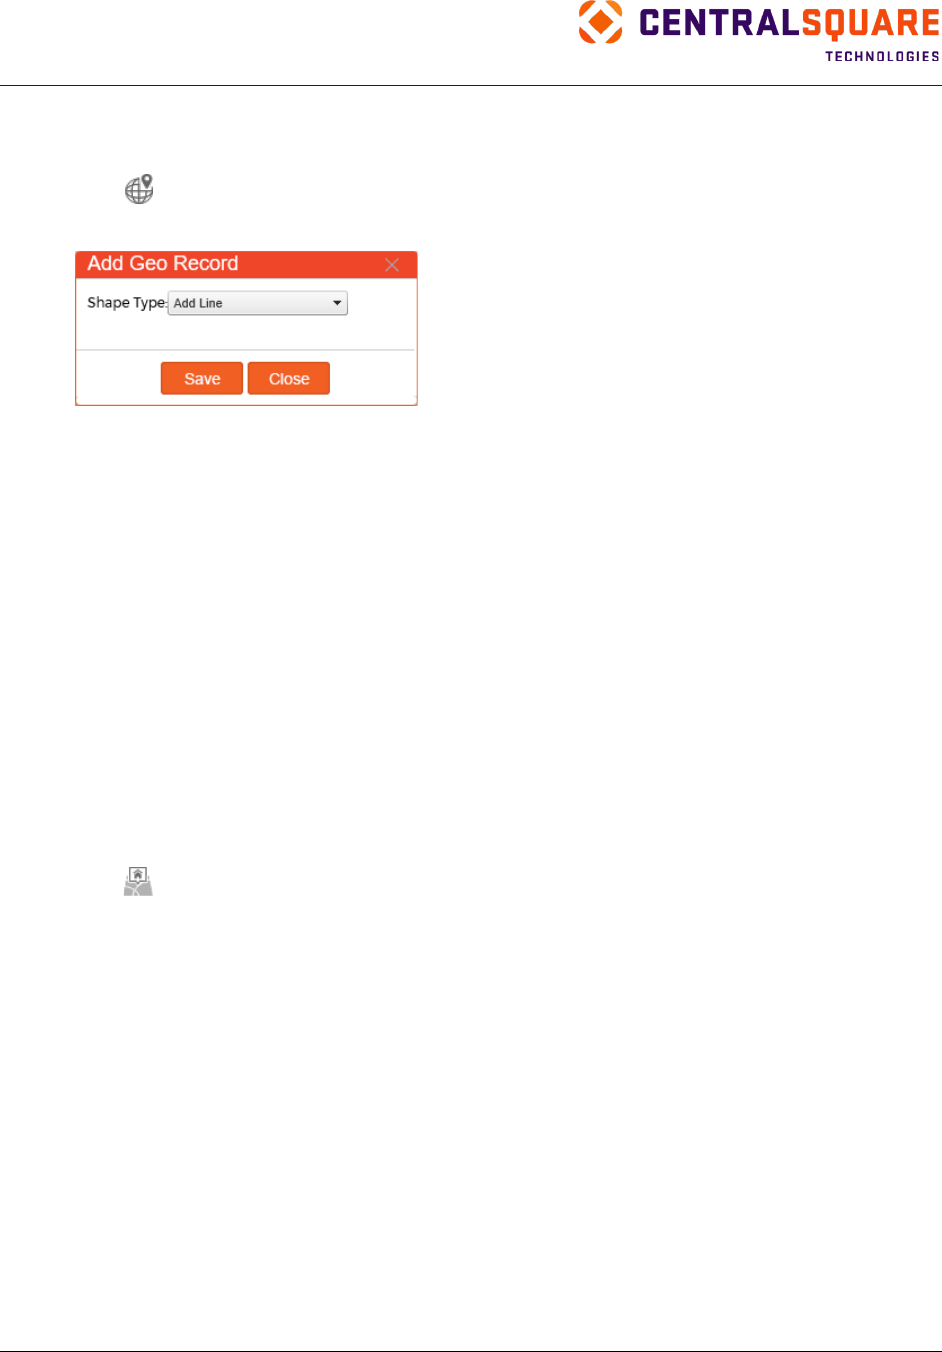
TRAKiT User Guide 18.1
Proprietary.
May not be reproduced or distributed without written permission of CentralSquare Technologies.
Copyright 2018 CentralSquare Technologies. All rights reserved.
20181212JC Page 55
Add GeoRecord Tool
Use the Add GeoRecord tool to add a point, line, or polygon shape as a geo record.
1.
Click
.
2.
In the Add Geo Record dialog box, select the shape type.
3.
Draw the shape on the map based on the shape type you selected.
•
If you selected Add Point, click a point on the map.
•
If you selected Add Line, click on the map to set the starting point of the line. Click additional
points on the map to set intermediate points on the line (for example, to change the direction
of the line to follow a road or border a building). Double-click to set the ending point of the
line.
•
If you selected Add Polygon, click on the map to set one corner of the polygon. Click
additional points on the map to set additional corners. Double‐click a point on the map to
close the shape.
4.
In the Add Geo Record dialog box, click Save. Click Add in the confirmation dialog box.
The new record opens in GeoTRAK, allowing permits and other information to be added.
Plot Inspections Tool
Use the Plot Inspections tool to place location pushpins on the map for inspections.
To plot inspections, complete the following steps:
1.
Click
.
2.
In the Plot Inspections dialog box, make selections for the following options:
a. Inspector: Select the name of one or more inspectors or select All to plot inspections for all
inspectors. The default inspector is the current user.
b. Groups: Select one or more categories (such as permits and licenses) or select All to plot
inspections for all categories.
c. Type: Select one or more types that correspond to the value you selected for Group or select
All to plot inspections for all types.
d. Filter: Select an option for filtering inspections based on whether the inspection is scheduled,
completed, incomplete, or overdue.
e. Date Range: Select a predefined date range (such as today, tomorrow, or yesterday) or
choose Selected Dates.
f. Start Date and End Date: If you chose Selected Dates in the Date Range field, enter start
and end dates. If you selected a predefined date range in the Date Range field, you do not
need to enter start and end dates.
TRAKiT User Guide 18.1
Proprietary
May not be reproduced or distributed without written permission of CentralSquare Technologies.
Copyright 2018 CentralSquare Technologies. All rights reserved.
20181212JC Page 56
g. Sort By: Select the field you want to use to sort inspections and whether to sort in ascending
or descending order.
3.
Click OK.
Clear Graphics Tool
Use the Clear Graphics tool to remove all graphics that you added to the map, such as sketches,
measurement selections, and ID pushpins. To remove all graphics, click
on the GIS toolbar.
Advanced GIS Search Tool
Use the Advanced GIS Search tool to apply a query to a specific area drawn on the map.
To use the Advanced GIS Search tool:
1.
On the GIS toolbar, click
.
2.
Choose a selection method (for example, a polygon, buffer, or radius).
3.
Draw the selected shape on the map. Refer to the “Multi‐Select Tool” section for details about
drawing shapes.
4.
When the advanced search window appears, select the parameters.
•
Search Results Format—Select to access and change the current search settings. In this
screen, the
module and field settings can be changed, additional parameters added or
removed, and settings saved as a new default by checking the Default Format box. New
formats can also be saved, reloaded, and removed here.
Note: When license type and permit type fields are added under Search Results
Format, additional checkboxes might be selectable in the advanced search.
•
Save—Enter a name in the Save Search to My Profile as field and select to save a search.
•
Locate in (Module): Select the module in which to focus the search.
•
Using Format: Use the default search, select My Last Search, or select a saved search
from the drop‐down.
•
Limit To: Use the default setting or select an option to return a limited number of records.
•
Select the desired search field from the first drop‐down menu. Fields will vary per module.
•
Select a search condition from the second drop‐down menu. Choices are: Contains, Is, Is
Not, Begins With.
•
Enter the criteria for the search in the field provided.
•
Add: Select to add another line of search criteria.
•
Delete: Select to delete the line of search criteria.
5.
Click Search to view the listed record results. The result window includes the following options:
•
Edit Search—Select to view and change current search parameters.
•
New Search—Select to return to the initial query screen that has no search parameters
selected.
•
Export Results—Select to save your search results in a Microsoft Excel file.
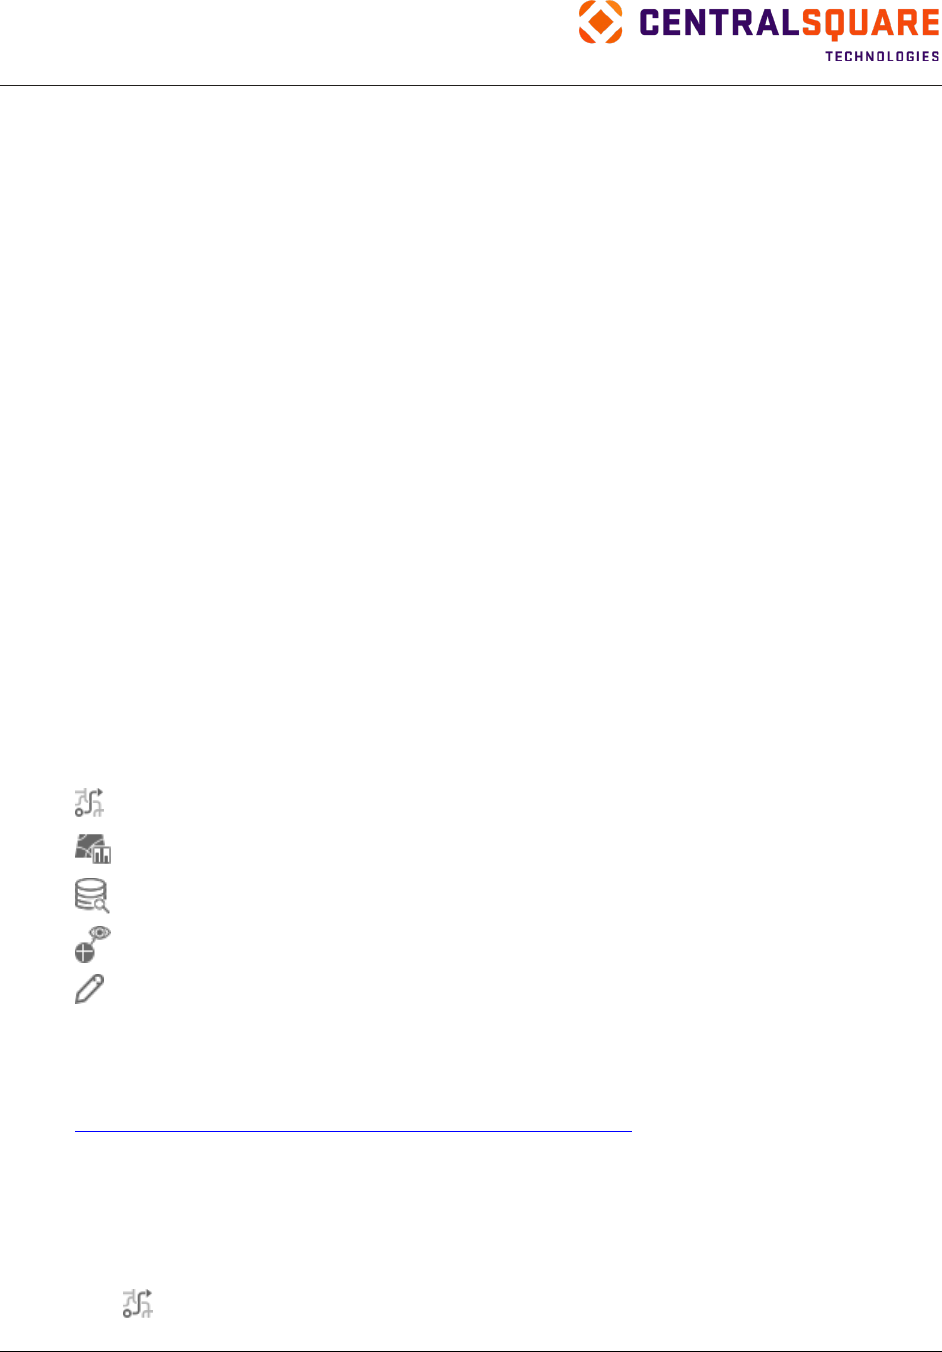
TRAKiT User Guide 18.1
Proprietary.
May not be reproduced or distributed without written permission of CentralSquare Technologies.
Copyright 2018 CentralSquare Technologies. All rights reserved.
20181212JC Page 57
Note: When you use the Export function, the following message might appear in Microsoft
Excel:
“The file format and extension of 'RadGridExport.xls' don't match. The file could be corrupted
or unsafe. Unless you trust its source, don't open it. Do you want to open it anyway?"
Microsoft Excel displays this message as a security measure against potentially harmful files.
Because TRAKiT is a trusted source, click Yes to continue with the export.
•
Browse—Select to load records from the resulting list to review one at a time.
•
Plot on Map—Select to place pushpins on record locations on the map.
Print Tool (GIS)
Use this tool to print a GIS map with or without annotations, margins, date, ratio, and scale.
1.
On the GIS toolbar:
•
Click Print to print the map using your default print settings
or
•
Click the Print arrow and then select a print option
TRAKiT processes the print job. When processing is complete, the Print tool button changes to a
Printout link.
2.
Click Printout to view the map in the default application.
3.
In the default application, you can view, save, or print the map.
GIS Professional
If you are licensed at the GIS Professional level, the following additional features are available in GIS:
•
Route Inspections
tool
•
Charting
tool
•
Advanced Query tool
•
Visual Analysis
tool
•
Edit Features tool
Note: The above tools require special services.
•
ArcGIS API update to JavaScript v3.13, which contains a variety of functional enhancements
Note: For more information about the ArcGIS API update, see
https://developers.arcgis.com/javascript/jshelp/whats_new.html
.
Route Inspections Tool
Use the Route Inspections tool to create a custom route for scheduled inspections including the ability to
rearrange the inspection order and produce driving directions.
To create a custom route, complete the following steps:
1.
Click
.

TRAKiT User Guide 18.1
Proprietary
May not be reproduced or distributed without written permission of CentralSquare Technologies.
Copyright 2018 CentralSquare Technologies. All rights reserved.
20181212JC Page 58
2.
Select the inspector name from the drop‐down list.
3.
Select the inspection start and end dates.
4.
Click Plot. The inspection locations appear on the map and the Routing dialog box appears.
5.
In the Routing dialog box, you can:
•
Refresh. Click to display the route on the map; repeat to update after changes.
•
Delete Route. Click to clear the entire route, including the locations.
•
Print. Click to print the step‐by‐step driving directions of the inspection route.
6.
The Inspections tab displays a list of the inspection route addresses, including a hyperlink to the
GeoTRAK record and a hyperlink to the inspection linked permit, code, or license record. On this
tab, you can:
•
Delete. Click to remove a specific location from the route.
•
Rearrange. Select an address and drag it up or down in the list until a small gray arrow
appears at the new placement.
•
Edit Inspection. Click to enter site follow‐up notes on an inspection record.
7.
The Directions tab displays step‐by‐step driving directions for the inspection route. Click the
refresh button to display the directions.
Tip: A Network Analyst Service must be active to use the driving directions feature.
Edit Features Tool
Use the Edit Features tool
to save, cancel, undo, redo, navigate, and zoom in.
Note: Use Undo to reverse the action from the last save. If your edit was not saved, use Cancel to
reverse the last unsaved action. Use Redo to restore forward with respect to the last save.
When the Edit Features tool is selected, all other tools on the toolbar are unavailable.
The Edit Features dialog box includes the following tabs:
•
Edit Tools—Use the tools on this tab to move, size, shape, delete, or add features. The selected
layer determines which tools will be active for use on that feature layer.
Note: Edit tools utilize advanced GIS functions and system administrators can restrict user
access to any or all of the individual edit tools, depending upon the specific goals of the agency.
Note: Depending on the map being used, the area must be zoomed 2–5x in order to see
available features and select the feature layer. Although it can be altered by the system
administrator, the necessary view is typically limited to show 1,000 features due to the vast
amount of geographic data being accessed.
○
Edit Feature Attributes—When a feature is selected, the Edit Feature tool is used to access
the geodata downloaded from the assessor.
○
Warning: While these fields might be editable, some information might still be overwritten by
the next download of assessor data.
○
Edit Feature Vertices—This tool allows the selected object to be changed by dragging the
active vertices.
○
Move Feature—This tool allows the selected object to be moved by dragging the mouse in
any direction.

TRAKiT User Guide 18.1
Proprietary.
May not be reproduced or distributed without written permission of CentralSquare Technologies.
Copyright 2018 CentralSquare Technologies. All rights reserved.
20181212JC Page 59
○
Rotate Feature—This tool allows the selected object to be rotated by selecting and moving
the active handle.
○
Scale Feature—This tool allows the object to be enlarged or reduced in size by selecting and
moving the handles.
○
Reshape Feature—This tool allows the selected object to be reshaped by drawing a line
through the selected feature to form a new shape. A confirmation message appears before
the action is completed.
○
Cut Feature—This tool allows the selected object to be separated into two shapes by
drawing a line through it to create two separate polygons. A confirmation message appears
before the action is completed.
○
Select Features to Delete—This tool allows the selected object to be deleted and presents a
confirmation message before completing the action.
○
Add Feature—This tool allows the user to create a feature on the currently selected layer.
The user must choose from available options (for example, a zone designation) before the
zone feature can be drawn.
•
Snapping Tool—Use this tab when drawing. Select the Enable Snapping option, and select a
layer on which to apply the snapping function. While drawing, press the Ctrl key to snap.
•
Layer Transparency—Use this tab to adjust the transparency of the selected layer.
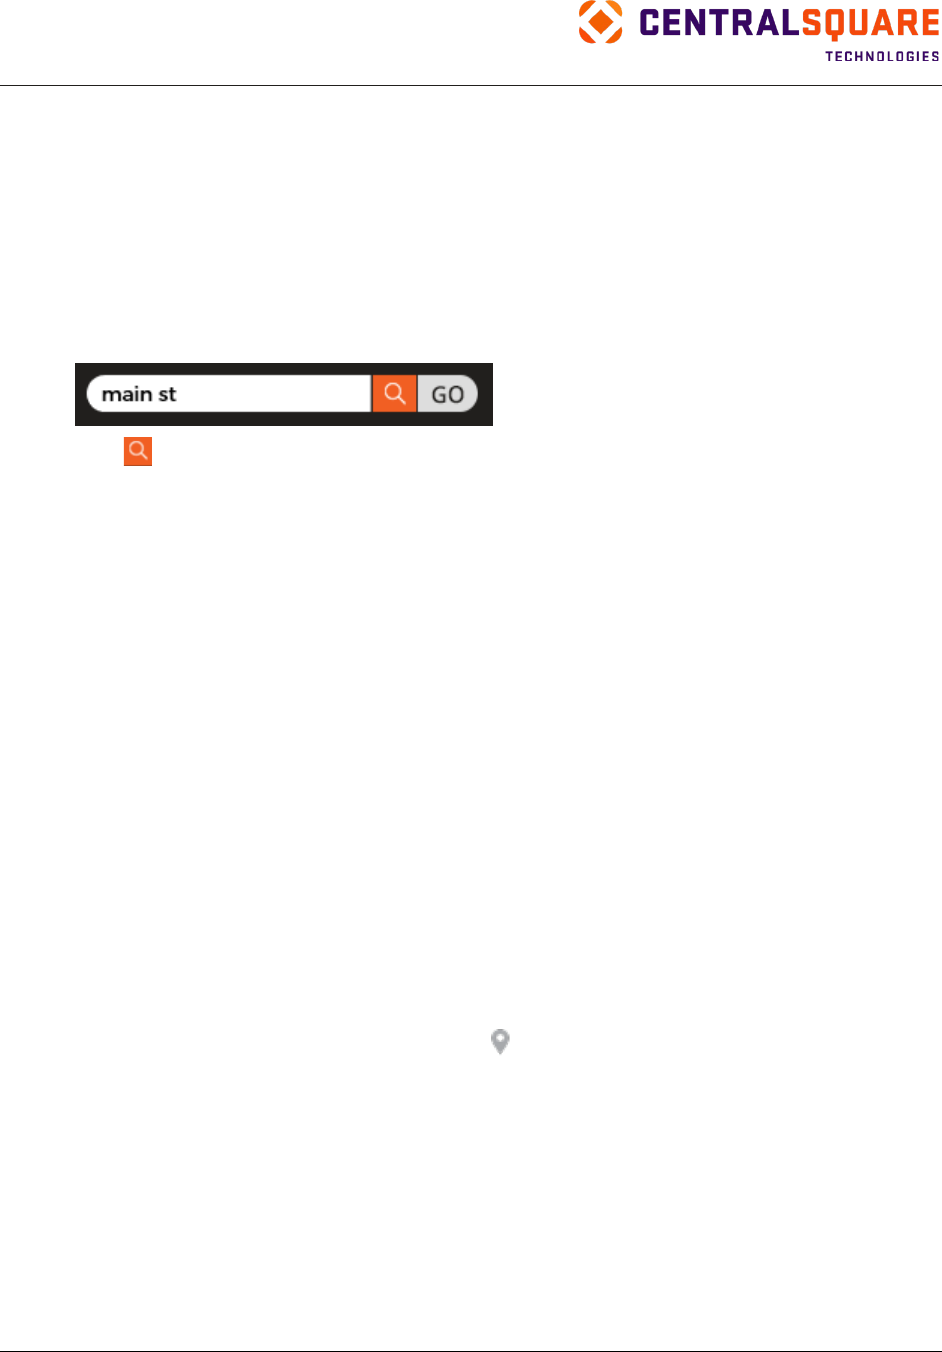
TRAKiT User Guide 18.1
Proprietary
May not be reproduced or distributed without written permission of CentralSquare Technologies.
Copyright 2018 CentralSquare Technologies. All rights reserved.
20181212JC Page 60
Locating Records
Overview
TRAKiT provides multiple tools to find records, including simple search and advanced search.
Global Search
Use the search field in the TRAKiT header to perform a simple search.
1.
Type the word, phrase, or number you want to search for.
2.
Click or Go to search for all records that contain your criteria. TRAKiT searches the following
fields for records that match your search text: parcel number, alternate site ID, record number,
site address, city, owner name, company name, and description. Results appear in the Global
Search dialog box.
3.
In the Global Search dialog box, you can make the following selections:
•
Change your search term. Type a word, phrase, or number in the Search field and then click
GO.
•
Limit results to GIS records. Select the Search GIS option and then click GO.
•
Open the Advanced Search feature. Click the Advanced Search link.
•
Narrow your results to a specific module. In the Filter by field, select a module.
•
Save a default module to search. Select the module you want to search by default and then
click
to save the selected filter as the default. After you save a default, search results are
limited to the module you selected and saved. At any time, you can expand search results to
other modules by changing the Filter by field or you can select a different module or All
Modules and save your new selection as the default.
Note: The
button appears only when the Filter by field is different than your saved setting.
•
Limit the number of results or view all results. Select the Limit to x records option to limit
results to the number of records you selected in the # of Global Search Rows option in user
Options > Search. Clear this option to see all results that match your search term.
•
View a record. Click the link in the Record # column.
•
View the record’s location on a map. Click
. This option might not be available for some
records.
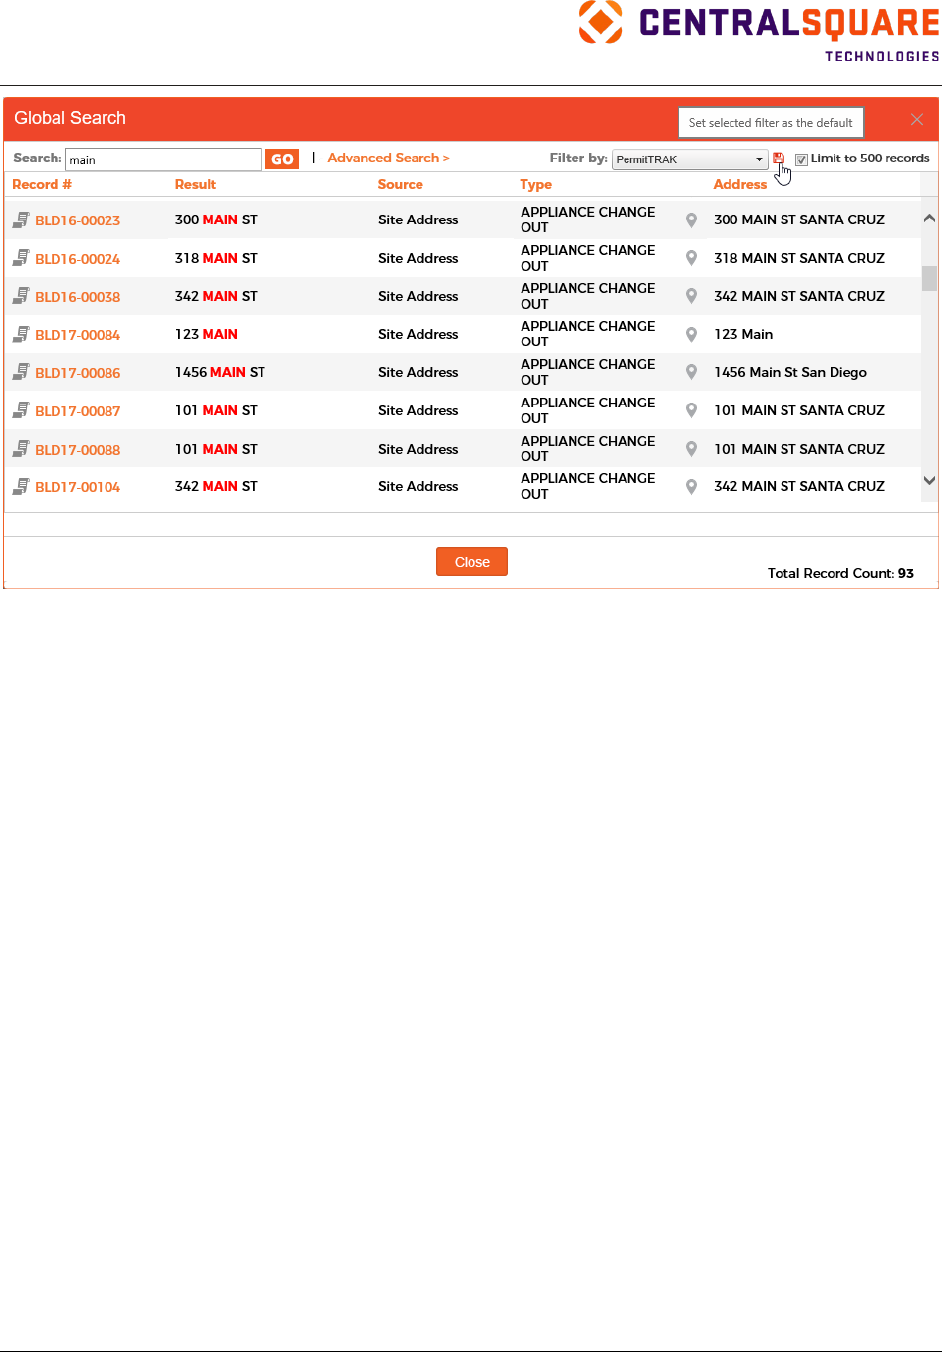
TRAKiT User Guide 18.1
Proprietary.
May not be reproduced or distributed without written permission of CentralSquare Technologies.
Copyright 2018 CentralSquare Technologies. All rights reserved.
20181212JC Page 61
Advanced Search
Advanced Search provides powerful search and ad hoc reporting capabilities by enabling you to choose
multiple custom search criteria for a selected module and customize the layout of the search results. You
can save searches for your own use and share searches with others in your agency.
Searches return data from the main table (and custom fields) that match the criteria, along with the count
of the rows in the subtables that match the search criteria (for example, search for Permits in
PermitTRAK, Projects in ProjectTRAK).
To perform an advanced search, point to Advanced Search in the TRAKiT header and select one of the
following options from the menu:
• Latest Search—Click Latest Search if you want to use parameters from the most recent search
you performed.
• New Search—Click New Search if you want to manually select all criteria for a custom search
(ad hoc search). The Advanced Search page appears so you can select criteria and perform
your search. See “Ad Hoc Search” for more details about ad hoc searches.
• Shared Searches—Point to Shared Searches if you want to use a search that was previously
saved and shared with a group in your agency. A list of shared searches appears. Click the
search you want to perform. The Advanced Search page appears showing the shared search
criteria. See “Shared Searches Tab” for more details about shared searches.
• Saved Searches—Point to Saved Searches if you want to perform a search that you previously
saved. A list of saved searches appears. Click the search you want to perform. The Advanced
Search page appears showing the saved search criteria. See “Saving Searches” and “Using
Saved Searches” for more details about saved searches.
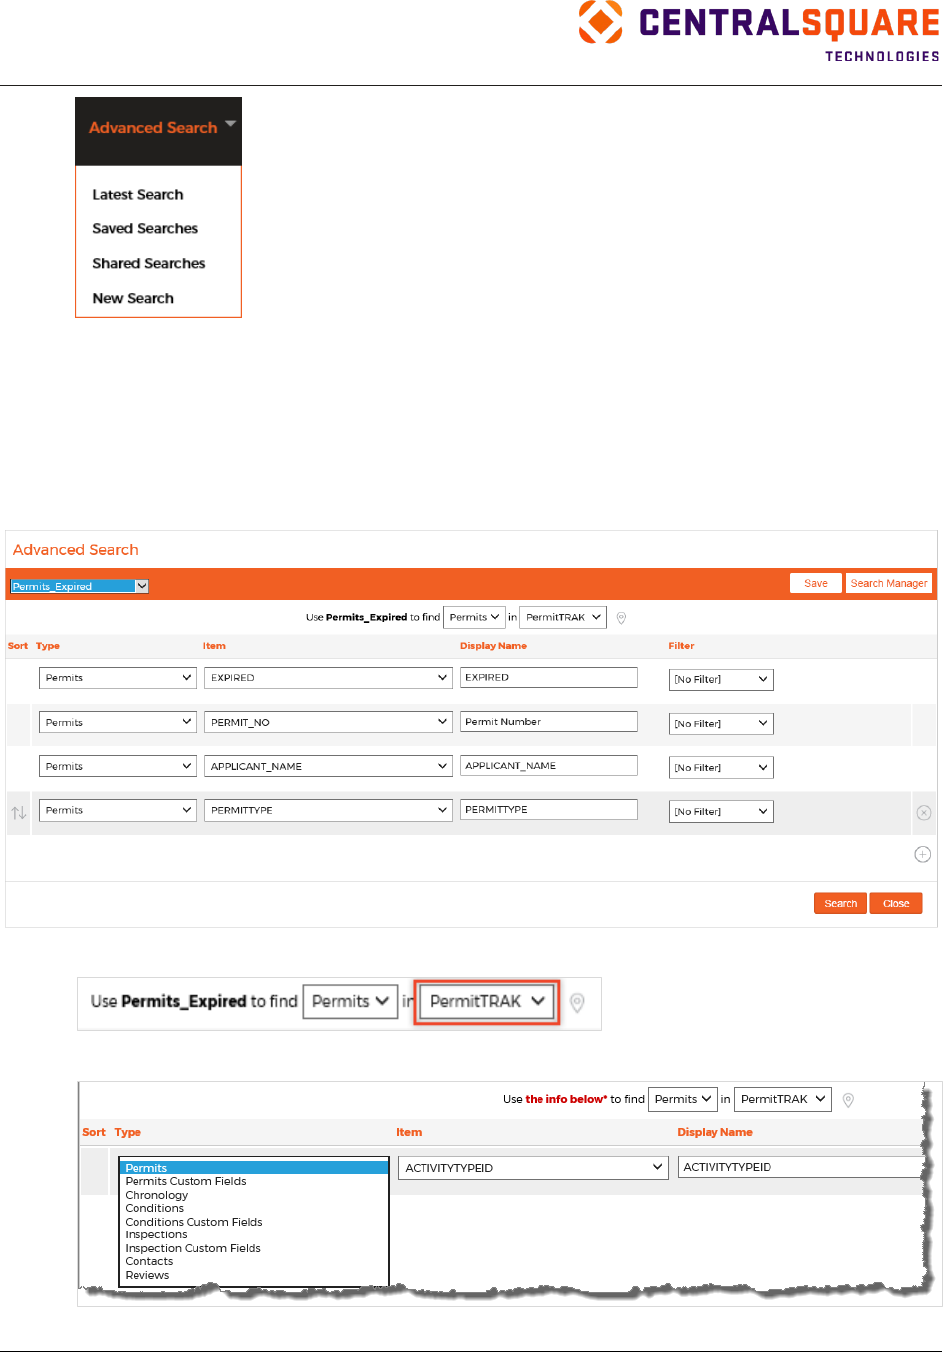
TRAKiT User Guide 18.1
Proprietary
May not be reproduced or distributed without written permission of CentralSquare Technologies.
Copyright 2018 CentralSquare Technologies. All rights reserved.
20181212JC Page 62
Ad Hoc Search
Use the New Search option on the Advanced Search menu to manually select criteria for a custom
search. After you select search criteria, you can save or share the search if you want to.
Main Table (Activity Search) Example
The steps below provide an example of searching the main table (searching an activity record).
1.
On the Advanced Search page, select the module you want to search.
2.
Select an option in the Type column. This indicates the database table you want to search.
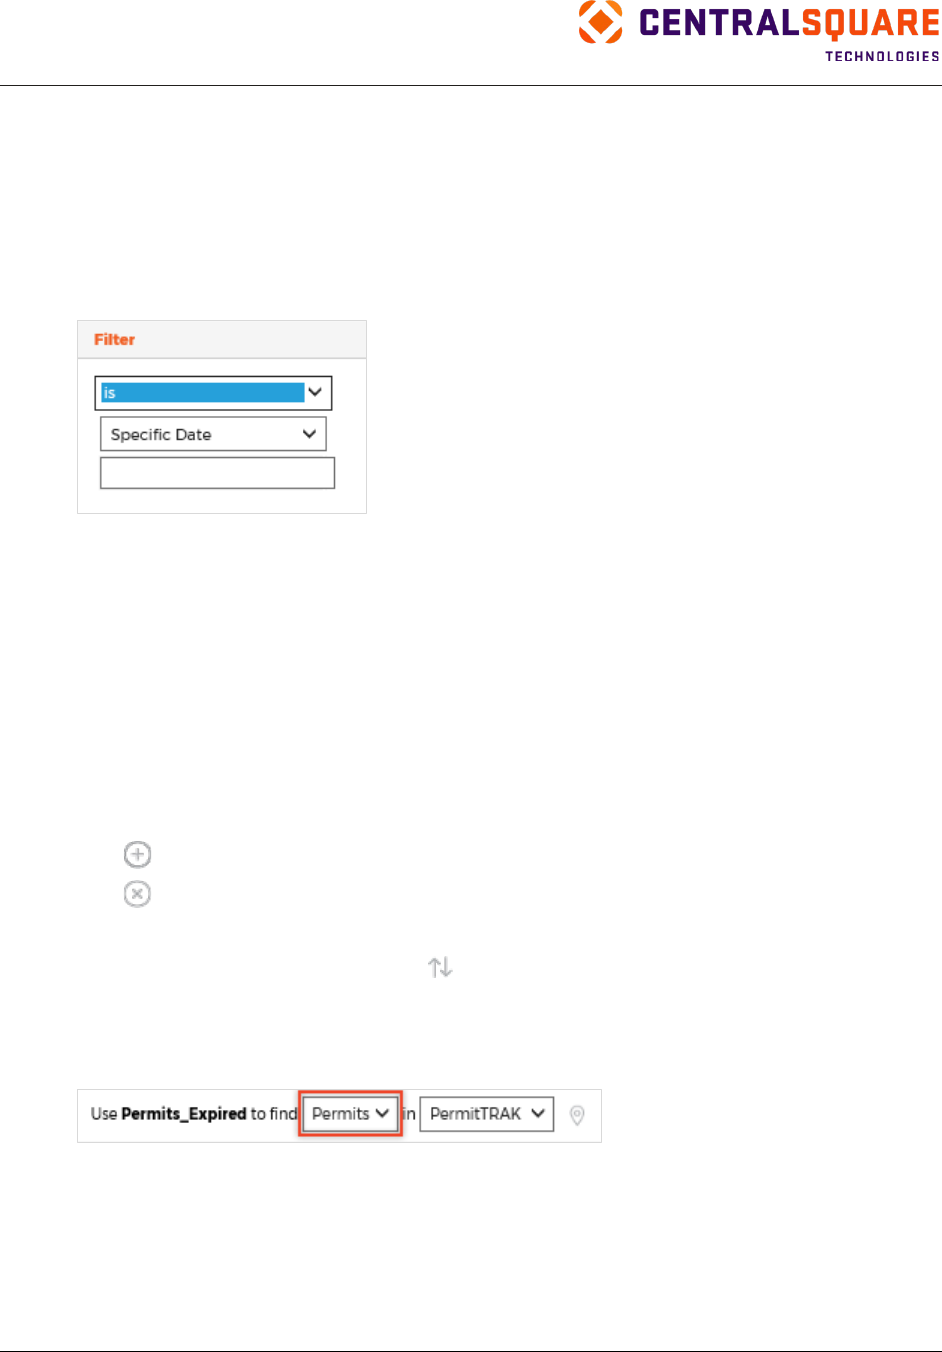
TRAKiT User Guide 18.1
Proprietary.
May not be reproduced or distributed without written permission of CentralSquare Technologies.
Copyright 2018 CentralSquare Technologies. All rights reserved.
20181212JC Page 63
3.
Select an option in the Item column. These options are the available fields (columns in the
database table) for the type you selected.
4.
In the Display Name column, type the column header as you want it to appear in the search
results.
5.
Select an option in the Filter column. These options enable you to type or select specific values
or a range of values to narrow results. Additional fields appear if applicable to the search field and
your selection in the Filter field. For example, if you include a date field in your search and then
select is in the Filter field, additional fields appear so that you can choose a specific date.
Note: You can use the underscore ( _ ) in text fields for the following purposes:
•
To replace special characters that cannot be typed in filter text fields. Type an underscore
( _ ) in place of disallowed special characters. For example, you cannot type @ in filter
text fields. To search for the email address info@example.com, type info_example.com.
•
As a wildcard character to replace a single character when you select the begins with,
ends with, or contains option.
Important: The underscore works as a wildcard only for text fields used with the filter
options listed.
For example, if you include status in your search, and select begins with in the Filter
field, and then type _en in the text field, results will include records with a status of
Pending or Renewal, but not Delinquent.
6.
Click
to add another search parameter to your search.
7.
Click
to delete a search parameter.
8.
Repeat steps 2–7 as necessary.
9.
Adjust the order of the fields by clicking
in the row you want to move and dragging the row up
or down.
Tip: The order of the search criteria list determines the order of the columns in the search results.
10.
Select a table. The options in this field depend on the search criteria you selected.
11.
Click Search. The search results appear.
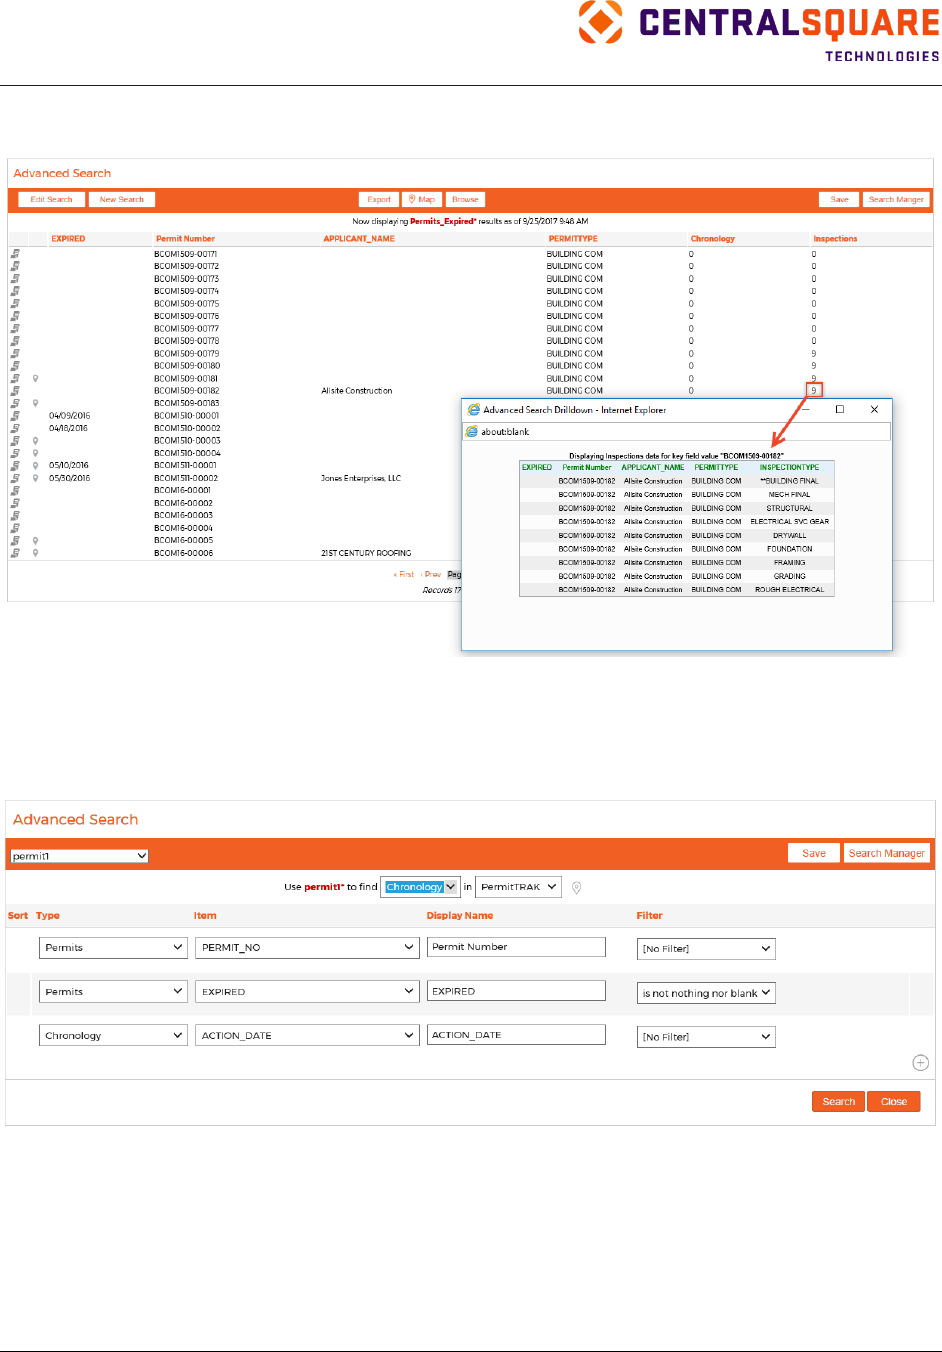
TRAKiT User Guide 18.1
Proprietary
May not be reproduced or distributed without written permission of CentralSquare Technologies.
Copyright 2018 CentralSquare Technologies. All rights reserved.
20181212JC Page 64
12.
Some search results contain hyperlinks that you can use to drill down to the subactivity level.
Click the link to open a pop-up window that contains more information.
Subtable (Subactivity Search) Example
The images below show an example of searching a subtable (searching a subactivity record).
Criteria List
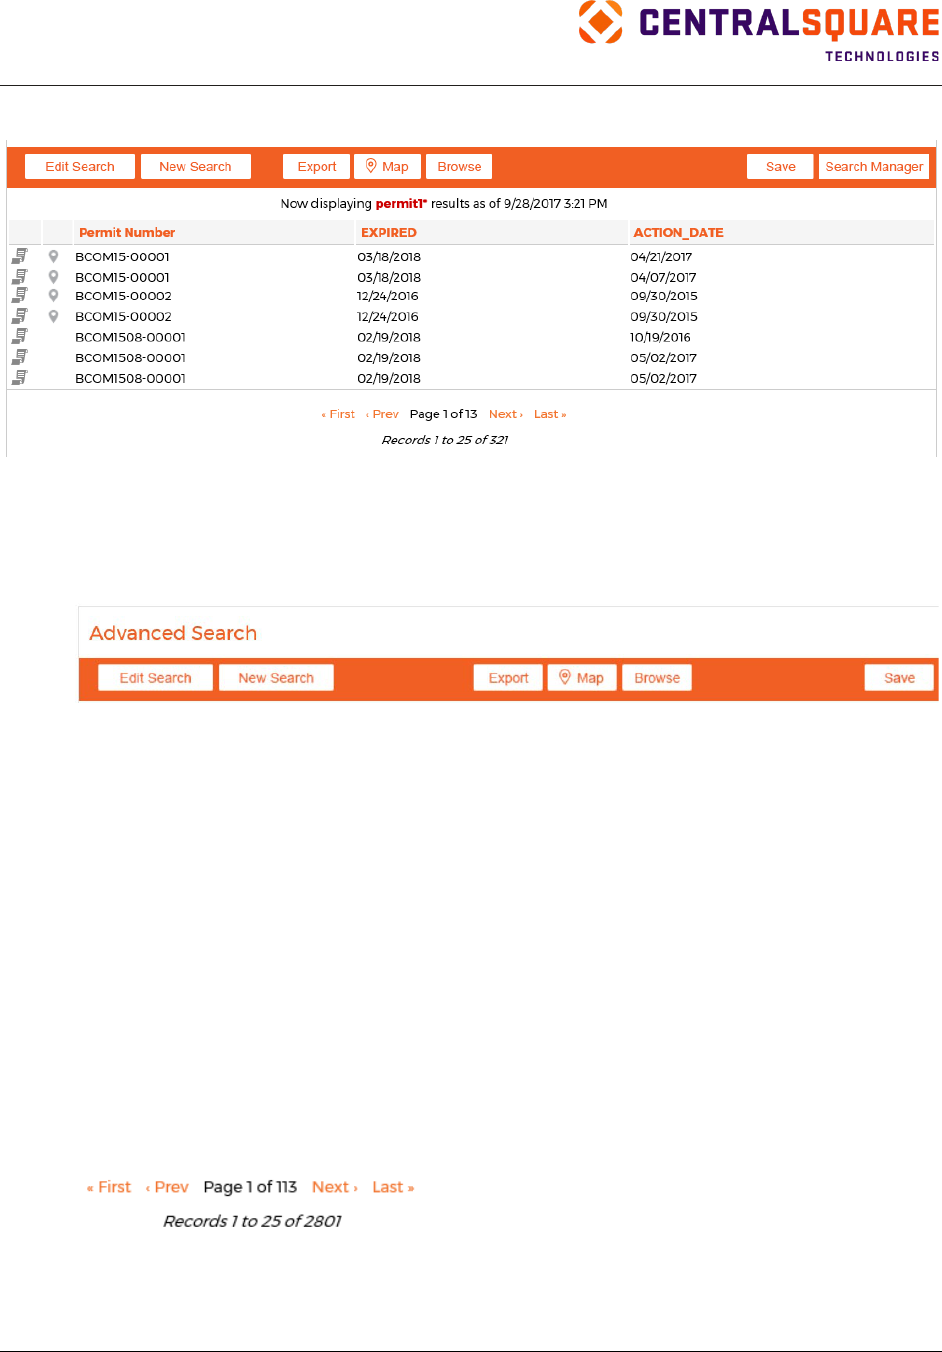
TRAKiT User Guide 18.1
Proprietary.
May not be reproduced or distributed without written permission of CentralSquare Technologies.
Copyright 2018 CentralSquare Technologies. All rights reserved.
20181212JC Page 65
Search Results
Advanced Search Tools
When your search results appear, use the Advanced Search tools to edit your search, start a new search,
export search results, browse search results in a separate window, plot search results on a map, and
save your search results.
•
Click Edit Search to view and change current search parameters.
•
Click New Search to return to the initial query screen that has no search parameters selected.
•
Click Export to save your search results in a Microsoft Excel file.
Note: When you use the Export function, the following message might appear in Microsoft Excel:
“The file format and extension of 'RadGridExport.xls' don't match. The file could be corrupted or
unsafe. Unless you trust its source, don't open it. Do you want to open it anyway?"
Microsoft Excel displays this message as a security measure against potentially harmful files.
Because TRAKiT is a trusted source, click Yes to continue with the export.
•
Click Map to display your search result locations as pushpins on the GIS map.
•
Click Browse to open the search results in a separate window. This enables you to work with
search results or start another search while retaining the results list.
•
Click Save to save your search results.
The footer area of the search results shows the total number of records found and the number of pages of
results. This area also includes navigation links so you can review the results.
•
Click « First to navigate to the first page of results.
•
Click < Prev to navigate to the previous page of results.
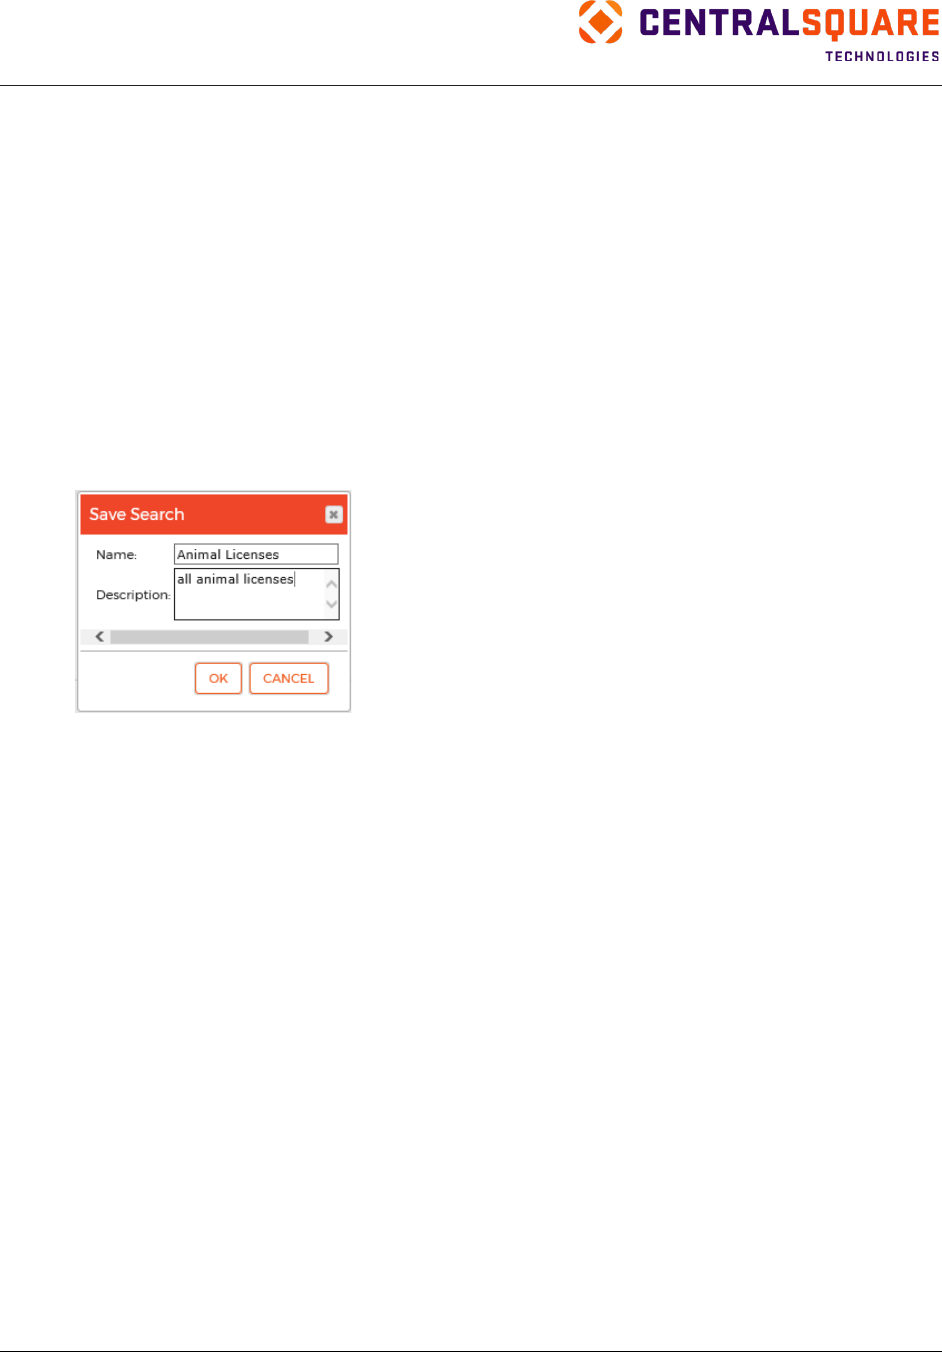
TRAKiT User Guide 18.1
Proprietary
May not be reproduced or distributed without written permission of CentralSquare Technologies.
Copyright 2018 CentralSquare Technologies. All rights reserved.
20181212JC Page 66
•
Click Next > to navigate to the next page of results.
•
Click Last » to navigate to the last page of results.
Saving Searches
If you often search using the same criteria, you can store the set of search criteria as a saved search.
Use the saved search when you need to produce a listing or report of records that meet the criteria.
To save a search, complete the following steps:
1.
Select all the parameters you want to include in your search.
2.
Click Save.
3.
In the Name field, type a name for your search.
4.
In the Description field, type a description or purpose of this search.
5.
Click OK. The search is saved and is available from the search list.
Using Saved Searches
The search list includes general, shared, default, and saved searches. The list under General includes
the following options:
•
The current search, which can be a saved search or unsaved search.
•
New. Select this option to reset the search parameters to default options so you can build a new
search.
•
Last Search. Selection this option to use parameters from the most recent search you
performed.
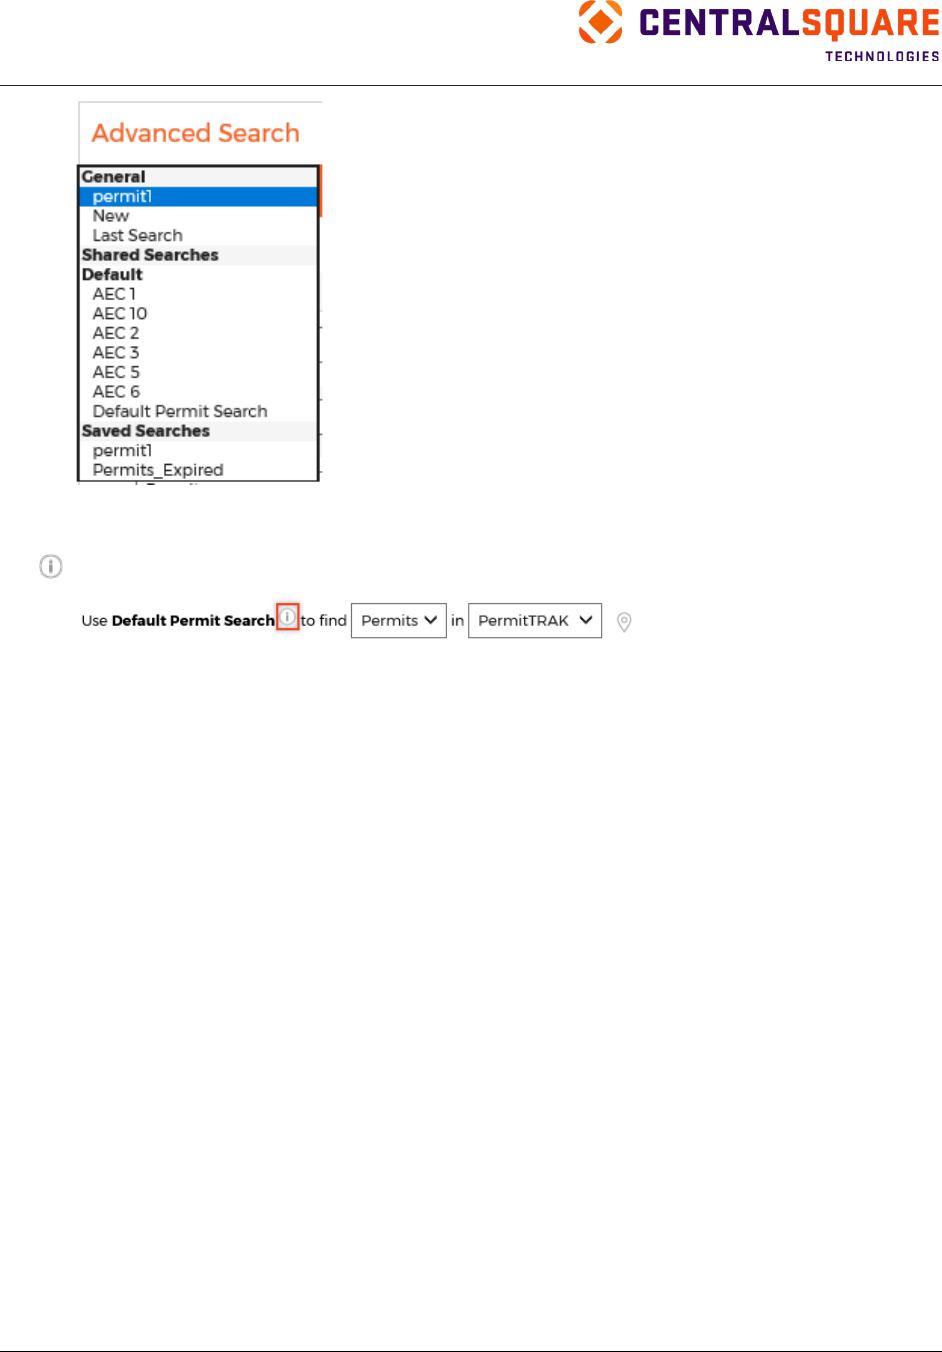
TRAKiT User Guide 18.1
Proprietary.
May not be reproduced or distributed without written permission of CentralSquare Technologies.
Copyright 2018 CentralSquare Technologies. All rights reserved.
20181212JC Page 67
Select the search you want to use.
Tip: If a description of the search is saved in TRAKiT Web Utilities & Maintenance (WUM),
appears next to the search name. Point to the icon to view a tooltip.
If you select a saved search, you can edit the search parameters or use the search as is. If you edit the
saved search, you can resave it to permanently update the search criteria for that saved search.
After you select all search parameters, click Search. The search results appear.

TRAKiT User Guide 18.1
Proprietary
May not be reproduced or distributed without written permission of CentralSquare Technologies.
Copyright 2018 CentralSquare Technologies. All rights reserved.
20181212JC Page 68
Search Manager
Use this feature to save searches, set up search user groups, and share searches with search user
groups. Click Search Manager to open the Search Manager dialog box.
Saved Searches Tab
After you save a search, it is listed on this tab. You can sort the list of saved searches and also rename,
copy, reposition, and delete saved searches.
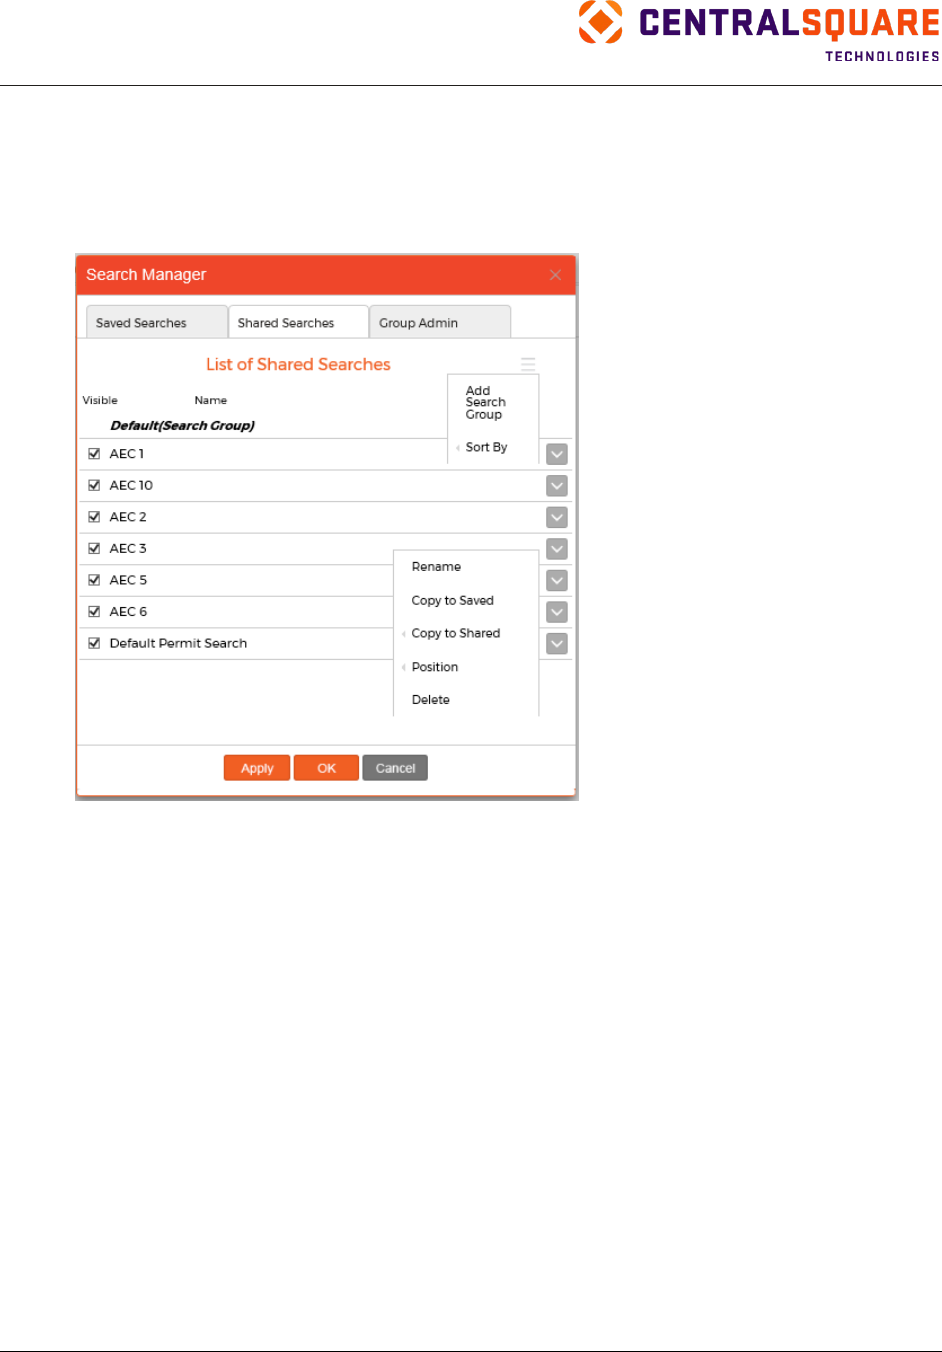
TRAKiT User Guide 18.1
Proprietary.
May not be reproduced or distributed without written permission of CentralSquare Technologies.
Copyright 2018 CentralSquare Technologies. All rights reserved.
20181212JC Page 69
Shared Searches Tab
After a search is shared, it is listed on this tab. You can organize the list by adding to, searching for,
grouping, and sorting the search list. You can rename, copy, reposition, or delete each saved search.
Note: Copy a shared search to the Advanced License Processing (ALP) group to use that search in
ALP processing. Refer to “Advanced License Processing” for more information about ALP.
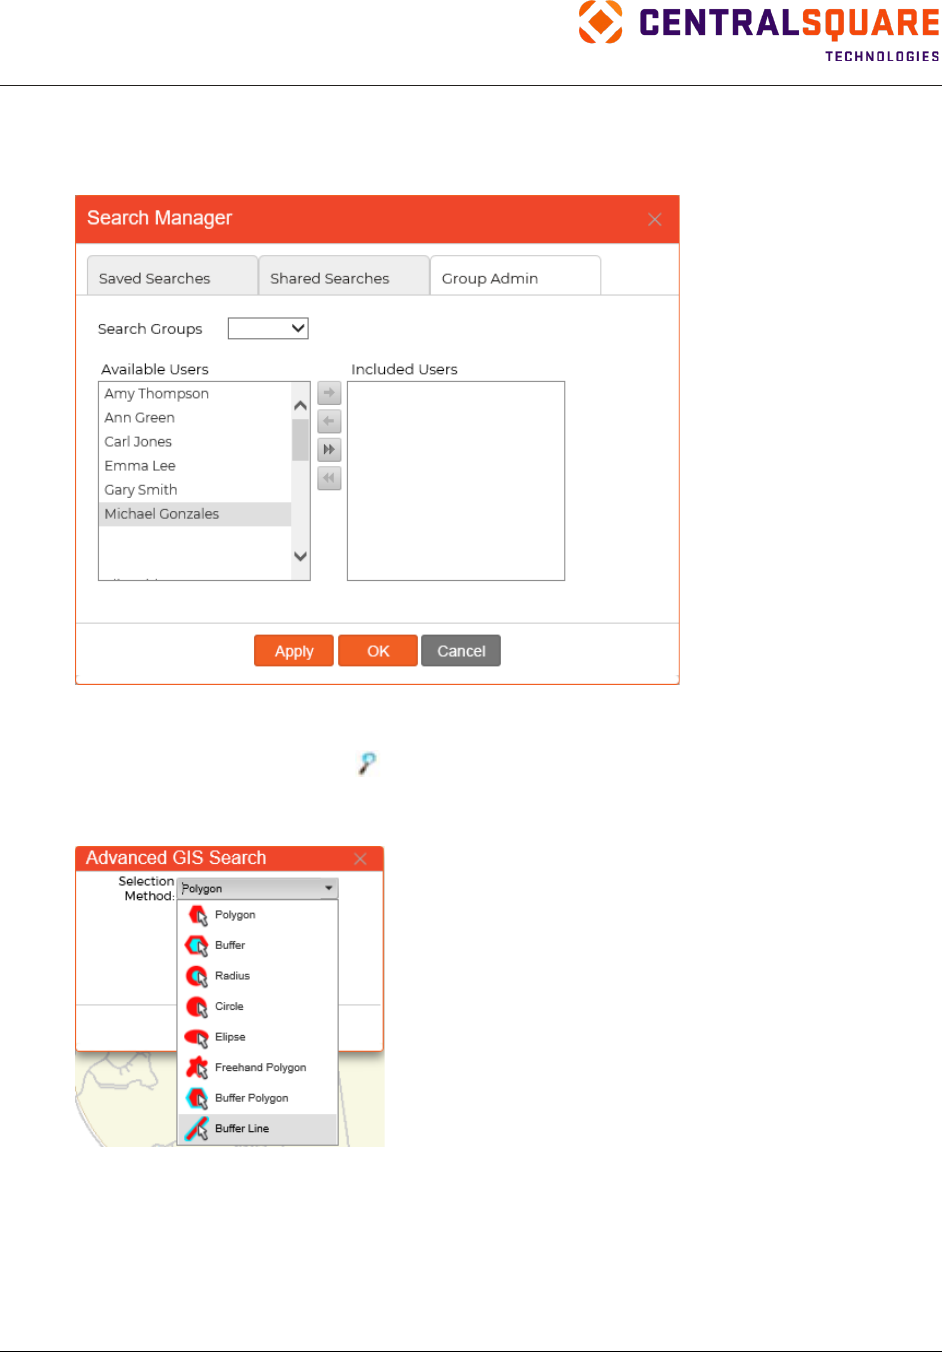
TRAKiT User Guide 18.1
Proprietary
May not be reproduced or distributed without written permission of CentralSquare Technologies.
Copyright 2018 CentralSquare Technologies. All rights reserved.
20181212JC Page 70
Group Admin Tab
Set groups by moving users from the Available Users column to the Included Users column. Shared
searches are available to the defined group.
Advanced GIS Search
Select the Advanced GIS Search tool ( ) to use a map to add or change geographical boundaries for
your search.
1.
Choose a selection method.
2.
Draw the selected shape on the map. See the “Multi‐Select Tool” section for details about
drawing shapes.
3.
When the advanced search window appears, select the parameters.
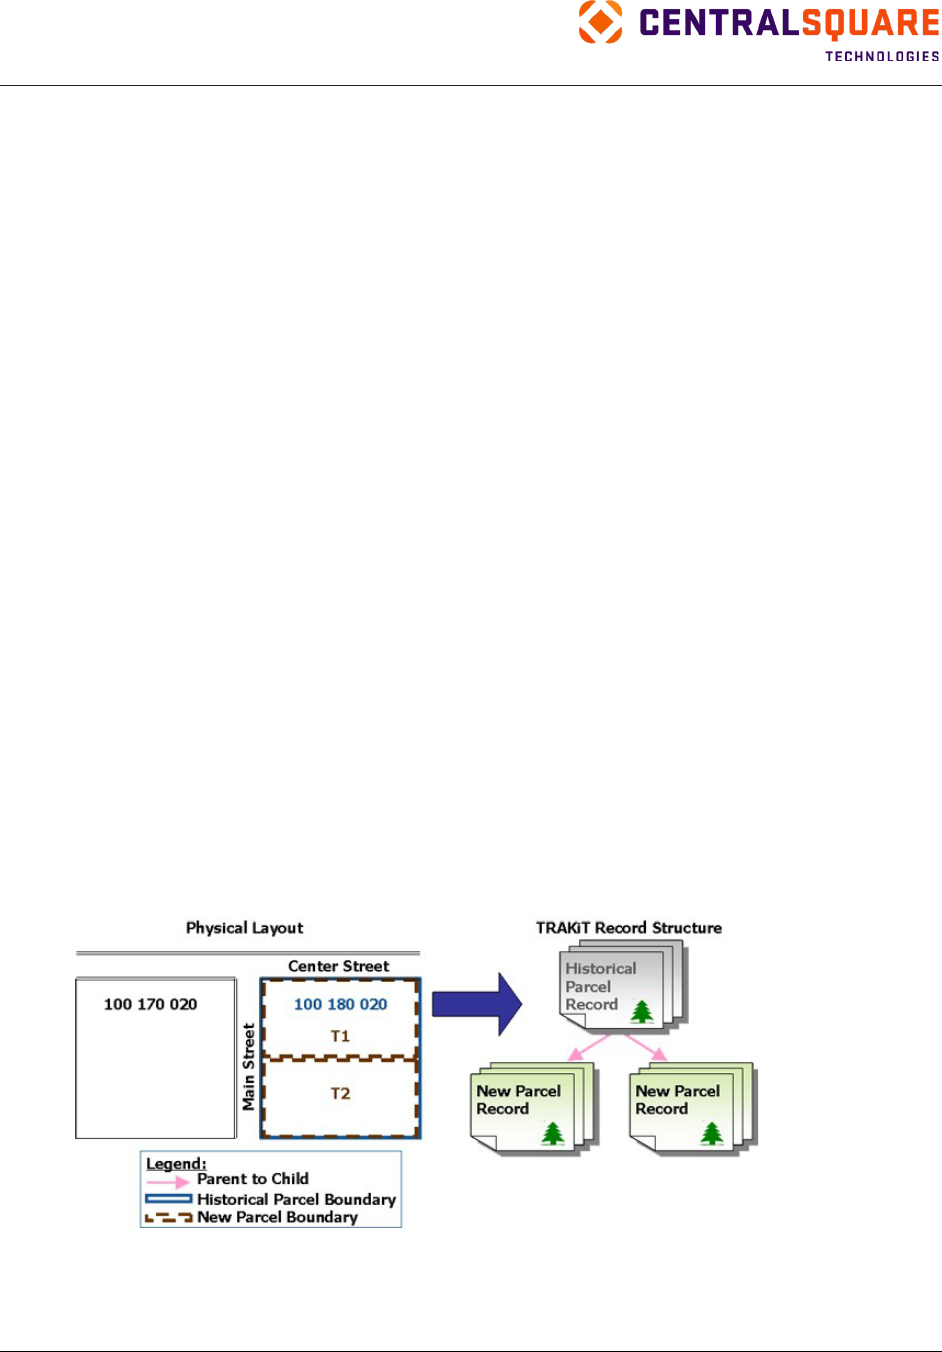
TRAKiT User Guide 18.1
Proprietary.
May not be reproduced or distributed without written permission of CentralSquare Technologies.
Copyright 2018 CentralSquare Technologies. All rights reserved.
20181212JC Page 71
Adding Records
Overview
TRAKiT records manage information associated with various departments, including:
•
Locations, such as parcels, buildings, and suites (GeoTRAK)
•
Activities that occur at locations, such as permits (PermitTRAK), projects (ProjectTRAK), code
enforcement cases (CodeTRAK), and licensing (LicenseTRAK)
•
People who are associated with activities, such as architects, engineers, and contractors
(AEC TRAK)
GeoTRAK
About GeoTRAK Records
GeoTRAK records manage information associated with locations within a municipality, including parcels,
buildings on parcels, suites within buildings, historical parcels that have since been subdivided, or any
combination of these. Additionally, GeoTRAK records can be linked to each other in parent‐child
relationships.
When adding a GeoTRAK record, you must choose to either duplicate an existing parcel number (if the
parcel number is not changing) or use a temporary parcel number (if the parcel number is changing).
Depending on your setup, TRAKiT might automatically generate a temporary parcel number or you might
enter the parcel number manually.
Example 1: Subdivided Parcels
You have a new subdivision that has been approved for development, and an existing parcel (Parcel
100 180 020) is being split into two parcels. You might want to retain all historical information about
the original parcel, but issue permits on the new parcels. In this example, there are three potential
GeoTRAK records: the historical parcel and the two new parcels. The two new parcels might be
created as subrecords of the original parcel and the status of the original parcel might be set as
inactive. Also, since the parcel numbers might be changing, you might add the new parcels using
temporary parcel numbers (Parcels T1 and T2).
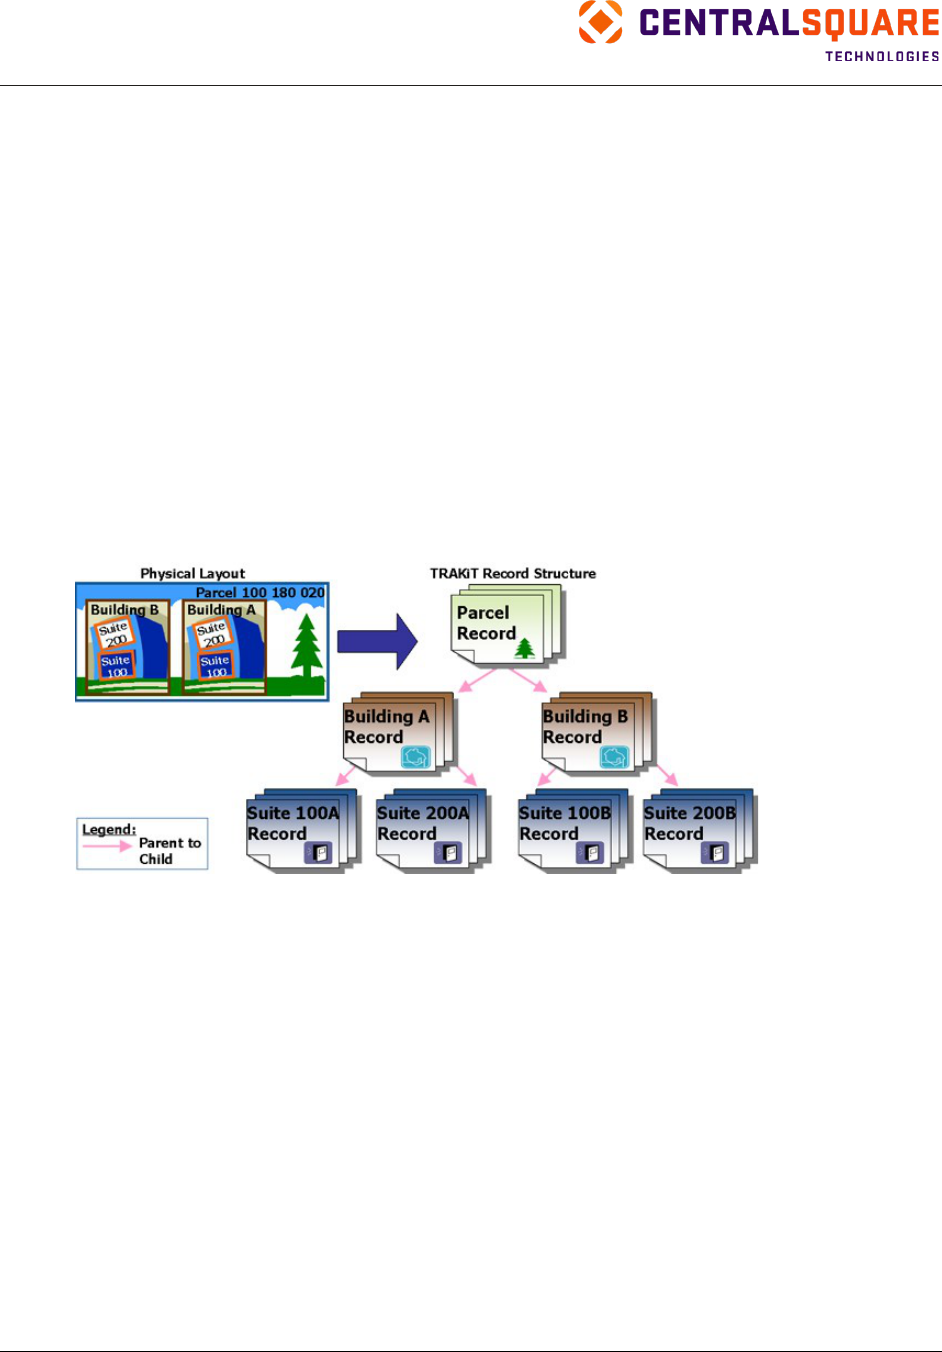
TRAKiT User Guide 18.1
Proprietary
May not be reproduced or distributed without written permission of CentralSquare Technologies.
Copyright 2018 CentralSquare Technologies. All rights reserved.
20181212JC Page 72
Example 2: Parcels with Multiple Units
You have a parcel (Parcel 100 180 020) with two buildings (Buildings A and B) on it, and each
building has two suites in it (Suites 100 and 200). In this example, there are seven potential
GeoTRAK records:
○
Parcel 100 180 020
○
Building A
○
Building B
○
Suite 100A
○
Suite 200A
○
Suite 100B
○
Suite 200B
Also, Suites 100A and 200A are subrecords (children) of Building A, Suites 100B and 200B are
subrecords of Building B, and Buildings A and B are subrecords of Parcel 100 180 020. The building
and suite subrecords might have the same parcel number as the main parcel record, so you might
choose to duplicate the existing parcel number when creating the subrecords.
Adding GeoTRAK Records
To add a GeoTRAK record, complete the following steps:
1.
Open GeoTRAK.
2.
Point to the GeoTRAK functions menu on any record and then click Add Record.
3.
Perform one of the following options for adding GeoTRAK records:
•
To add a subsite of the current parcel with a temporary parcel number: Select Sub location
linked to this record and select None from the Site APN field. (In Example 1, use this
option to create Parcel T1 as a subrecord of Parcel 100 180 020.)
•
To add a subsite of the current parcel with the same parcel number as the current parcel:
Select Sub location linked to this record and select None from the Site APN field. (In
Example 2, use this option to create Building A as a subrecord of Parcel 100 180 020.)
•
To add a record with the same parcel number as the current parcel: Select New Location
from Create New and select Copy Current from the Site APN field. (In Example 2, use this
option to create Building A without a link to main Parcel 100 180 020.)

TRAKiT User Guide 18.1
Proprietary.
May not be reproduced or distributed without written permission of CentralSquare Technologies.
Copyright 2018 CentralSquare Technologies. All rights reserved.
20181212JC Page 73
•
To add a record with a temporary parcel number: Select New Location from the Create New
field and select None from the Site APN field. (In Example 1, use this option to create Parcel
T1 without a link to historical Parcel 100 180 020.)
4.
Type an ID in the Site Alternate ID field.
5.
Select an option in the Record Type field, if applicable. (In Example 2, you might select Building
for Building A.)
6.
Select the number of records to add.
7.
Click Add.
Adding Activity Records
You can add activity records for permits, projects, cases, issues, and licenses. You can add activity
records with or without a link to a GeoTRAK record unless your agency requires that activity records are
linked to a GeoTRAK record. Contact your system administrator to find out the requirements for your
agency.
To add an activity record linked to a GeoTRAK record:
1.
Locate the GeoTRAK record.
2.
On the GeoTRAK functions menu, select Add Record.
3.
In the Create New field, select the type of record (for example, Permit linked to this record).
Available options vary by user based on the module and user privileges.
4.
Select options or type values for the remaining fields in the dialog box. Fields vary based on your
selection in the Create New field and can include:
•
Record Type
•
Site APN
•
Site Alternate ID
•
Record Subtype
•
Prefix
•
Description
•
Licensee Name
•
Number of Records
•
Sync Sub-Projects
•
Options for adding multiple subprojects linked to the parent record
5.
Depending on the type of record you are adding and the next action you want to take, select Add,
Save, or Save and Add Owner.
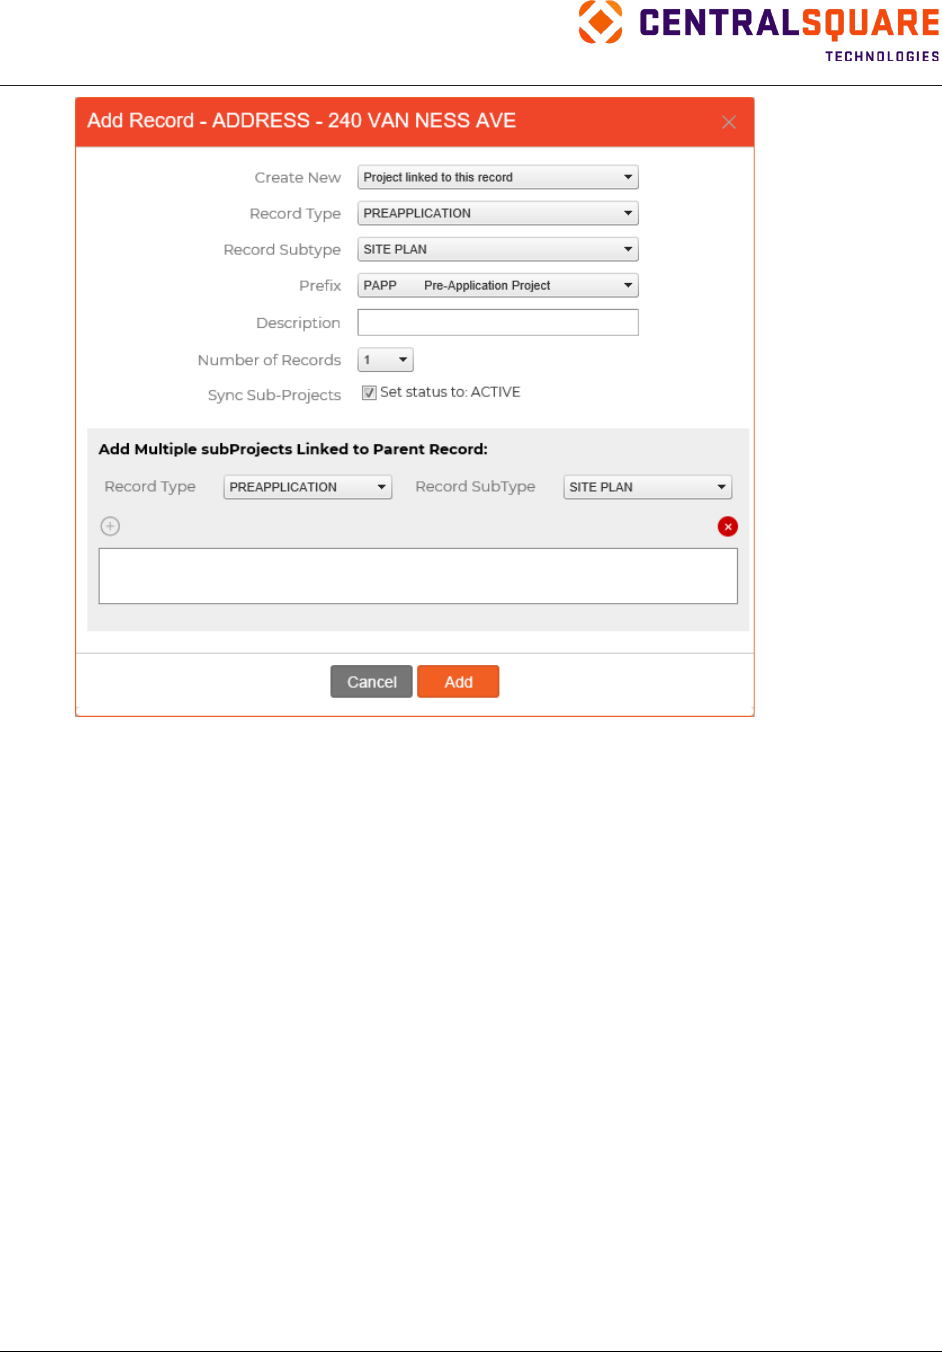
TRAKiT User Guide 18.1
Proprietary
May not be reproduced or distributed without written permission of CentralSquare Technologies.
Copyright 2018 CentralSquare Technologies. All rights reserved.
20181212JC Page 74
Tip: Depending on your setup, you might use a year/month code in your record numbering format.
For example, permit numbers for building permits entered in December 2018 might begin with B1812,
where B is the prefix for the building, 18 is the year code, and 12 is the month code. This option gives
you a grace period to account for interruptions such as vacations and holidays. If you use the year
and month in your record numbering format, this option is available at the beginning and end of each
month. If you use the year only, this option is available at the beginning and end of each year. If
applicable, select the year/month in which you want to track the record.
Adding Activity Records Not Linked to a GeoTRAK Record
Complete the following steps to add an activity record that is not linked to a GeoTRAK record:
Note: This process is not available for projects, permits, and cases if your agency requires linking
those record types to a GeoTRAK record. Contact your system administrator for more information.
1.
From the module main screen (for example, PermitTRAK), point to the functions menu and click
Add Record.
2.
In the Create New field, select the type of record you want to add.
3.
Select a record type.
4.
Select a record subtype.
5.
Select a prefix.
Note: A prefix might be required depending on your agency’s configuration.
6.
Enter details in additional fields, such as Description or Licensee Name. The fields vary
depending on the TRAKiT module.

TRAKiT User Guide 18.1
Proprietary.
May not be reproduced or distributed without written permission of CentralSquare Technologies.
Copyright 2018 CentralSquare Technologies. All rights reserved.
20181212JC Page 75
7.
Select the number of records you want to add.
8.
Depending on the type of record you are adding and the next action you want to take, click Add,
Save, or Save and Add Owner.
The site information on the new activity record is blank. This record can be linked to a GeoTRAK record at
any time by clicking on the Click to link to a Geo Record link.
Add and Save Owner
If you are adding a license in LicenseTRAK or a linked license in GeoTRAK, you have the option to go
directly from the Add Record dialog box to the Contacts dialog box to add an owner contact. To use this
feature, follow the steps in the previous sections for adding a record but click the Save and Add Owner
button instead of Save or Add.
Tip: The Save and Add Owner button appears only when the Create New field is New License in
LicenseTRAK or License linked to this record in GeoTRAK.
If an owner contact already exists on the record, the owner’s information appears in the Contacts dialog
box. You can change this information if necessary. You can also search for an existing contact or add the
new contact to AEC TRAK.
Enter or select the owner contact details and then click Save.
Adding Subprojects and Subpermits
You can add subactivity records for projects and permits when you add the parent record. To create
subprojects/subpermits at the time the parent project/permit is created, complete the following steps:
1.
Locate the GeoTRAK record.
2.
Select Add Record from the functions menu.
3.
Select either Permit with Subs linked to this record or Project with Subs linked to this
record, depending on whether you are adding permit or project records.
4.
Click Create.
5.
Select the primary record type.
6.
Select the subtype, if required.
7.
Select one or more subpermits/projects. For each subpermit or project, select an associated
subtype.
8.
Enter a description, if required.
9.
Enter contact information, as required. Contact information entered at this level is copied to every
record.
10.
Click Add.
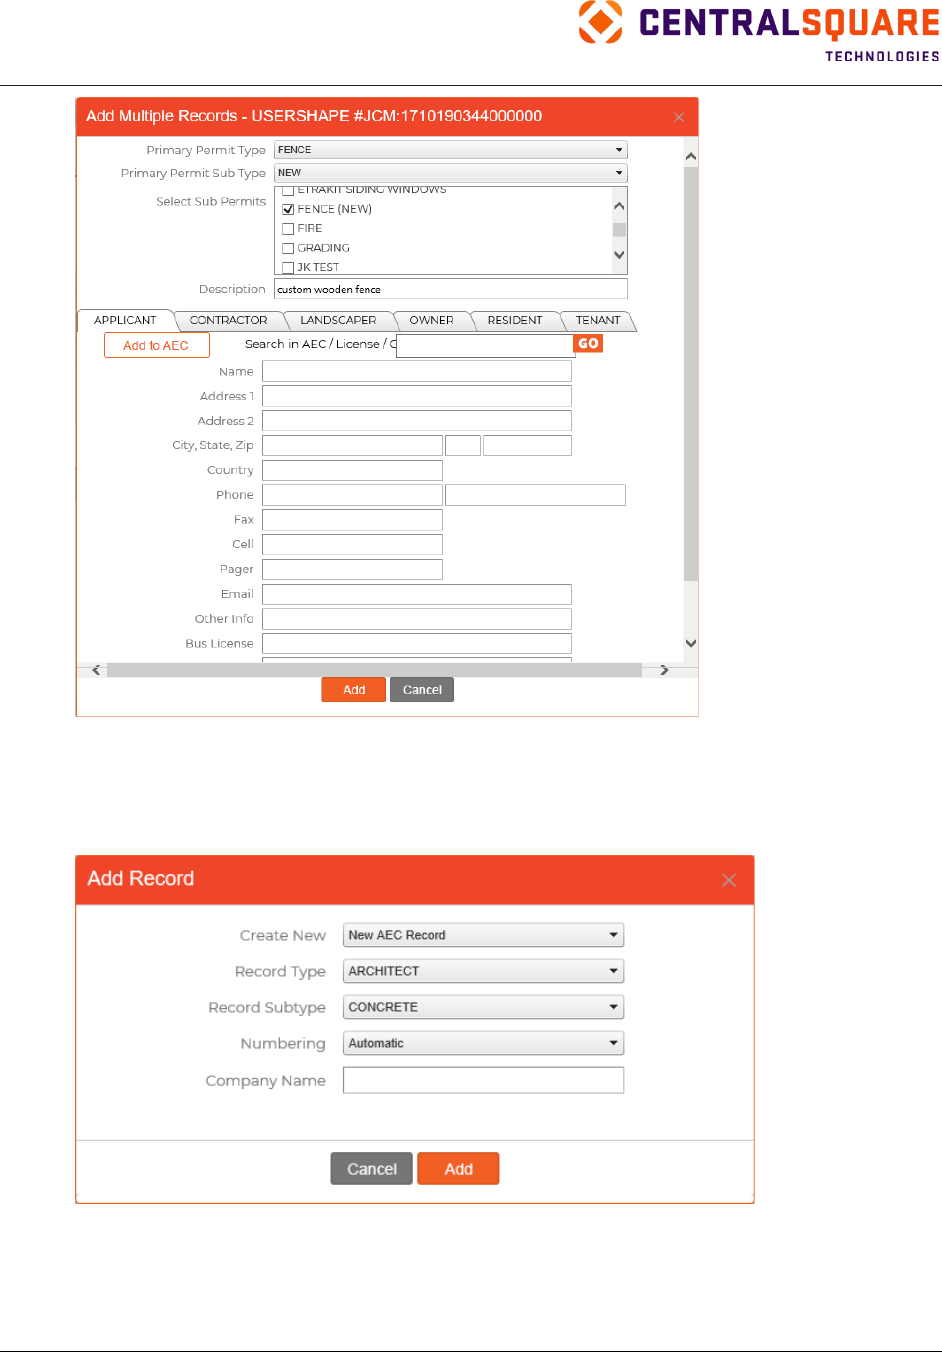
TRAKiT User Guide 18.1
Proprietary
May not be reproduced or distributed without written permission of CentralSquare Technologies.
Copyright 2018 CentralSquare Technologies. All rights reserved.
20181212JC Page 76
Adding Records in AEC TRAK
Complete the following steps to add an AEC (architects, contractors, engineers) record in AEC TRAK.
1.
From the AEC TRAK functions menu, select Add Record.
2.
Select a record type.
3.
Select a record subtype.

TRAKiT User Guide 18.1
Proprietary.
May not be reproduced or distributed without written permission of CentralSquare Technologies.
Copyright 2018 CentralSquare Technologies. All rights reserved.
20181212JC Page 77
4.
Select one of the following options from the Numbering field:
Automatic—Use for contacts that do not have a state registration number (for example,
architects). TRAKiT assigns a unique registration number to the contact.
Manual—Use for state-registered contractors. If you select this option, type the contractor’s AEC
number in the box.
Tip: CentralSquare recommends using the contractor's state registration number as the AEC
number whenever available.
Important: TRAKiT accepts an asterisk ( * ) in the AEC license number; however, an asterisk
might cause unexpected issues with other systems.
5.
Type a company name.
6.
Click Add.
Tip: AEC TRAK records contain both an IVR (Interactive Voice Response) PIN and a password. The
IVR PIN is used as the password for the IVR system. The Password field is used to log in to
eTRAKiT. When you add or update the IVR PIN, TRAKiT sets the password to the value entered into
the IVR PIN # field.
Adding AEC Records through the Contacts Pane
When you add or edit an AEC record through the Contacts pane, you can add an AEC record and
establish an association between the AEC record and the activity record.
To establish the association, complete the following steps:
1.
Open the Contacts pane in the activity record.
2.
Click Edit to associate an existing contact record or click Add to associate a new contact record.
3.
Enter the contact details in the information fields.
4.
Click Add to AEC.
5.
Select one of the following numbering options:
•
Automatic AEC Numbering—Use for contacts that do not have a state registration number
(for example, architects). TRAKiT assigns a unique registration number to the contact. This
option is selected by default.
•
Manual AEC Numbering—Use for state-registered contractors. If you select this option, type
the contractor’s AEC number in the box.
Important: TRAKiT accepts an asterisk ( * ) in the AEC license number; however, an asterisk
might cause unexpected issues with other systems.
6.
Select a record type.
7.
Click OK.
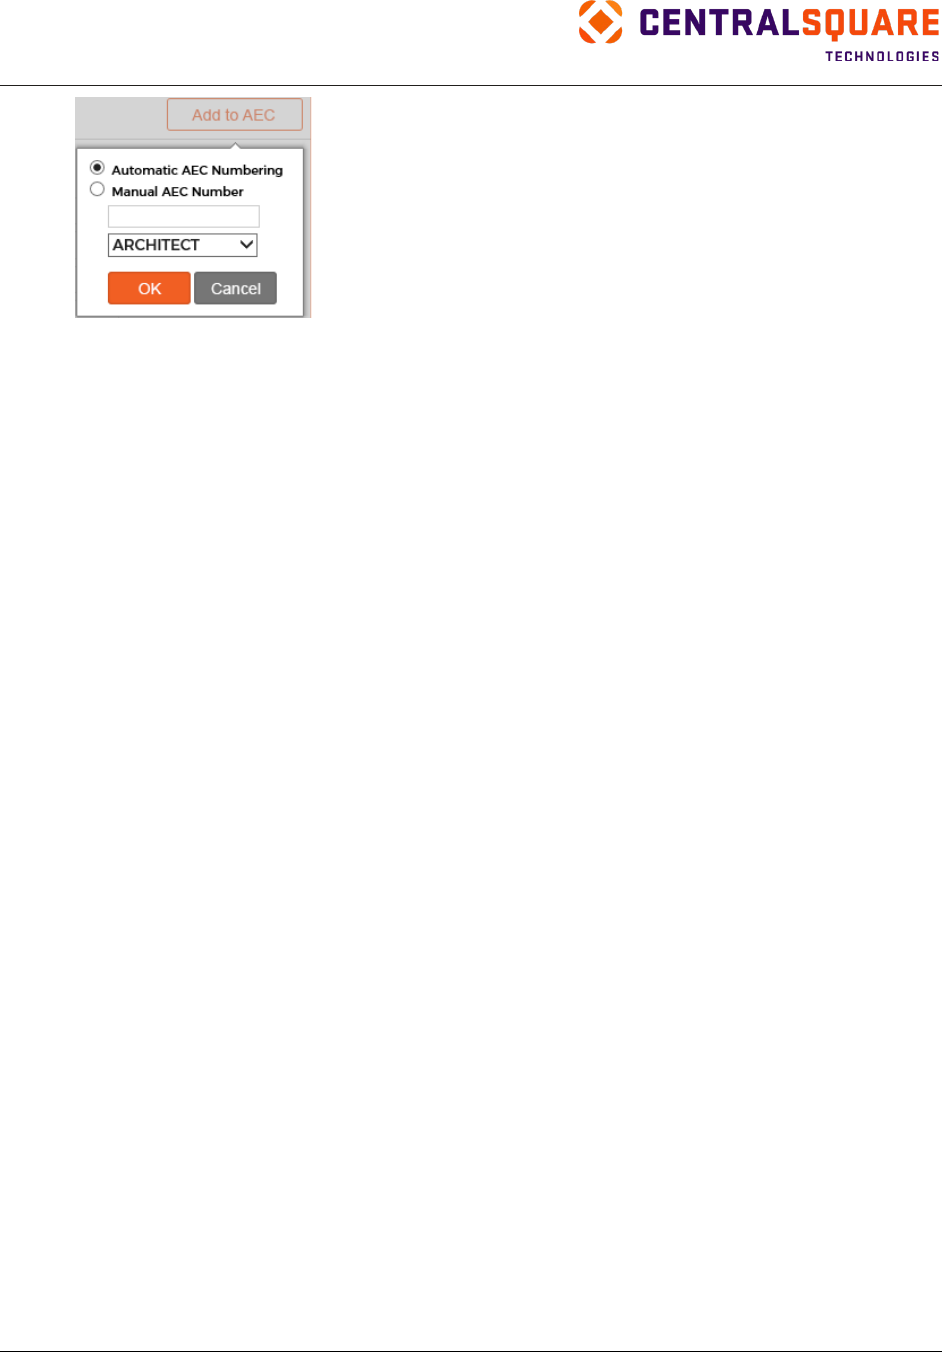
TRAKiT User Guide 18.1
Proprietary
May not be reproduced or distributed without written permission of CentralSquare Technologies.
Copyright 2018 CentralSquare Technologies. All rights reserved.
20181212JC Page 78
Tip: You can also create an AEC record through the Contacts pane in other applications.
Duplicating Records
You can add a record that has the same basic information as another record.
Tip: Duplicate records work particularly well with the Model prefix in PermitTRAK for floor plans that
have been reviewed and approved and the contractor intends to build more than one. Use the Model
prefix to add and track the basic information, plan reviews, and approvals for the first permit, and then
add duplicates of the model permit for each subsequent permit with the same floor plan.
To create a duplicate record, complete the following steps:
1.
Locate the record you want to duplicate.
2.
Select Duplicate on the functions menu.
3.
Select options for fields in the dialog box. The fields vary by module.
4.
Select the number of records you want to add.
5.
Select the Applied date (PermitTRAK, ProjectTRAK, and LicenseTRAK) or Opened date field
(CodeTRAK).
6.
Select the components of the record to duplicate.
7.
Click Add.
Note: If you set the Applied date or Opened date field to a date in the past, the action is logged in
the audit table and a message appears. Click OK to continue and add the duplicate record. Click
Cancel to return to the Duplicate Record dialog box and change the date.
Note: When you duplicate an AEC TRAK record, you must select whether the duplicated record is
numbered manually or automatically. Select automatic numbering for contacts that do not have a
state registration number (for example, architects). TRAKiT assigns a unique registration number to
the contact. Select manual numbering for state-registered contractors. If you select manual
numbering, type the contractor’s AEC number in the box.
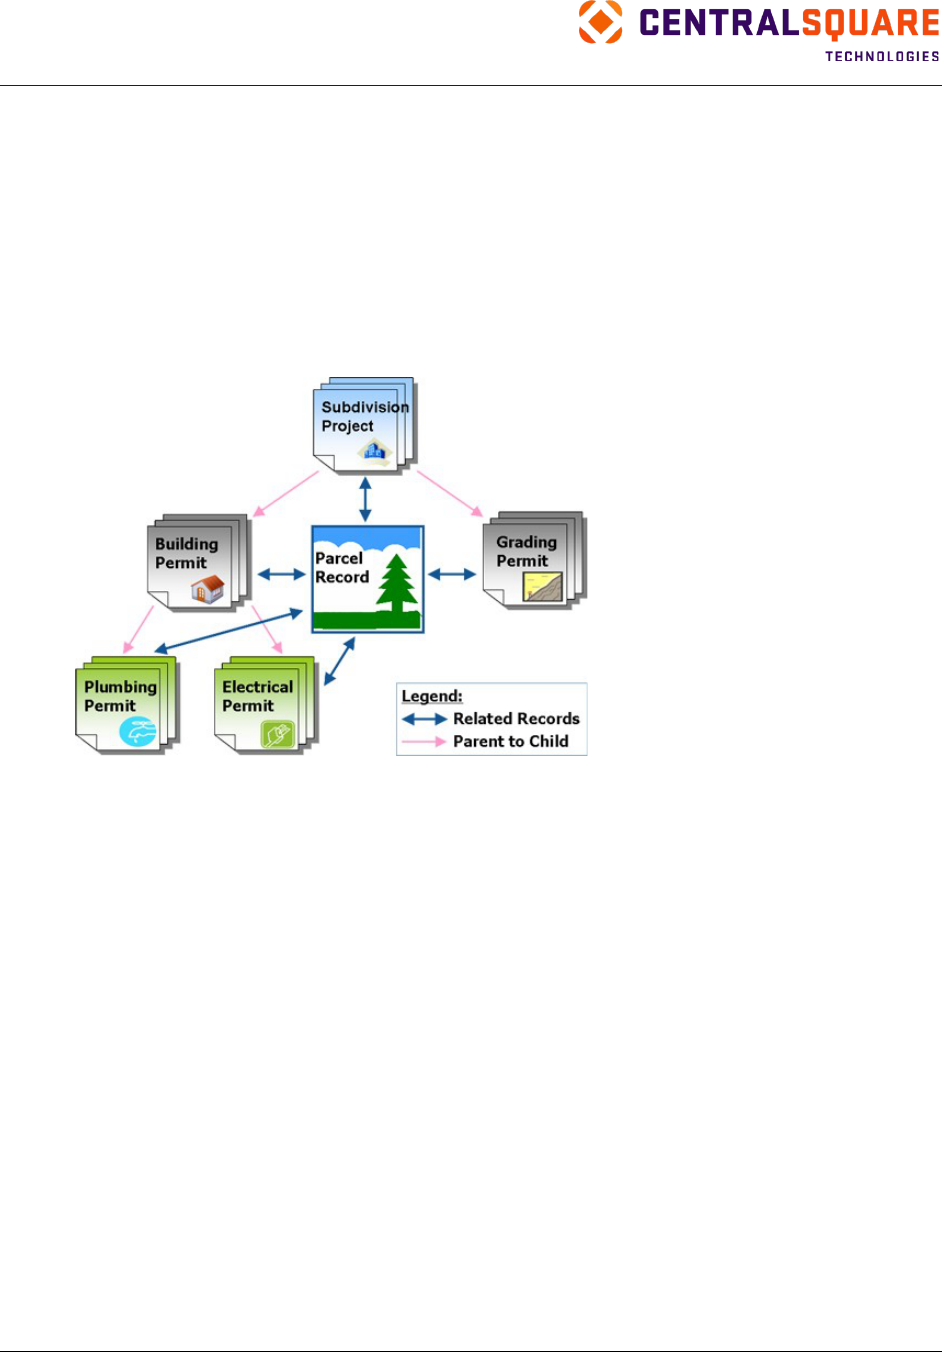
TRAKiT User Guide 18.1
Proprietary.
May not be reproduced or distributed without written permission of CentralSquare Technologies.
Copyright 2018 CentralSquare Technologies. All rights reserved.
20181212JC Page 79
Linking Records
Overview
TRAKiT records can be linked together in a number of ways:
•
Permit, project, case, business, parcel, and CRM records can be linked to a GeoTRAK record.
Linked records can be accessed directly through the Tree or Site tabs in the Navigation pane.
•
Permit, project, case, and property records can be linked in parent‐child relationships. For
example, a building permit might have a subpermit for electrical work. In this example, the main
building permit is the parent record and the electrical permit is the child record.
•
Case records can be linked to one another.
•
An association can be established between AEC records and permit, project, and case records
that allows you to navigate to related permits or pay fees on related records directly from AEC
TRAK.
Linking Records
To link records, complete these steps:
1.
Locate a record that you want to link from.
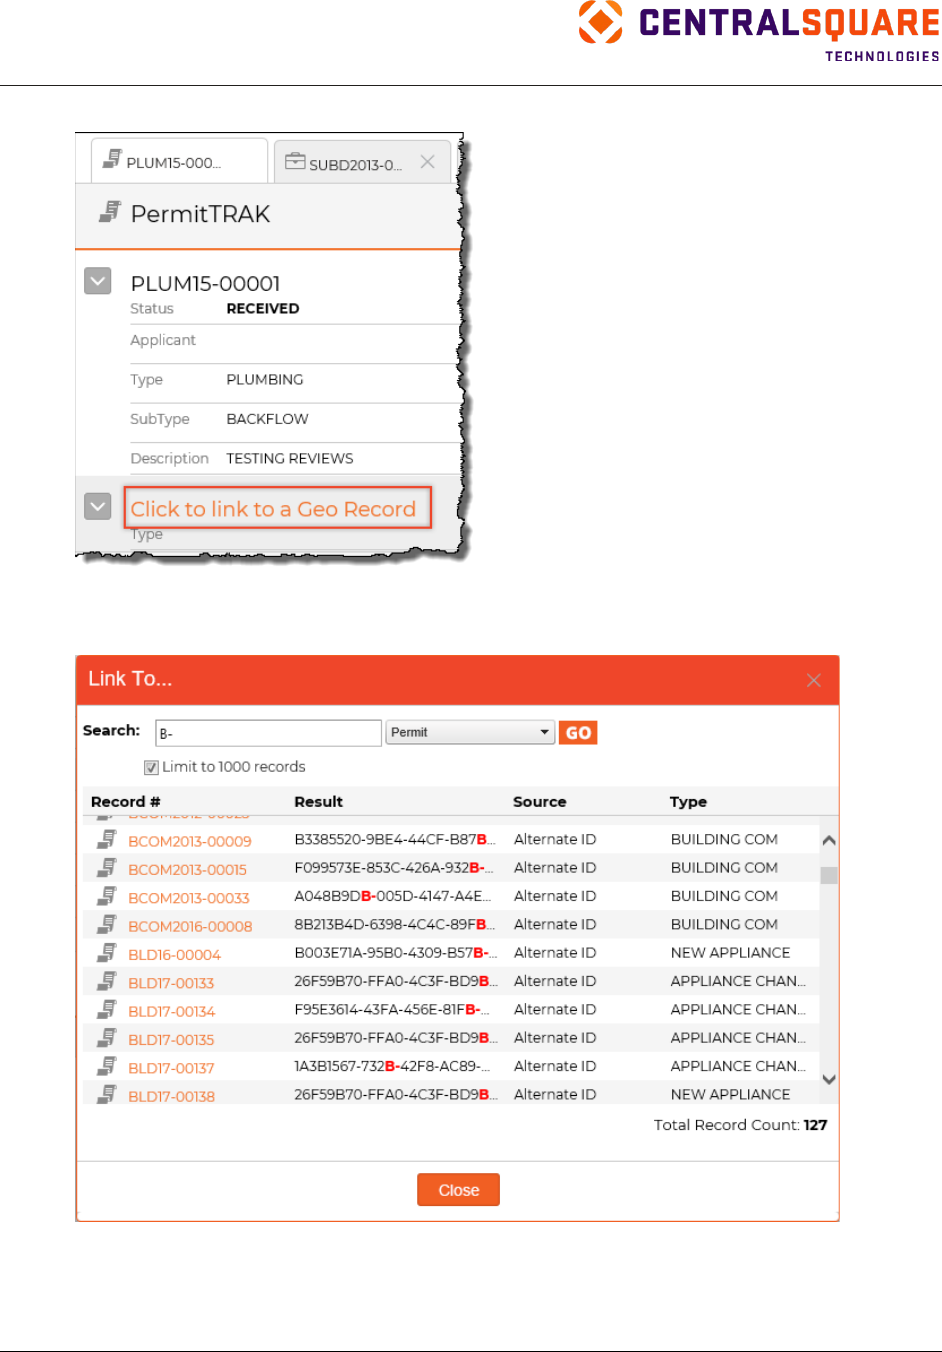
TRAKiT User Guide 18.1
Proprietary
May not be reproduced or distributed without written permission of CentralSquare Technologies.
Copyright 2018 CentralSquare Technologies. All rights reserved.
20181212JC Page 80
2.
Click Click to link to a Geo Record.
3.
Locate the record using the Search feature.
4.
Click the record number in the results listing.
5.
Click OK to confirm the link.
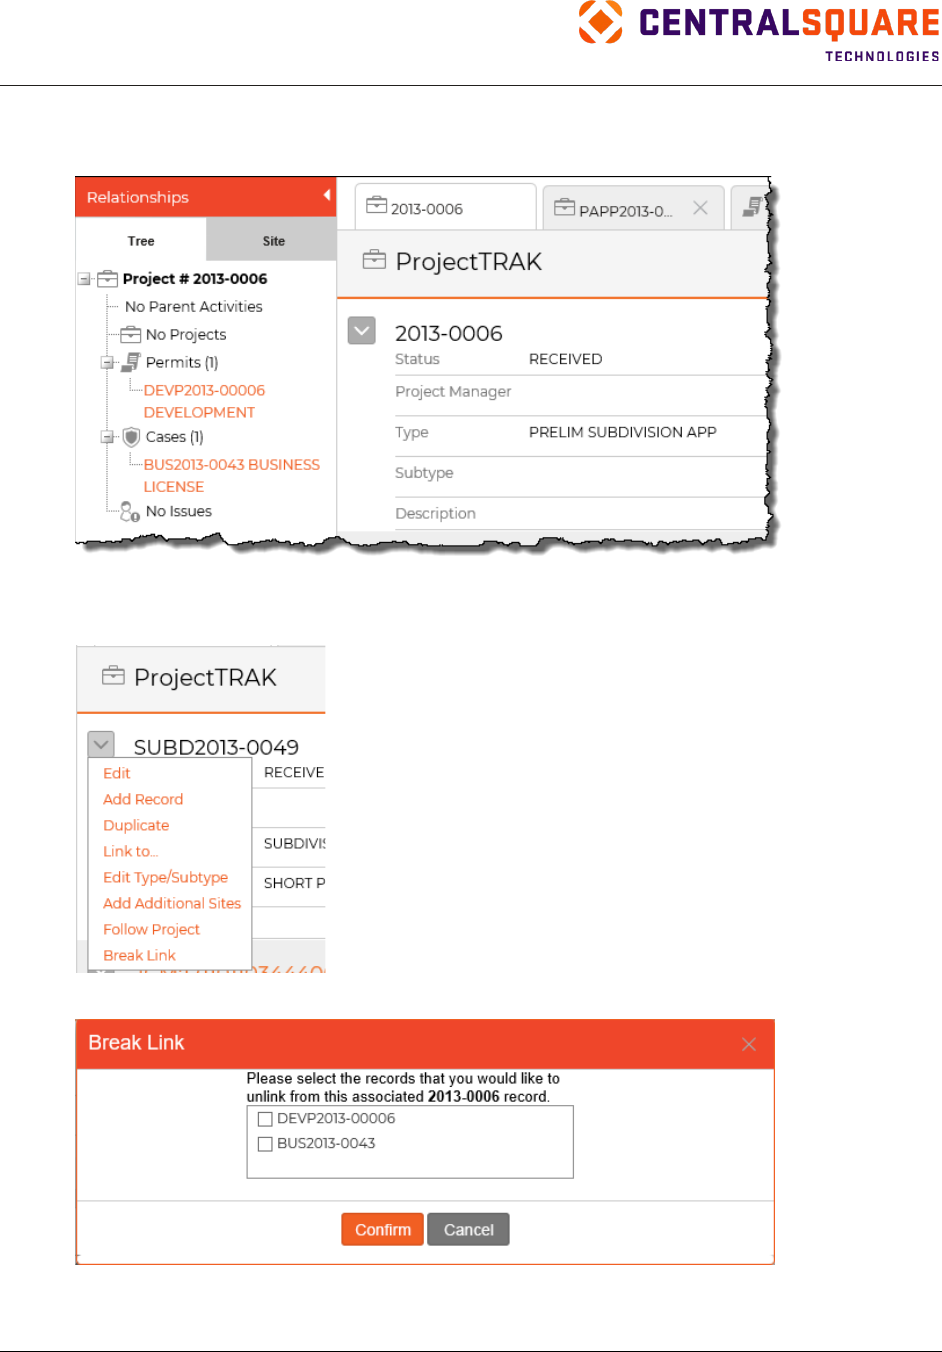
TRAKiT User Guide 18.1
Proprietary.
May not be reproduced or distributed without written permission of CentralSquare Technologies.
Copyright 2018 CentralSquare Technologies. All rights reserved.
20181212JC Page 81
Breaking a Link
Existing links show in the Tree tab for related permits and the Site tab for additional sites.
To break a link, complete the following steps:
1.
From the functions menu, click Break Link.
2.
Select the records you want to unlink and then click Confirm.
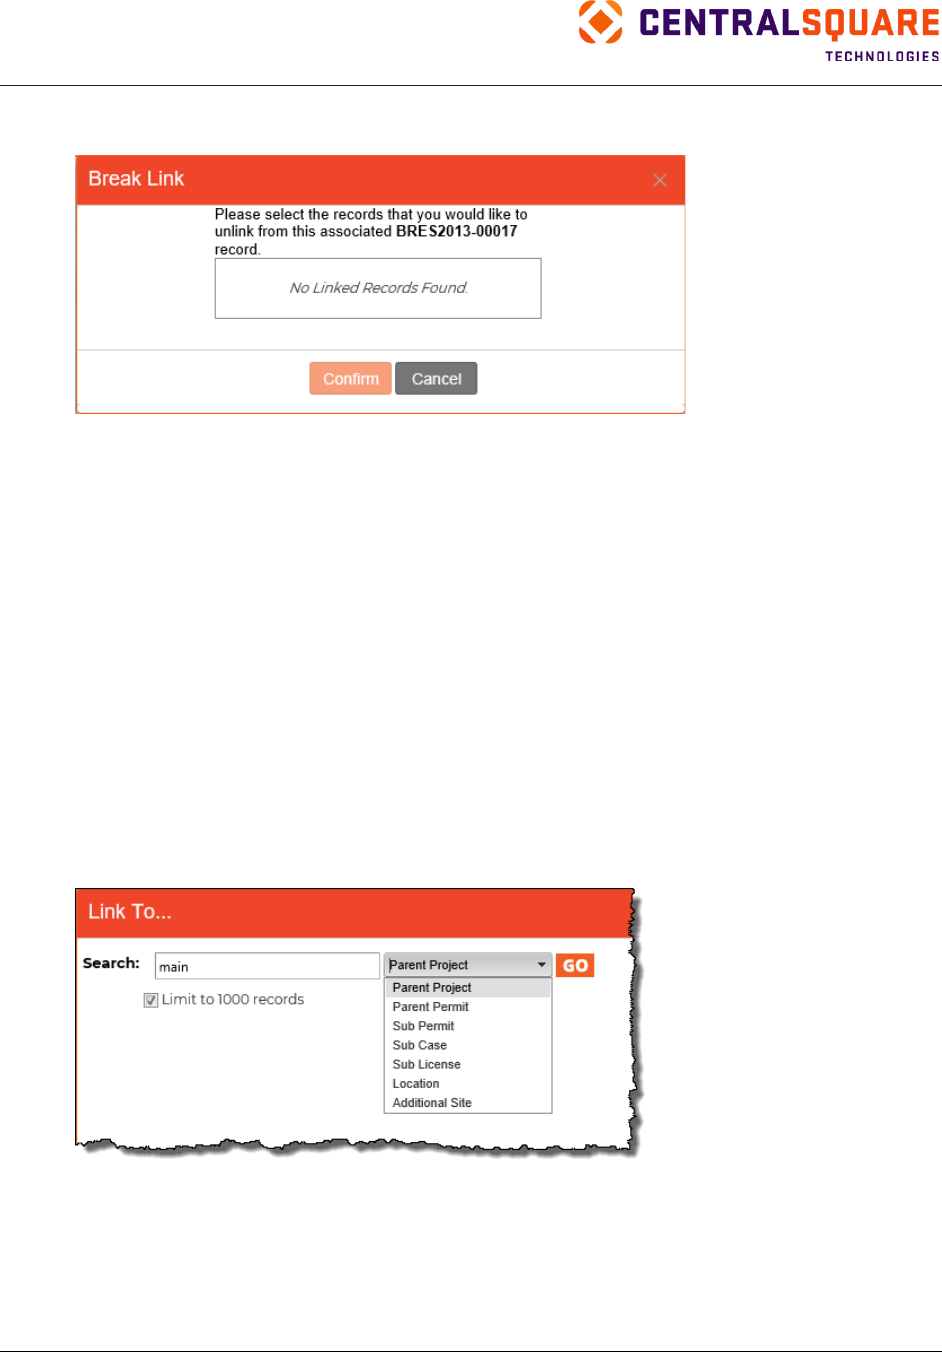
TRAKiT User Guide 18.1
Proprietary
May not be reproduced or distributed without written permission of CentralSquare Technologies.
Copyright 2018 CentralSquare Technologies. All rights reserved.
20181212JC Page 82
3.
Verify all links were broken by viewing both the Tree tab and Site tab. Or, select Break Link from
the functions menu and verify that the unlinked records are not in the list.
Linking a Record to a GeoTRAK Record
To link a permit, project, case, issue, or license record to a GeoTRAK record, complete the steps below.
Tip: Adding a permit, project, or case through GeoTRAK automatically establishes a link between the
GeoTRAK record and the PermitTRAK, ProjectTRAK, or CodeTRAK record.
Note: If your agency is set up to require permits, projects, and cases to be linked to a GeoTRAK
record, you must follow the procedure in the “Adding Activity Records” section for adding an activity
record linked to a GeoTRAK record.
1.
Locate the activity record.
2.
Point to the functions menu and then click Link to GeoTRAK.
3.
Locate the GeoTRAK record using the Search feature.
4.
Click a record number in the results listing to automatically populate the site information.
5.
Click OK to confirm the link.
To link additional site records to a single permit, project, or case, click Link To on the functions menu and
then click Additional Site.
Tip: Additional site records are listed on the Site tab in the Navigation pane.
Tip: Refresh from GeoTRAK updates the site information and owner information from the linked
GeoTRAK record.
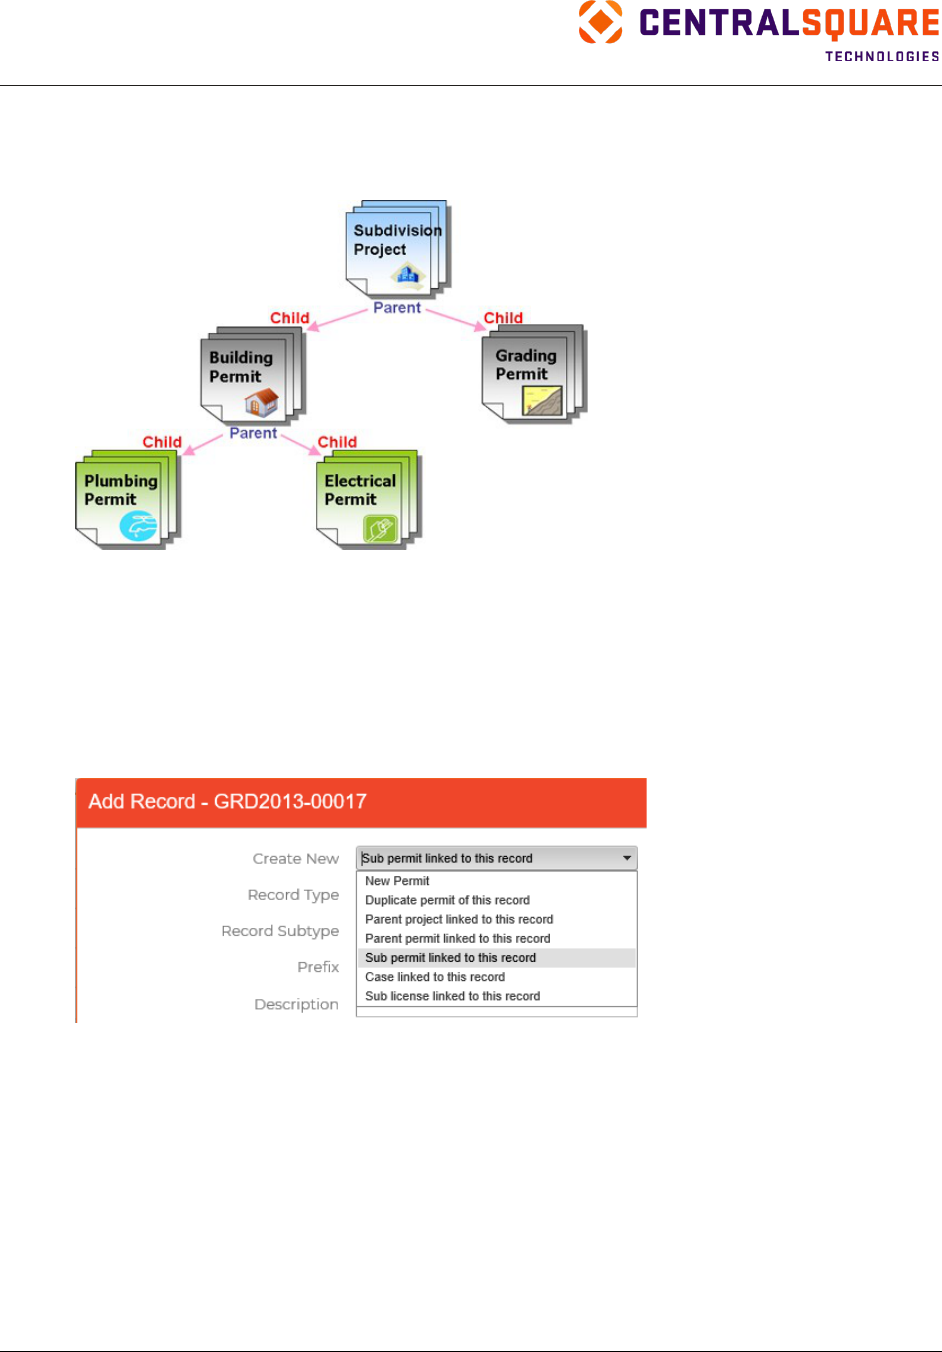
TRAKiT User Guide 18.1
Proprietary.
May not be reproduced or distributed without written permission of CentralSquare Technologies.
Copyright 2018 CentralSquare Technologies. All rights reserved.
20181212JC Page 83
Parent‐Child Relationship
Records can be linked together in a parent‐child relationship. You can establish this link by adding a
linked record or linking existing records.
Adding Linked Records
To add a linked record, complete the following steps:
1.
Locate the existing record.
2.
Click Add Record from the functions menu.
3.
In the Create New field, select the option to add a subrecord. For example, in PermitTRAK,
select Sub permit linked to this record.
4.
Complete fields in the dialog box. The fields vary depending on the module.
5.
Click Add.
6.
Select whether to copy information from the parent record to the new record.
7.
Select other options as available and save your settings. For example, for a subpermit, select a
default inspector and then click Save.
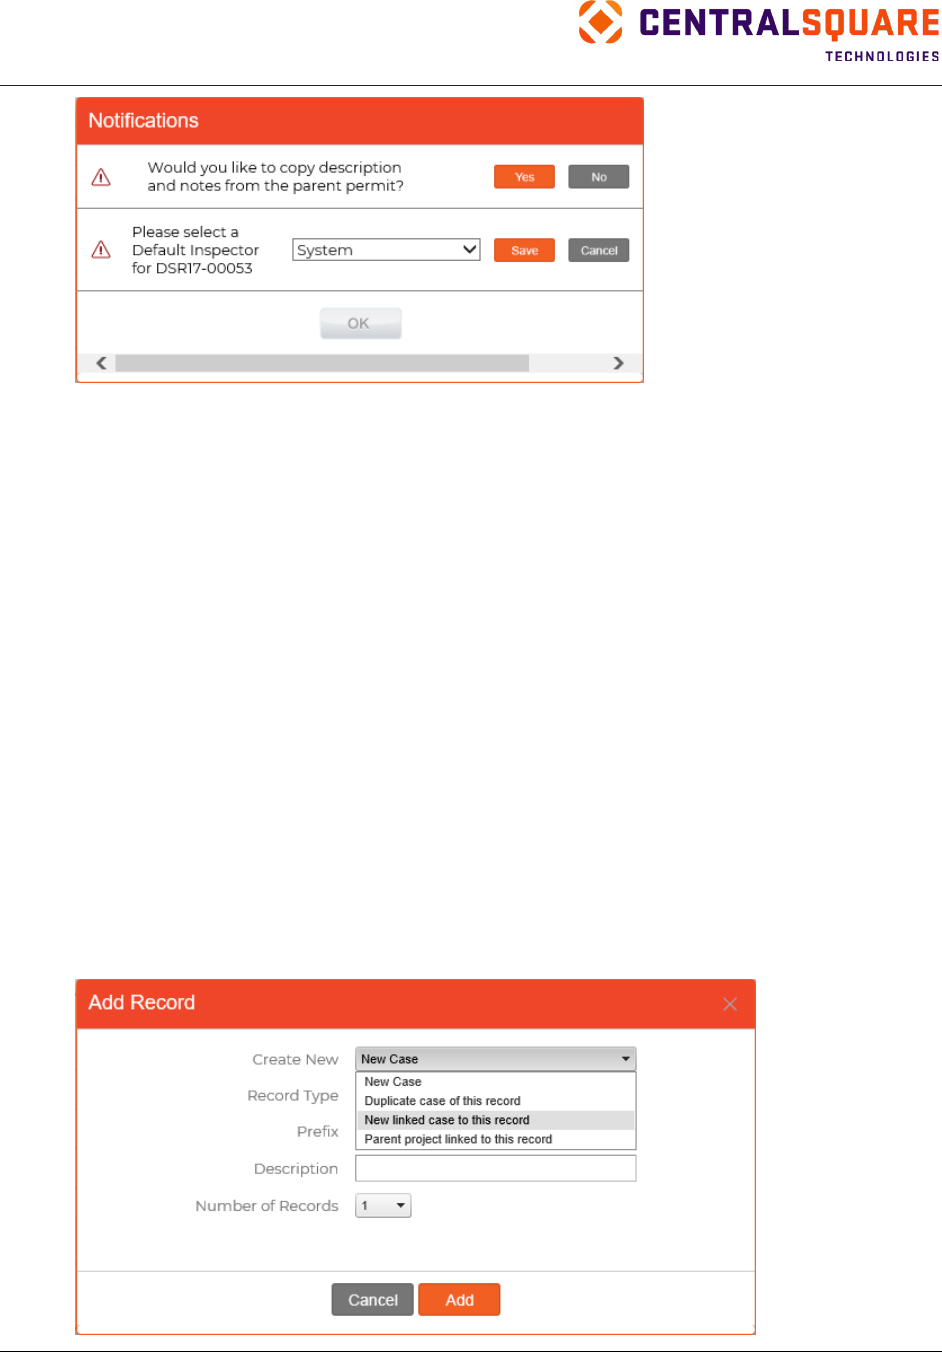
TRAKiT User Guide 18.1
Proprietary
May not be reproduced or distributed without written permission of CentralSquare Technologies.
Copyright 2018 CentralSquare Technologies. All rights reserved.
20181212JC Page 84
8.
Click OK.
Linking Existing Records
1.
Locate the record.
2.
Select Link To from the functions menu.
3.
Select the type of link relationship from the Link To menu.
4.
Locate the record using the Search feature.
5.
Click the record number in the results listing.
6.
Click OK to confirm the link.
Link Case Records
Case records can be cross‐linked to each other.
Adding Linked Case Records
To add a case record that is linked to an existing case record:
1.
Locate the existing record in CodeTRAK.
2.
Select Add Record from the functions menu.
3.
Select New linked case to this record from the Create New field.

TRAKiT User Guide 18.1
Proprietary.
May not be reproduced or distributed without written permission of CentralSquare Technologies.
Copyright 2018 CentralSquare Technologies. All rights reserved.
20181212JC Page 85
4.
Select a record type.
5.
Select a prefix.
6.
Type a description.
7.
Select the number of records you want to add.
8.
Click Add.
Associate Records with AEC Records
Associations between AEC records and permit, project, case, and license records enable you to navigate
to related permits or pay fees on related records directly from AEC TRAK. However, in order to preserve
historical information, contact information is not updated automatically. Creating an AEC record through
the Contacts pane automatically makes an association.
To associate an activity record with an AEC record, complete the following steps:
1.
Locate the activity record.
2.
In the Contacts pane, click Edit.
3.
In the Search field, type a name or address and then click Go.
4.
In the search results listing, find the record you want to associate and then click the record
number.
5.
Click Save.

TRAKiT User Guide 18.1
Proprietary
May not be reproduced or distributed without written permission of CentralSquare Technologies.
Copyright 2018 CentralSquare Technologies. All rights reserved.
20181212JC Page 86
Locking Records
Overview
TRAKiT can lock GeoTRAK records to freeze activity for a property that has an outstanding issue on a
permit, project, or case record.
When a GeoTRAK record is locked, no records can be created from or linked to that property and a red
flag appears on the property record and on all linked permit, project, and case records.
Locking a Record through an Activity
Your agency might choose to lock a GeoTRAK record when there is an outstanding issue on a permit,
project, or case that is linked to the property. Depending on your setup, an outstanding issue is identified
by certain status codes in PermitTRAK, ProjectTRAK, and CodeTRAK. For example, your agency might
choose to lock a property that is in violation of a code (CodeTRAK status of Non‐compliance). When a
permit, project, or case record is set to one of these record-locking status codes, the property is locked by
the activity.
To lock a property record through an activity, complete these steps:
1.
Locate the permit, project, or case record with an outstanding issue in PermitTRAK,
ProjectTRAK, or CodeTRAK.
2.
Ensure that the record is linked to GeoTRAK.
3.
Edit the record’s status and select a lock status (as defined by your system administrator).
4.
Click Save. The linked GeoTRAK record is locked. All records linked to the property display
.
To unlock a property record locked by an activity, complete these steps:
1.
Locate the permit, project, or case record with an outstanding issue in PermitTRAK,
ProjectTRAK, or CodeTRAK.
2.
Edit the record’s status and select a non‐locked status (as defined by your system administrator).
3.
Click Save. The linked GeoTRAK record is unlocked.
Locking a Record through GeoTRAK
To lock a property record manually through GeoTRAK, complete the following steps:
1.
Locate the record in GeoTRAK.
2.
Click Edit.
3.
Select a lock status (as defined by your system administrator).

TRAKiT User Guide 18.1
Proprietary.
May not be reproduced or distributed without written permission of CentralSquare Technologies.
Copyright 2018 CentralSquare Technologies. All rights reserved.
20181212JC Page 87
4.
Click Save.
Tip: If you lock a record manually through GeoTRAK, TRAKiT lists the record as being locked by
status.
Tip: Only system administrators or users with the Can Unlock a Locked Parcel privilege can unlock a
record that is locked through GeoTRAK.
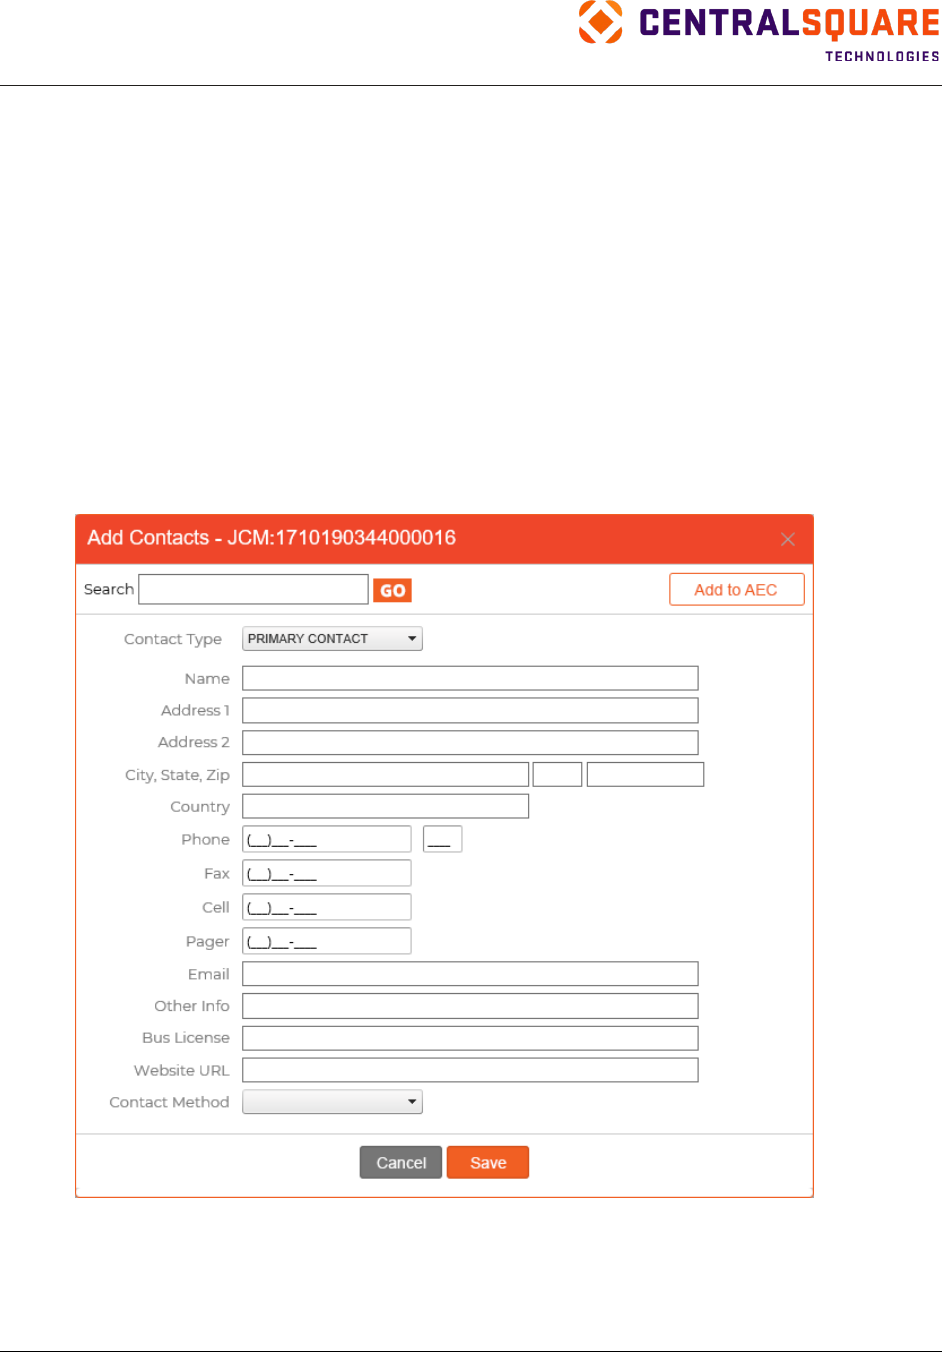
TRAKiT User Guide 18.1
Proprietary
May not be reproduced or distributed without written permission of CentralSquare Technologies.
Copyright 2018 CentralSquare Technologies. All rights reserved.
20181212JC Page 88
Contacts
Overview
The Contacts pane stores the contact information of individuals or companies associated with an activity
record.
Note: The maximum length for the Name, Other Name, Address 1, Address 2, and City fields is 60
characters.
Adding Contacts
To add a contact, complete the following steps:
1.
In any record, open the Contacts pane.
2.
Click Add Contacts.
3.
Select a contact type.
4.
Enter the contact name, address, phone numbers, and other information. Or, if the contact is
already in TRAKiT, use the Search feature to find and link the existing contact.
Tip: You can add a record to AEC TRAK directly from the Contacts pane if you are entering a new
contact. For more information about this feature, see “Adding AEC Records through the Contacts
Pane.”
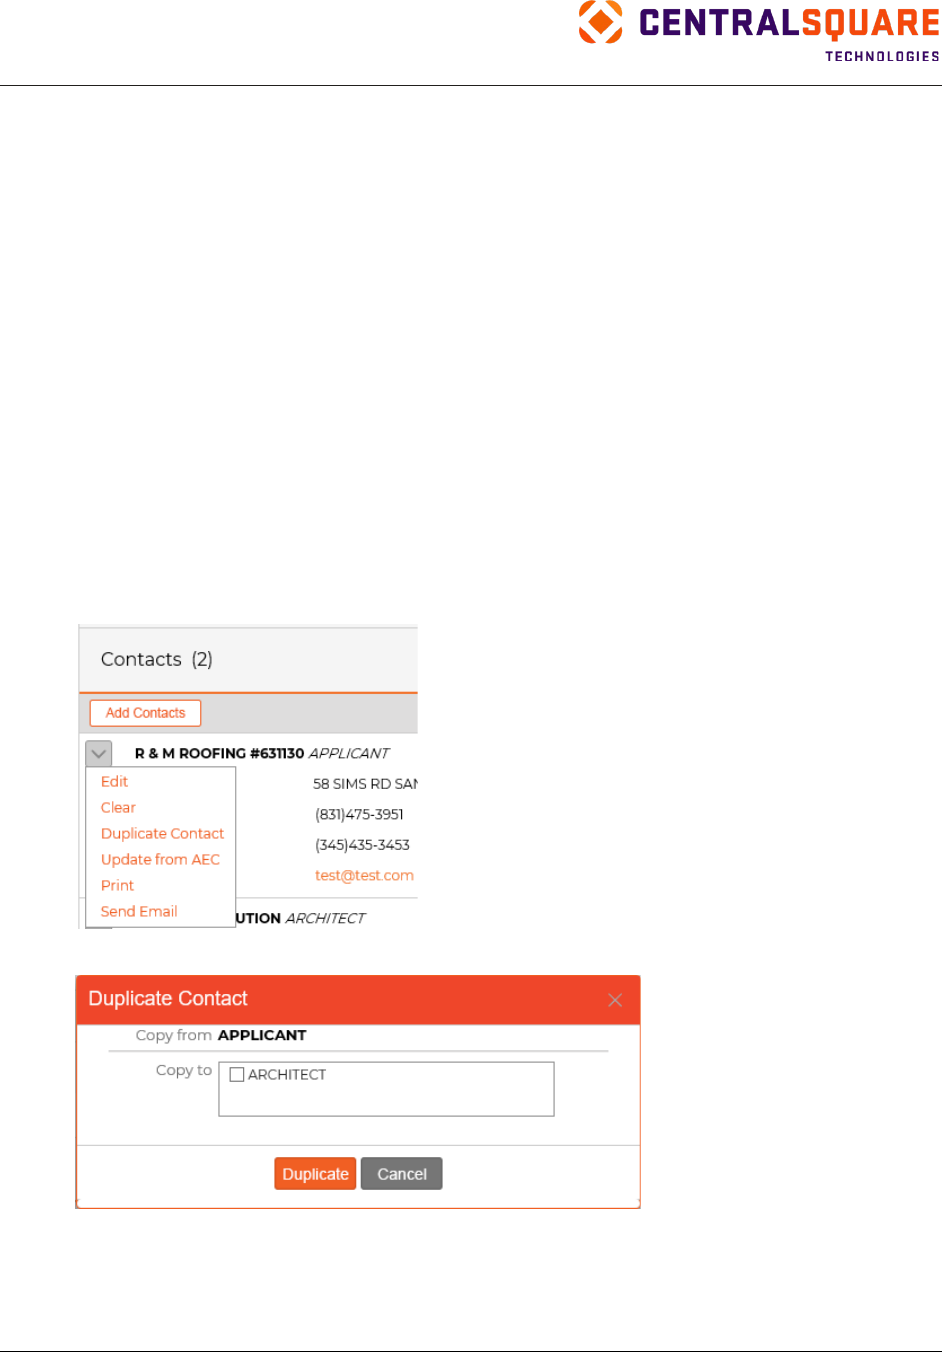
TRAKiT User Guide 18.1
Proprietary.
May not be reproduced or distributed without written permission of CentralSquare Technologies.
Copyright 2018 CentralSquare Technologies. All rights reserved.
20181212JC Page 89
Using Search in AEC TRAK, LicenseTRAK, GeoTRAK
This feature allows you to add an AEC TRAK record, an owner in GeoTRAK, or a business license as a
contact in a PermitTRAK, ProjectTRAK, CodeTRAK, LicenseTRAK, or AEC TRAK record.
To use the Search feature, complete the following steps:
1.
Open the Contacts pane.
2.
Select Edit next to the contact type you want to complete.
3.
Enter a name or address in the Search field.
4.
Click Go.
5.
Click the record number of the contact you want to add.
6.
Click Save.
Duplicating Contact Information
Use the Duplicate Contact function to copy information from one contact to one or more contacts in the
same PermitTRAK, ProjectTRAK, CodeTRAK, LicenseTRAK, or AEC TRAK record.
1.
Open the Contacts pane.
2.
Select Duplicate Contact from the functions menu.
3.
Select the contact(s) to copy to.
4.
Click Duplicate.
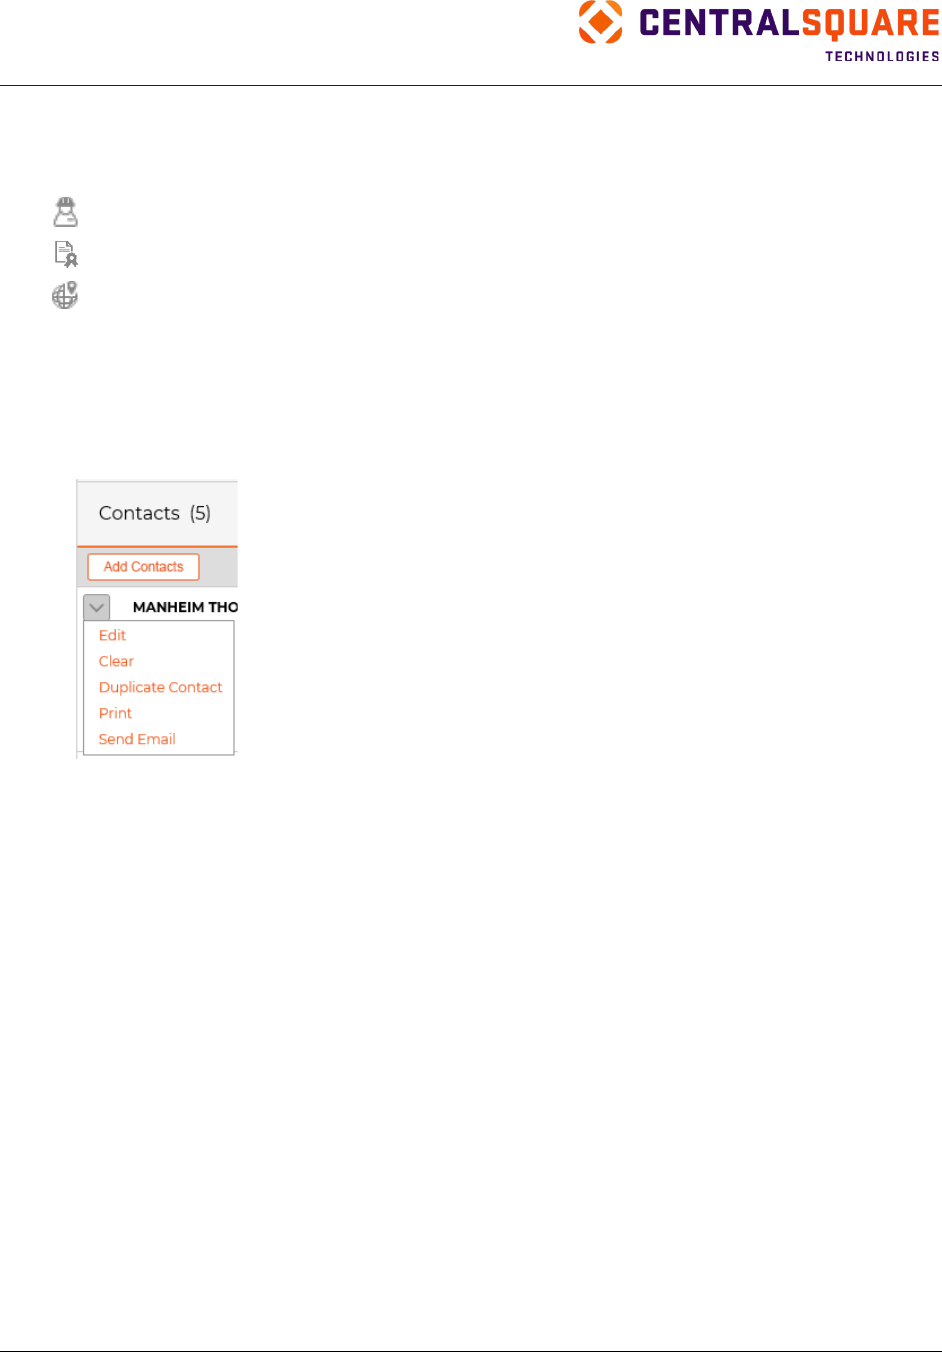
TRAKiT User Guide 18.1
Proprietary
May not be reproduced or distributed without written permission of CentralSquare Technologies.
Copyright 2018 CentralSquare Technologies. All rights reserved.
20181212JC Page 90
Using Association Icons
Use association icons to open linked or associated AEC TRAK, LicenseTRAK, and GeoTRAK records
from the Contacts pane in PermitTRAK, ProjectTRAK, CodeTRAK, LicenseTRAK, or AEC TRAK.
Click
to open the associated AEC TRAK record.
Click
to open the associated LicenseTRAK record.
Click
to open the associated GeoTRAK record.
Clearing a Contact
Clearing a contact removes all of the information from the selected contact.
1.
Open the Contacts pane.
2.
Select Clear from the functions menu next to the contact that you want to clear.
3.
Click Yes to confirm the action.

TRAKiT User Guide 18.1
Proprietary.
May not be reproduced or distributed without written permission of CentralSquare Technologies.
Copyright 2018 CentralSquare Technologies. All rights reserved.
20181212JC Page 91
Reviews
TRAKiT can track reviews associated with records in PermitTRAK, ProjectTRAK, and LicenseTRAK. You
can add, edit, void, and delete reviews. You can also automatically generate emails to reviewers and set
up alternate reviewers.
Adding Reviews
To add a review to a record in PermitTRAK, ProjectTRAK, or LicenseTRAK, complete the following steps:
1.
In a PermitTRAK, ProjectTRAK, or LicenseTRAK record, open the Reviews pane.
2.
Click Add Reviews.
3.
Select a reviewer. If you select Default Reviewer (if any), the review is assigned to the reviewer
defined in TRAKiT WUM. The default reviewer’s name can be changed.
4.
Select a status.
5.
Enter the date the review items are sent to the reviewer.
6.
Enter the date the review items are due back.
Tip: The reviewer, date sent, and date due can be set automatically when a review is added to a
record.
7.
Type remarks.
8.
Select one or more review types. The reviewer, status, date sent, date due, remarks, and notes
you entered are applied to all reviews you select.
9.
Type notes.
10.
Click Add.
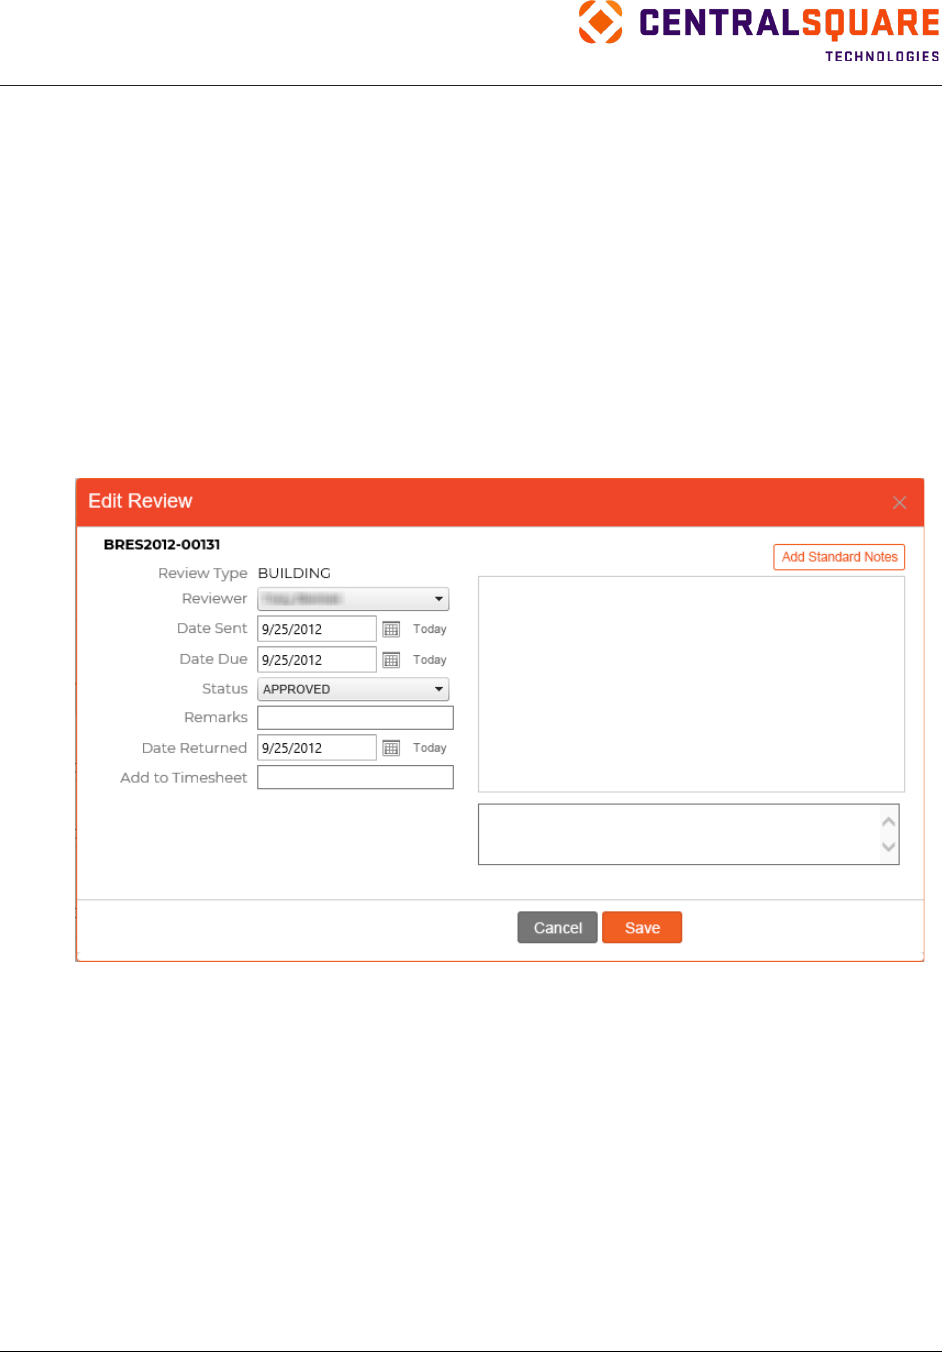
TRAKiT User Guide 18.1
Proprietary
May not be reproduced or distributed without written permission of CentralSquare Technologies.
Copyright 2018 CentralSquare Technologies. All rights reserved.
20181212JC Page 92
Note: If you set the Date Sent or Date Due field to a date in the past, the action is logged in the
audit table and a message appears. Click OK to continue with the date you selected or click
Cancel to return to the dialog box and change the date.
Note: Depending on your WUM settings, an automatic email might be sent to reviewers when a
review for a permit or project record is added in TRAKiT.
Editing Reviews
You can edit reviews from the record in PermitTRAK, ProjectTRAK, and LicenseTRAK or from the
Workspace Review Center. See “Review Center” for more information about using the Review Center.
To edit reviews from the record in PermitTRAK, ProjectTRAK, or LicenseTRAK, complete the following
steps:
1.
In a PermitTRAK, ProjectTRAK, or LicenseTRAK record, open the Reviews pane.
2.
Click Edit next to the review that you want to add information to.
3.
Update the review as necessary with the reviewer, dates, status, remarks, and other details.
Tip: Depending on your WUM settings, when you change the Reviewer field to add a reviewer or
change the reviewer, TRAKiT might send an email to the new reviewer.
4.
To add standard notes, click Add Standard Notes, select the notes you want to add, and then
click OK.
Tip: You can add standard notes, a custom note, or both.
Tip: Standard notes are configured by your system administrator.
5.
Click Save.
Note: If you set the Date Sent or Date Due field to a date in the past, the action is logged in the
audit table and a message appears. Click OK to continue with the date you selected or click
Cancel to return to the dialog box and change the date.
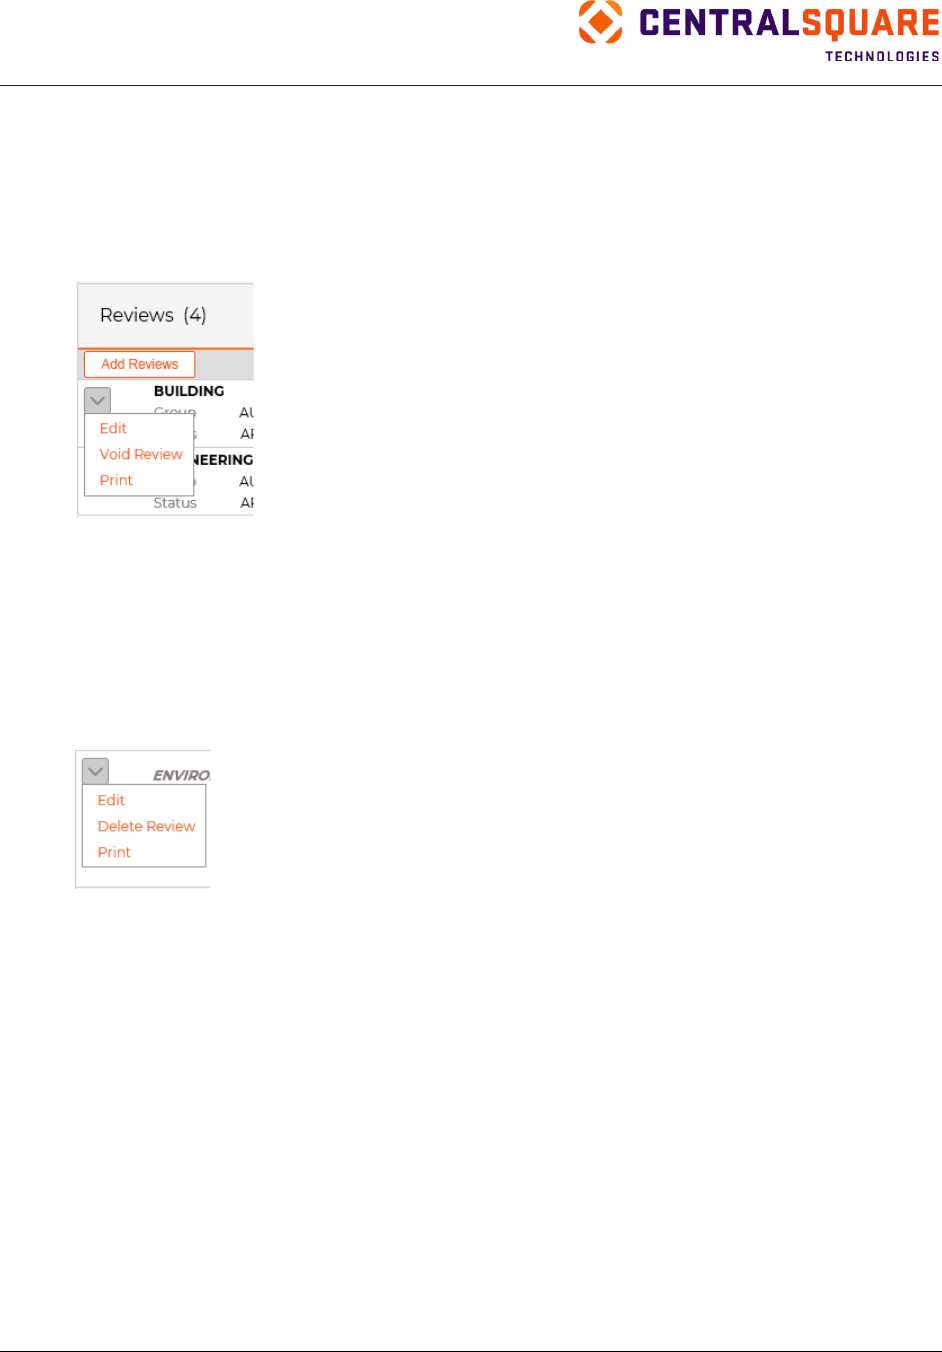
TRAKiT User Guide 18.1
Proprietary.
May not be reproduced or distributed without written permission of CentralSquare Technologies.
Copyright 2018 CentralSquare Technologies. All rights reserved.
20181212JC Page 93
Voiding Reviews
Users who do not have the Can Delete Reviews privilege can void reviews but not delete them.
To void a review, complete the following steps:
1.
Open the Reviews pane.
2.
Select Void Review from the functions menu.
3.
Click Yes.
Deleting Reviews
Only system administrators or users with the Can Delete Reviews privilege can delete reviews. A review
must be voided before it can be deleted.
1.
Open the Reviews pane.
2.
Select Delete Review from the functions menu.
3.
Select Yes to confirm the deletion.
Automating Emails by Module and Review Type
Use this feature to automatically generate emails from custom templates both by module and review type.
When enabled and set up in TRAKiT Web Utilities & Maintenance (WUM), each review type generates an
email to the assigned reviewer when a review is added. Contact your system administrator or refer to the
TRAKiT System Administrator guide for more information about automatic emails for reviews.
Alternate Reviewer
Use this feature to assign an alternate reviewer when the default reviewer is out of the office or does not
respond to the review in a timely manner. Reviews are assigned to the alternate reviewer under the
following conditions:
• The default reviewer does not acknowledge the review within two days of assignment
• The default reviewer is unavailable for the entire review period (day the review was assigned
through the due date)
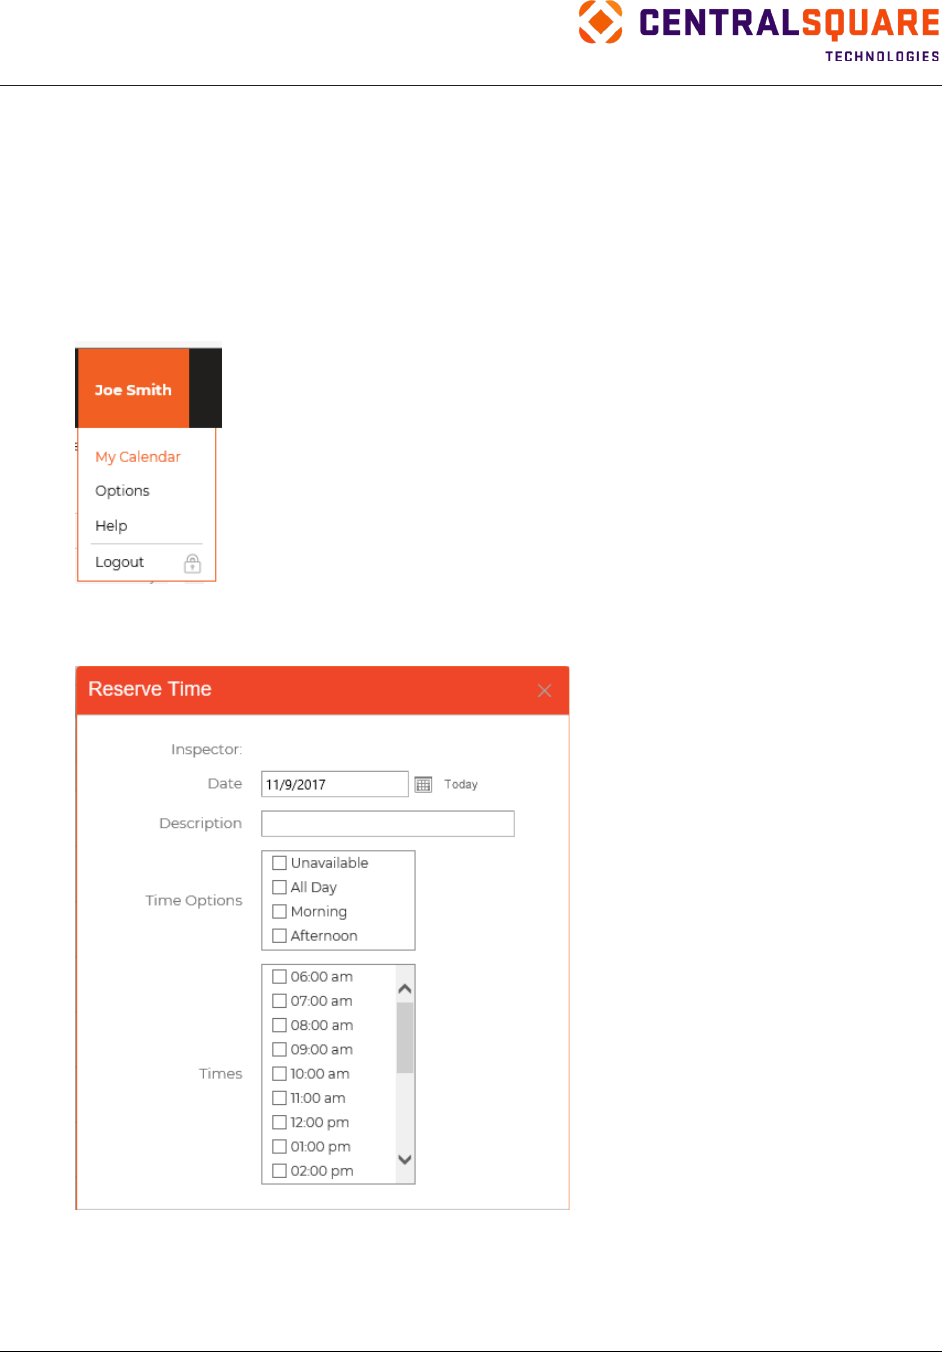
TRAKiT User Guide 18.1
Proprietary
May not be reproduced or distributed without written permission of CentralSquare Technologies.
Copyright 2018 CentralSquare Technologies. All rights reserved.
20181212JC Page 94
Note: If both the default reviewer and alternate reviewer are unavailable, the review is assigned
to the alternate reviewer.
To use this feature, complete the following setup:
1.
System Administrator: In TRAKiT Web Utilities & Maintenance (WUM), set up alternate reviewers
for each review type in each module.
2.
Reviewers: In TRAKiT, designate time when you are unavailable by completing the following
steps:
a. Point to the user menu and then click My Calendar.
b. In the Relationships pane, click Reserve Time.
c. Select the out-of-office date and time.
d. Click OK.
Note: In TRAKiT WUM (for PermitTRAK and ProjectTRAK), the Review Trigger preference enables
the status of projects and permits to be changed automatically when all review statuses are set to a
user-defined status (or list of statuses).
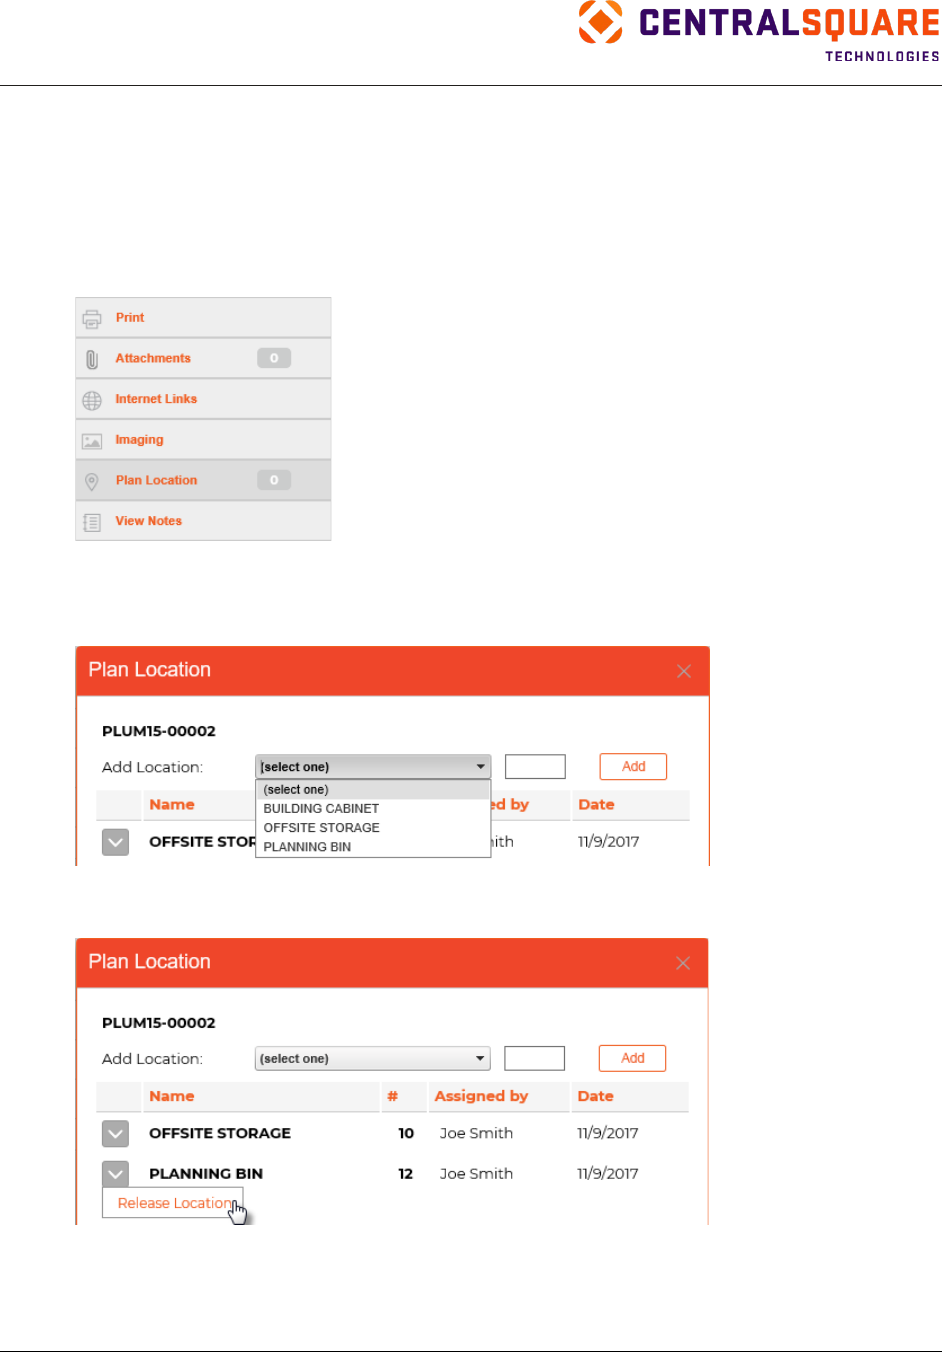
TRAKiT User Guide 18.1
Proprietary.
May not be reproduced or distributed without written permission of CentralSquare Technologies.
Copyright 2018 CentralSquare Technologies. All rights reserved.
20181212JC Page 95
Plan Location
Plan Location manages and tracks the physical location of all plan items that are associated with a record
in PermitTRAK or ProjectTRAK.
Note: The list of plan locations must be set up by a system administrator before you can use this
feature in TRAKiT.
To access Plan Location, click Plan Location in the Relationships pane.
From the Plan Location dialog box, you can:
•
Assign a plan location. First, select the location type. TRAKiT assigns an available location. Click
Add.
•
Release a location. Point to the functions menu next to the location you want to release and then
click Release Location.
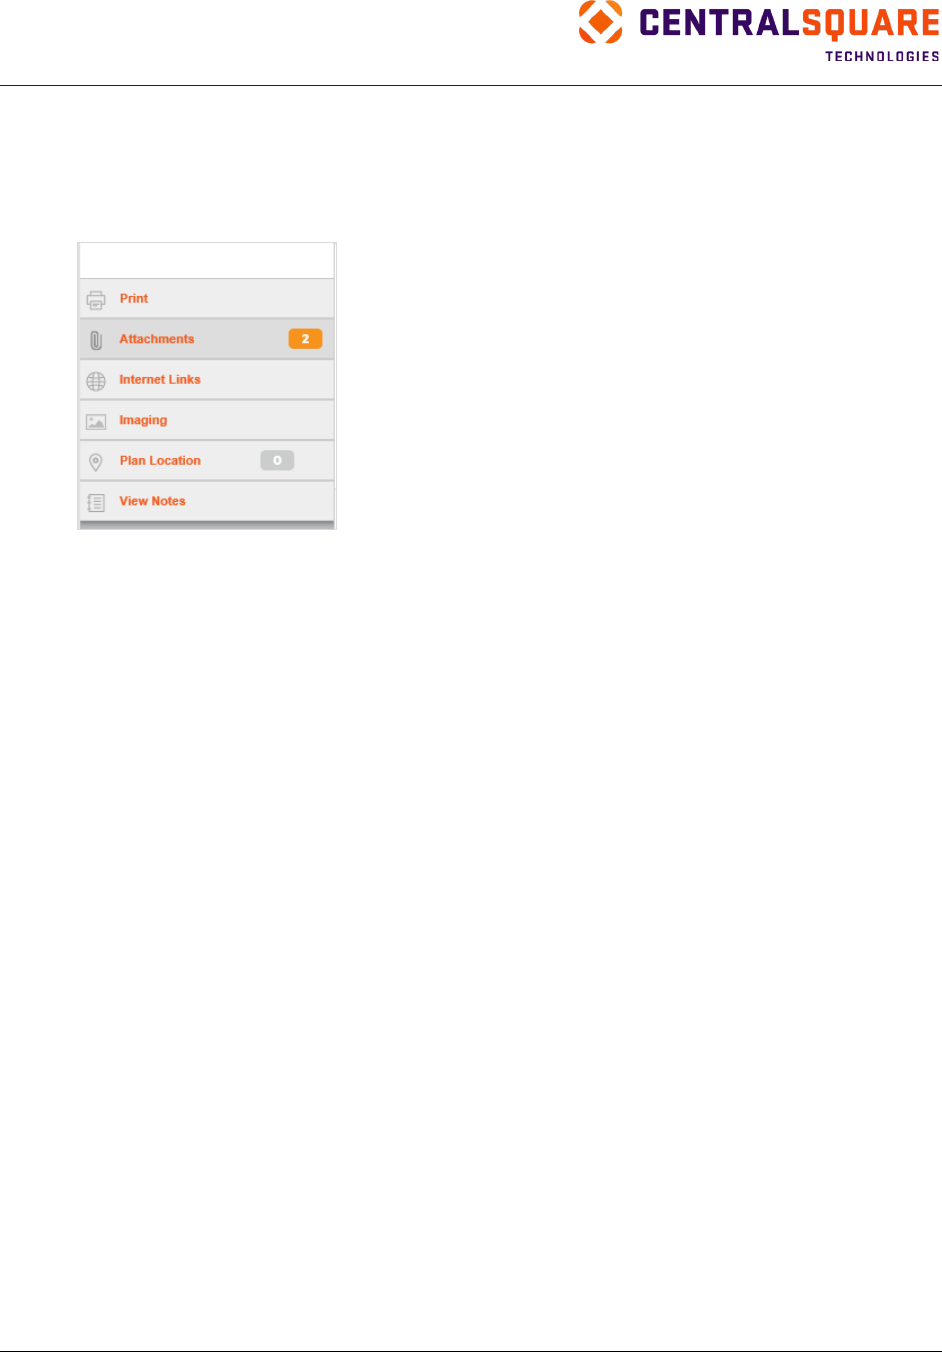
TRAKiT User Guide 18.1
Proprietary
May not be reproduced or distributed without written permission of CentralSquare Technologies.
Copyright 2018 CentralSquare Technologies. All rights reserved.
20181212JC Page 96
Attachments
You can attach a file with any file format to a record in PermitTRAK, ProjectTRAK, CodeTRAK,
LicenseTRAK, AEC TRAK, GeoTRAK, or CRM TRAK. Attachments are stored on the server.
To manage attachments, locate the record and then click Attachments in the Relationships pane.
In the Attachments dialog box, you can perform the following functions:
• View a list of attachments
• Add attachments
• Sort the attachments list and save a default sort for the record type
Note: See “Saving the Sort Order” for more information.
• Open attachments
Note: Attachments open in the default program associated with the file type (for example, pdf files
generally open in Adobe
®
Acrobat
®
).
• Delete attachments
• Send an attachment in an email
• Make an attachment available or unavailable to view in eTRAKiT
• Rename attachments
• Add or change the description of an attachment
• Add or change the document type
• Set options and perform functions related to your document management system, depending on
the system you use
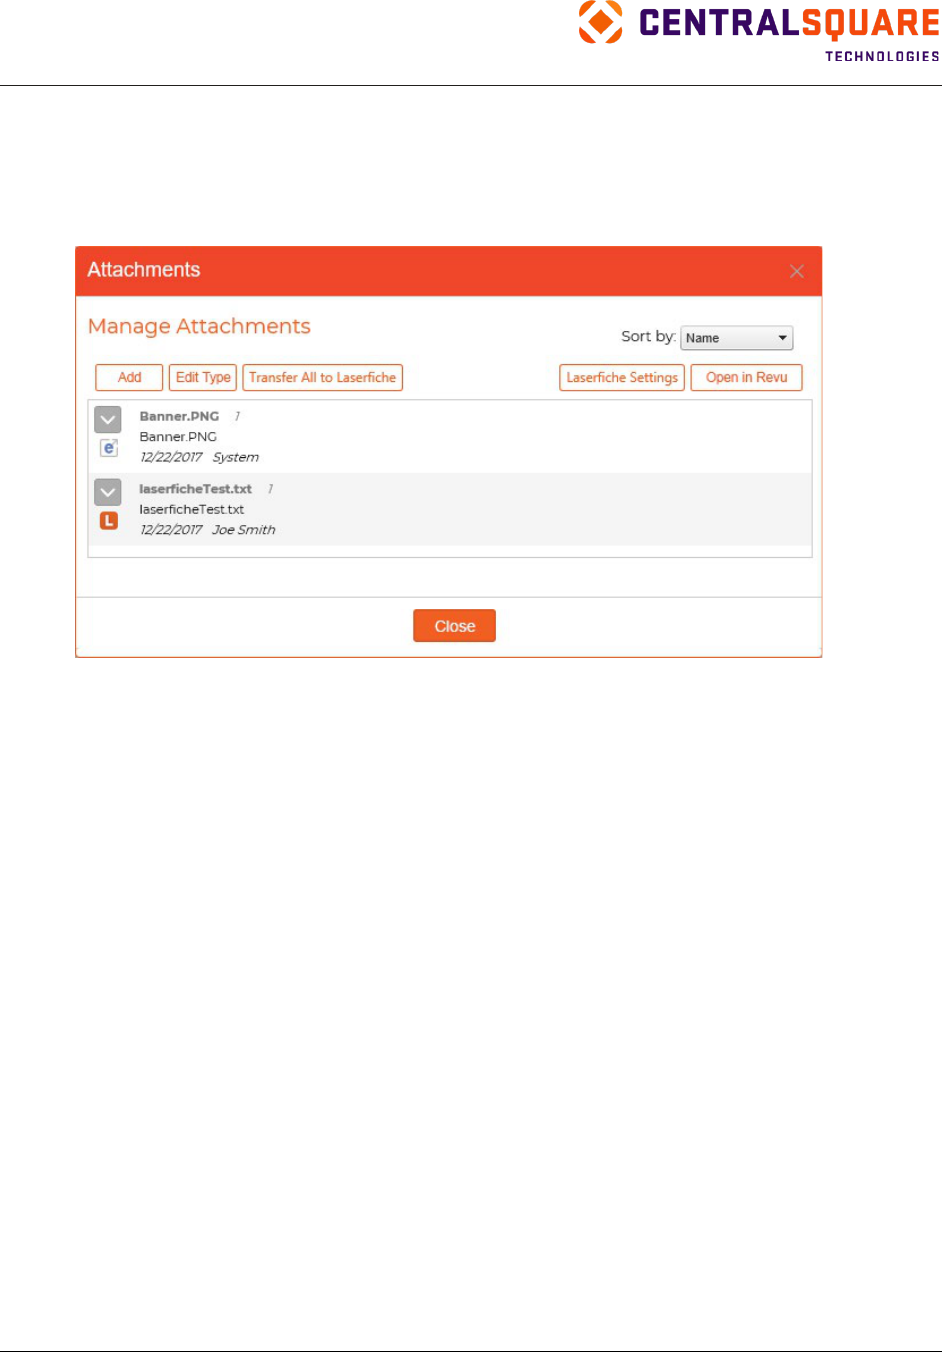
TRAKiT User Guide 18.1
Proprietary.
May not be reproduced or distributed without written permission of CentralSquare Technologies.
Copyright 2018 CentralSquare Technologies. All rights reserved.
20181212JC Page 97
Attaching Files
To attach a file to a TRAKiT record, complete the following steps:
1.
In the Relationships pane, click Attachments. The Attachments dialog box appears.
Note: Options in this dialog box vary depending on the document management system you use.
2.
Click Add.
3.
Click Browse.
4.
In the Choose File to Upload dialog box, select the file you want to attach and then click Open.
Tip: Attachment file names cannot include the plus sign (+) or non-ASCII characters. If the file
name of an attachment contains the plus sign or a non-ASCII character, TRAKiT changes the
character to an underscore ( _ ) when uploading the file.
Attachments that were uploaded in TRAKiT versions 17.2 and earlier might contain one of these
characters. These attachments must be renamed manually to change the plus sign or non-ASCII
character to an underscore or other ASCII character. You will not be able to view or edit these
attachments until they are renamed.
To rename a file, click Attachments in the Relationships pane. Point to the functions menu for
the file you want to rename and then click Rename Filename. Type the file name changes and
then click Save.
5.
In the unlabeled text field, type a file description. The file name is the default description.
6.
If you want users to be able to view the attachment on your eTRAKiT public website, select the
unlabeled checkbox next to the file name.
7.
Click OK.
Note: The date and the name of the user who attached the document are recorded automatically.
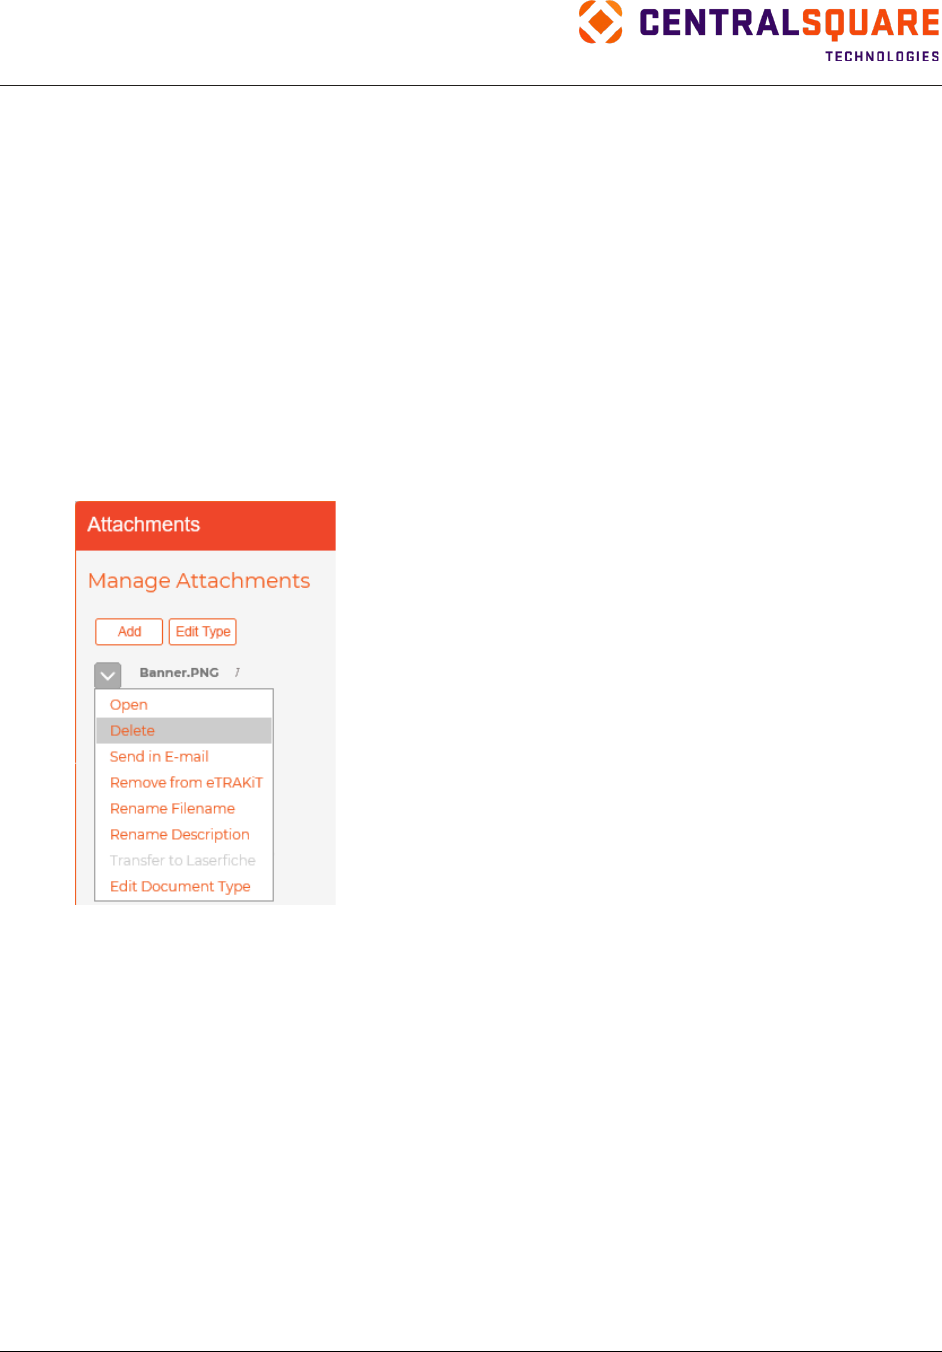
TRAKiT User Guide 18.1
Proprietary
May not be reproduced or distributed without written permission of CentralSquare Technologies.
Copyright 2018 CentralSquare Technologies. All rights reserved.
20181212JC Page 98
Opening Attachments
You can open images and documents that are attached to a TRAKiT record.
To open images and documents, complete the following steps:
1.
In the Relationships pane, click Attachments. The Attachments dialog box appears.
2.
From the functions menu for the attachment you want to view, click Open.
3.
The file opens in the default associated application. For example, pdf files generally open in
Adobe Acrobat.
Deleting Attachments
To delete an attachment, complete the following steps:
1.
In the Relationships pane, click Attachments. The Attachments dialog box appears.
2.
Click Delete on the functions menu next to the attachment.
3.
Click Yes to confirm the deletion.
Sending an Attachment in an Email
To send a TRAKiT attachment in an email, complete the following steps:
1.
In the Relationships pane, click Attachments. The Attachments dialog box appears.
2.
Click Send in E-mail on the functions menu next to the attachment.
3.
Add the following information:
a. In the To field, type the recipient’s email address.
b. In the Subject field, type a subject.
c. In the Body field, type a message.
4.
Click Send Email.
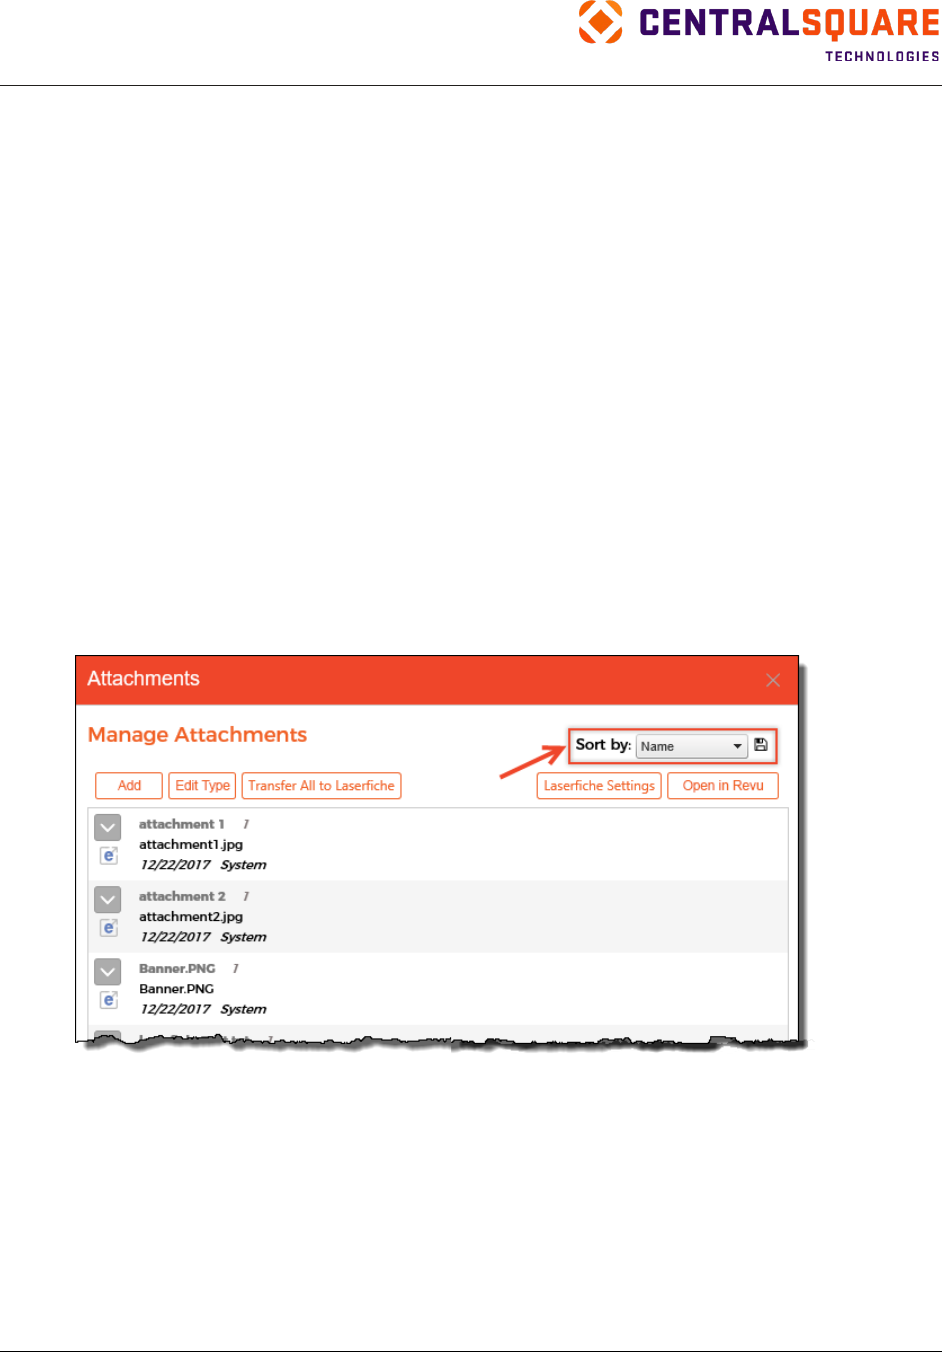
TRAKiT User Guide 18.1
Proprietary.
May not be reproduced or distributed without written permission of CentralSquare Technologies.
Copyright 2018 CentralSquare Technologies. All rights reserved.
20181212JC Page 99
Additional Features
Saving the Sort Order
You can save a sort order for the list of attachments in the Attachments dialog box. The saved sort order
is module-specific.
In the Attachments dialog box, select an option in the Sort by field and then click the Save
button.
The following sort options are available:
• Name—Sort by file name.
• Type—Sort into image/photo and document files. Image and photo files have file extensions such
as .jpg and .png. Documents are all files that are not images. If you select this option, document
files appear first in the listing following by image/photo files.
• Owner—Sort by the user who uploaded the document.
• Date—Sort by the date the document was uploaded.
• Document Type—Sort by document type category. Your agency defines these categories.
After you save a sort order, attachments are listed in that order each time you open the Attachments
dialog box for the same type of activity record. For example, if you view attachments for a permit record
and you save Type as the sort order, attachments are listed in type order for any permit record you view.
You can save a different sort order for each type of activity record.
Note: The Save button appears only when the Sort by field is different than your saved setting.
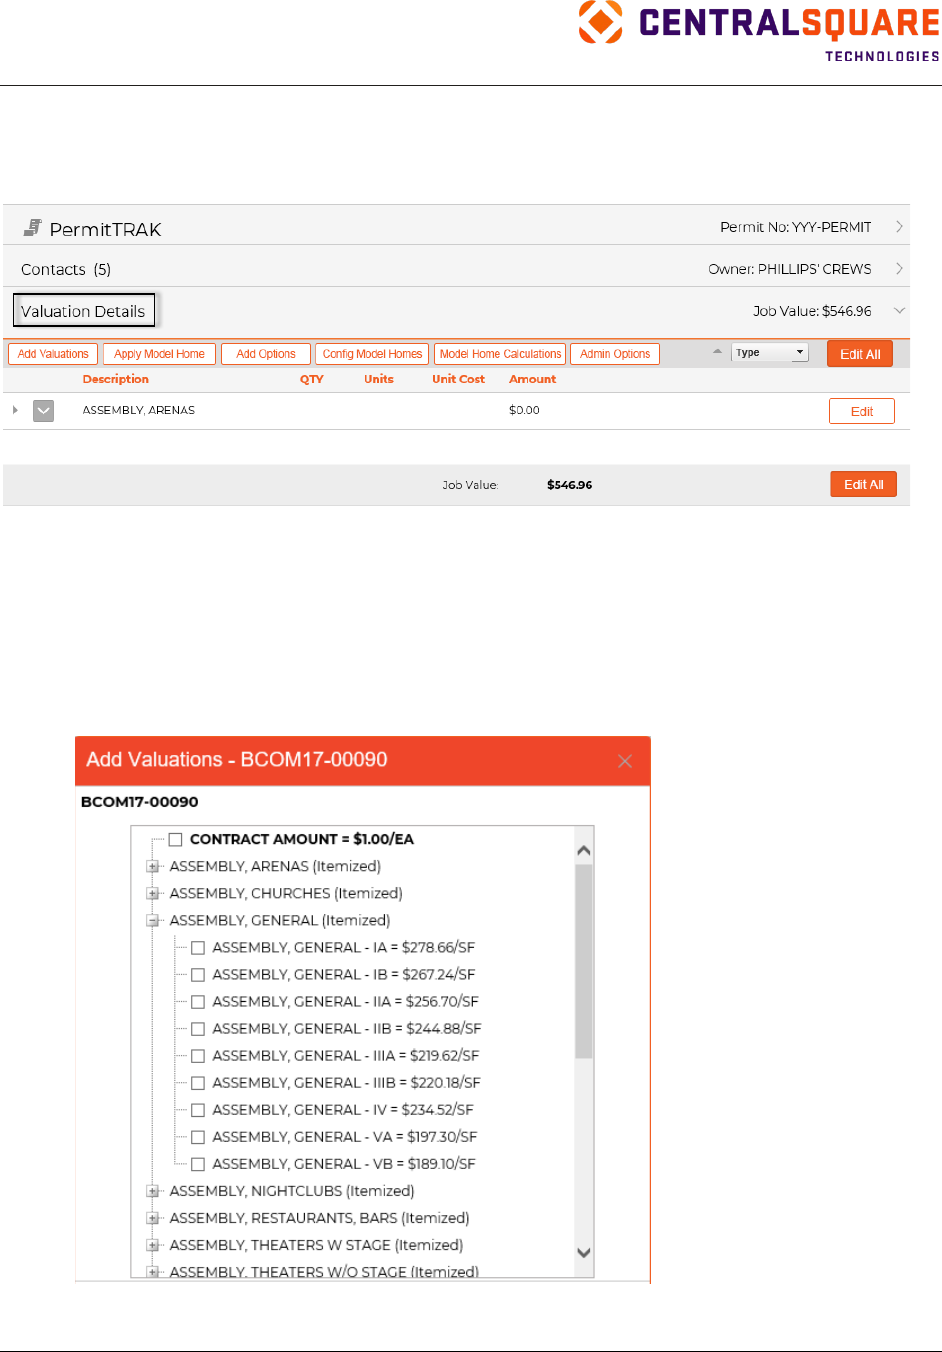
TRAKiT User Guide 18.1
Proprietary
May not be reproduced or distributed without written permission of CentralSquare Technologies.
Copyright 2018 CentralSquare Technologies. All rights reserved.
20181212JC Page 100
Valuations
TRAKiT can calculate and track the job value for a record in PermitTRAK. Use the Valuation Details
pane to manage job value details.
Adding Valuations
To add a valuation, complete the following steps:
1.
Open the Valuation Details pane.
2.
Click Add Valuations.
3.
Select one or more valuation items by which the job value is calculated. To expand a valuation
category, select the plus sign (+).
4.
Click Add.
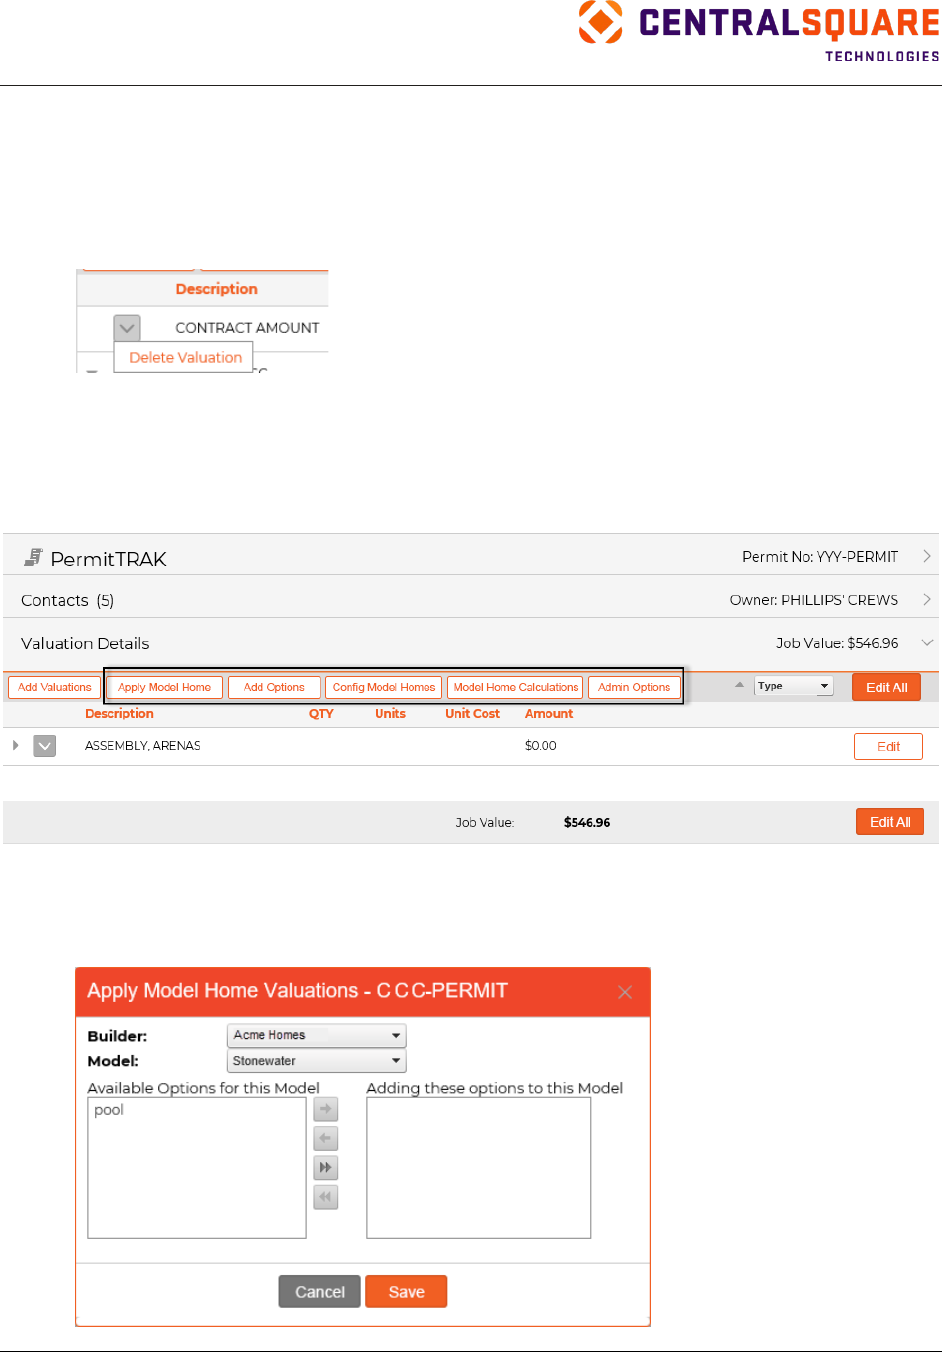
TRAKiT User Guide 18.1
Proprietary.
May not be reproduced or distributed without written permission of CentralSquare Technologies.
Copyright 2018 CentralSquare Technologies. All rights reserved.
20181212JC Page 101
Deleting Valuations
1.
Open the Valuation Details pane.
2.
In the listing, find the valuation or subvaluation item you want to delete.
3.
Point to the functions menu and then click Delete Valuation or Delete Sub-Valuation,
depending on the level of the item you are deleting.
4.
Click Yes to confirm the deletion.
Model Home Templates
This feature streamlines the workflow for model home permits and projects using model home templates.
Templates are configurable according to builders, models, base configuration, and optional valuations.
Apply Model Home
Click Apply Model Home on the Valuations pane to select the builder and model for the template. If
options are known at this point, you can choose the options.
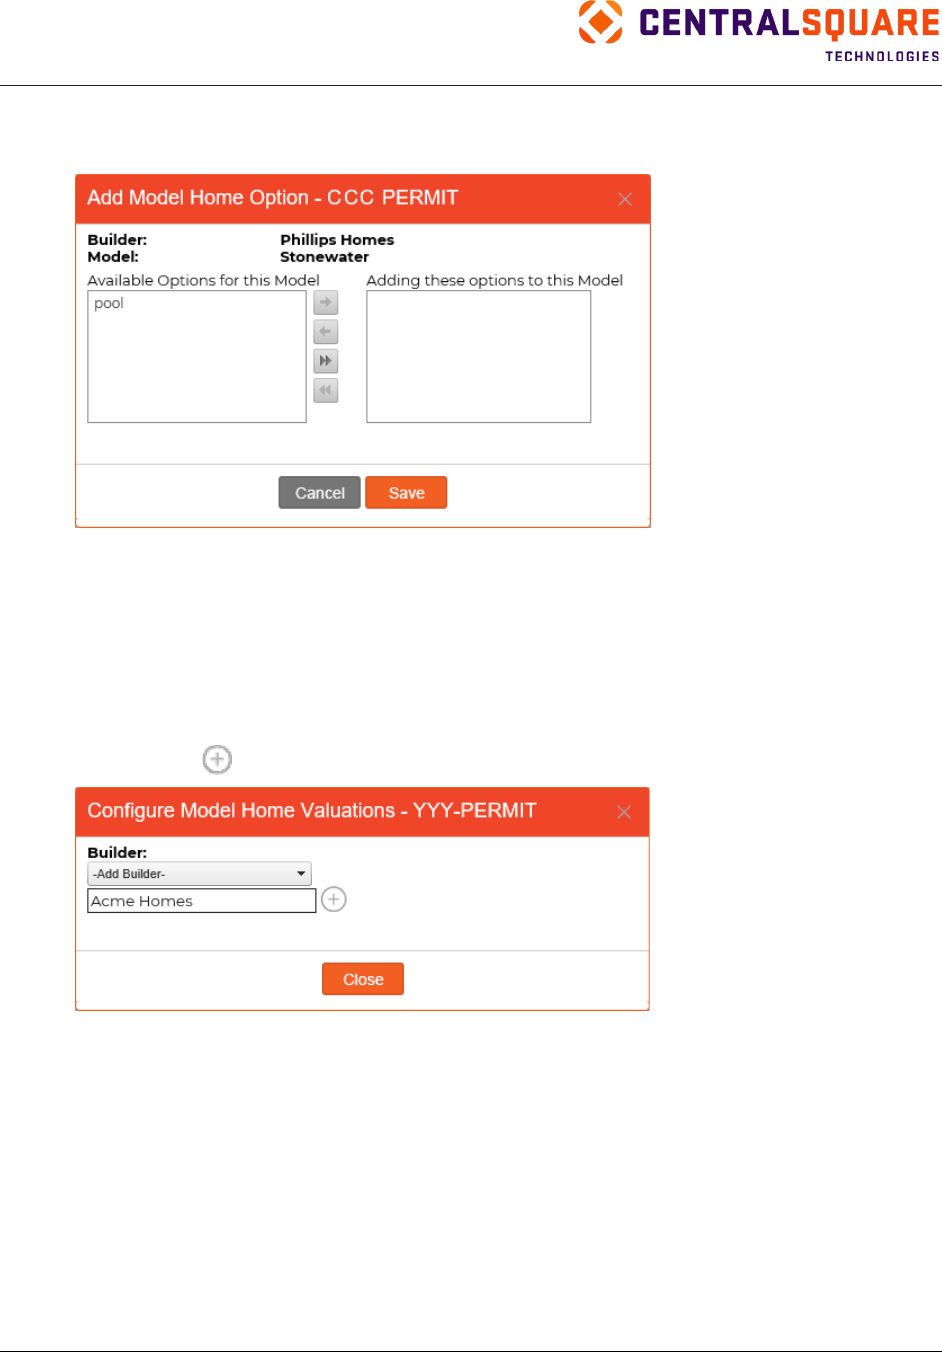
TRAKiT User Guide 18.1
Proprietary
May not be reproduced or distributed without written permission of CentralSquare Technologies.
Copyright 2018 CentralSquare Technologies. All rights reserved.
20181212JC Page 102
Add Options
Click Add Options on the Valuations pane to select additional options for the template.
Configure Model Homes
Use the Config Model Homes button to set up the builders, models, and both the base and options
valuations for the model home template.
To set up a model homes with base and optional valuations, complete the following steps.
1.
Click Config Model Homes.
2.
Select a builder or add a builder. To add a builder, select Add Builder, enter the builder’s name,
and then click
.

TRAKiT User Guide 18.1
Proprietary.
May not be reproduced or distributed without written permission of CentralSquare Technologies.
Copyright 2018 CentralSquare Technologies. All rights reserved.
20181212JC Page 103
3.
If the model is not already set up, set up the model by typing the name of the model and then
clicking .
4.
Click Base next to the model you want to configure.
Note: The Base link must be tied to the appropriate valuation(s) for model home templates to
function properly.
5.
Select from the available choices in the drop-down menu and then click
. Enter the applicable
square feet in the corresponding field. Click Save and then click Back.
Note: The valuation options are set up in the Master Valuation List in TRAKiT Web Utilities &
Maintenance (WUM).
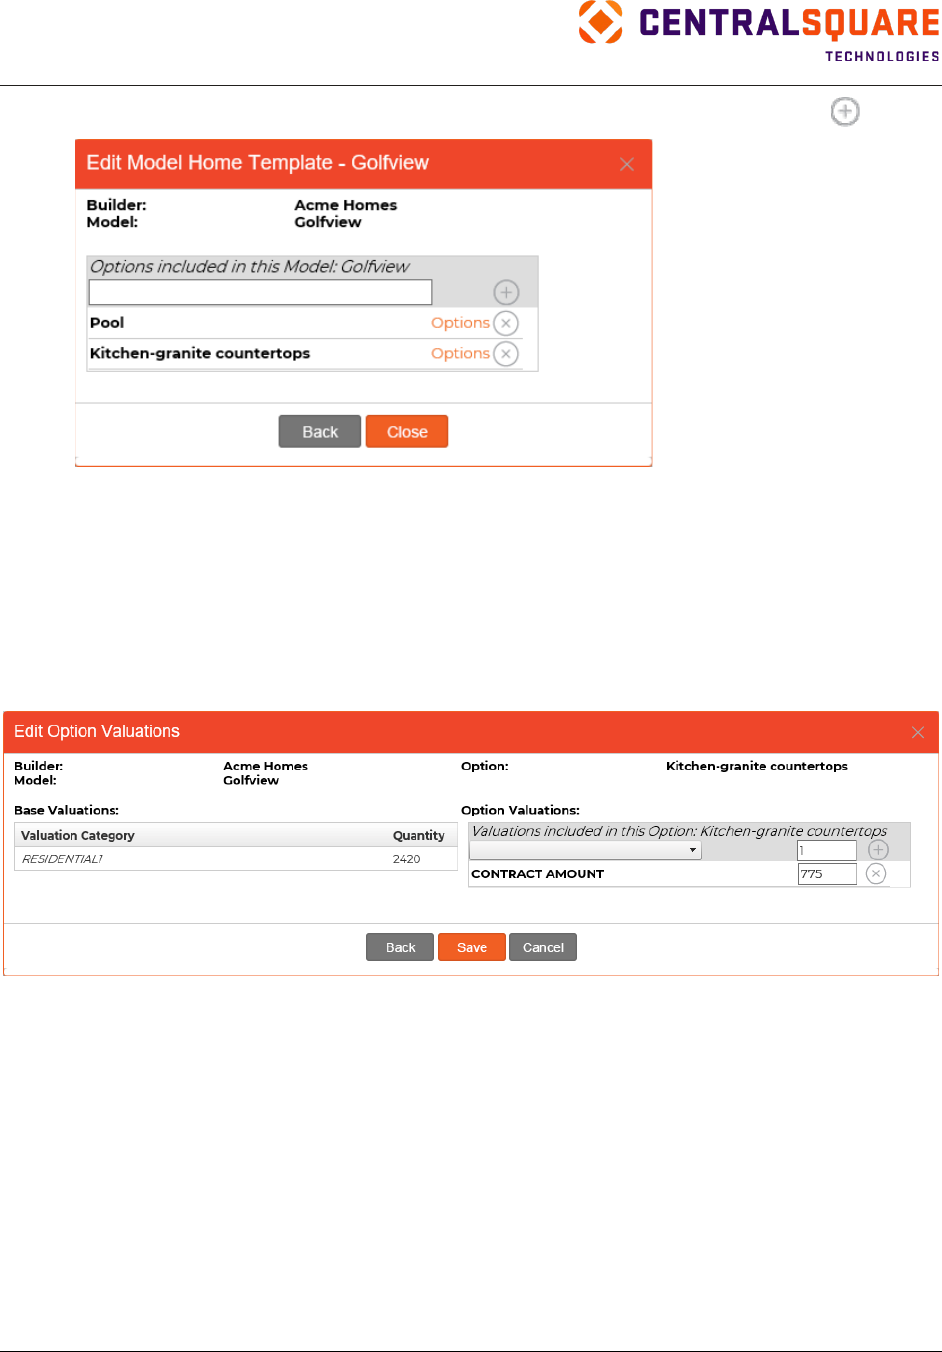
TRAKiT User Guide 18.1
Proprietary
May not be reproduced or distributed without written permission of CentralSquare Technologies.
Copyright 2018 CentralSquare Technologies. All rights reserved.
20181212JC Page 104
6.
Click Options next to the model you want to configure. Type an option and then click
.
7.
Edit option valuations by completing these steps:
a. Click the Options link for an option.
b. Select and add each valuation to be included with the option.
c. Enter the square feet.
d. Repeat for each option.
Note: The Options link must be tied to the appropriate valuation(s) for model home templates to
function properly.
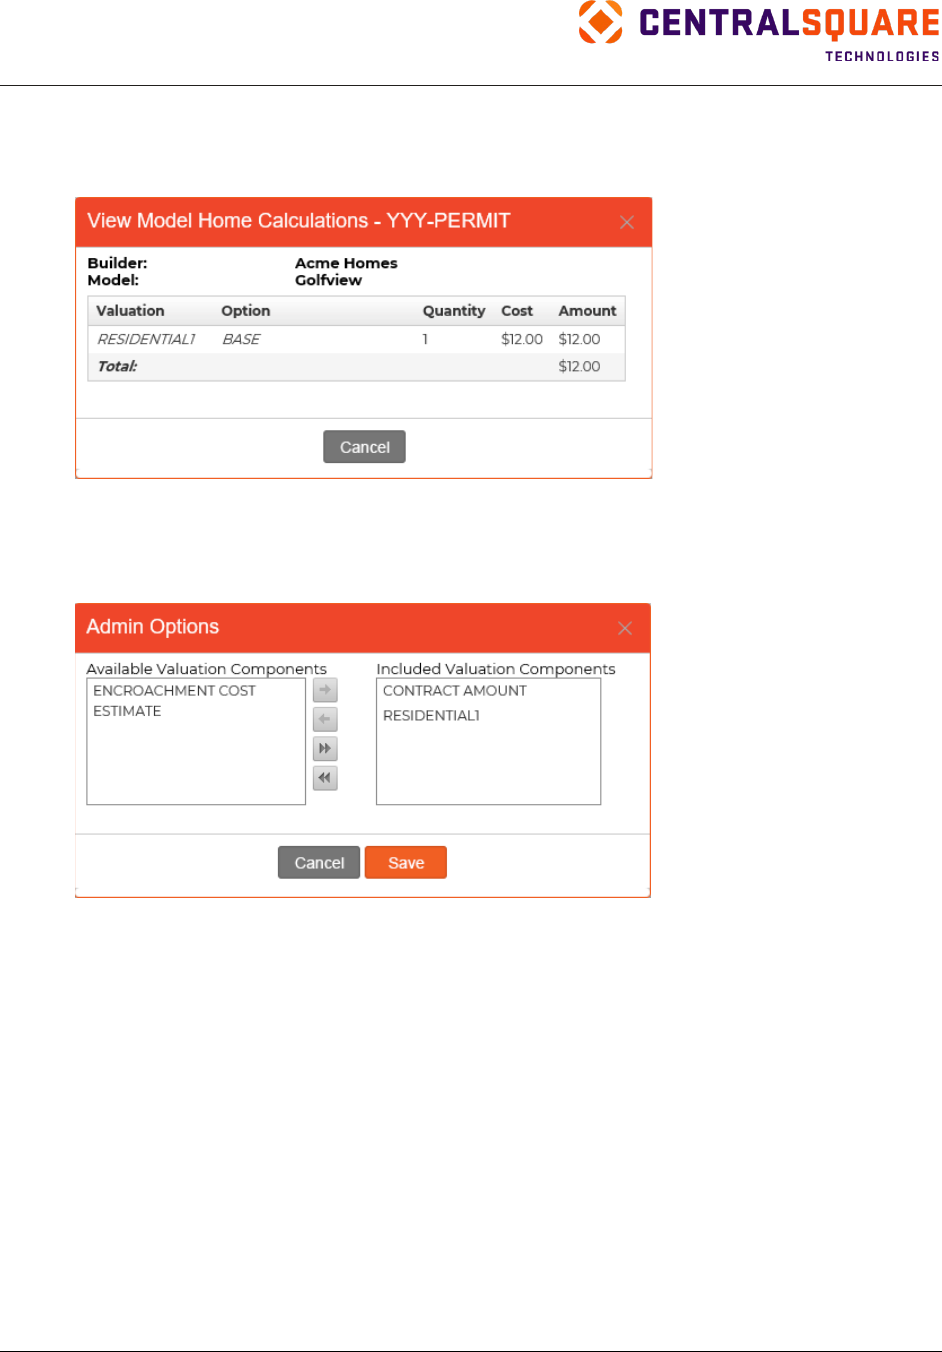
TRAKiT User Guide 18.1
Proprietary.
May not be reproduced or distributed without written permission of CentralSquare Technologies.
Copyright 2018 CentralSquare Technologies. All rights reserved.
20181212JC Page 105
Model Home Calculations
Click Model Home Calculations to display the total cost of a model home template according to the
selected builder, model, and additional options.
Admin Options
Click Admin Options to select and effectively limit option valuations that are available as choices when
configuring model homes.
Note: All remaining model home administrator functions, including valuation setup, are included in the
TRAKiT System Administration Guide.
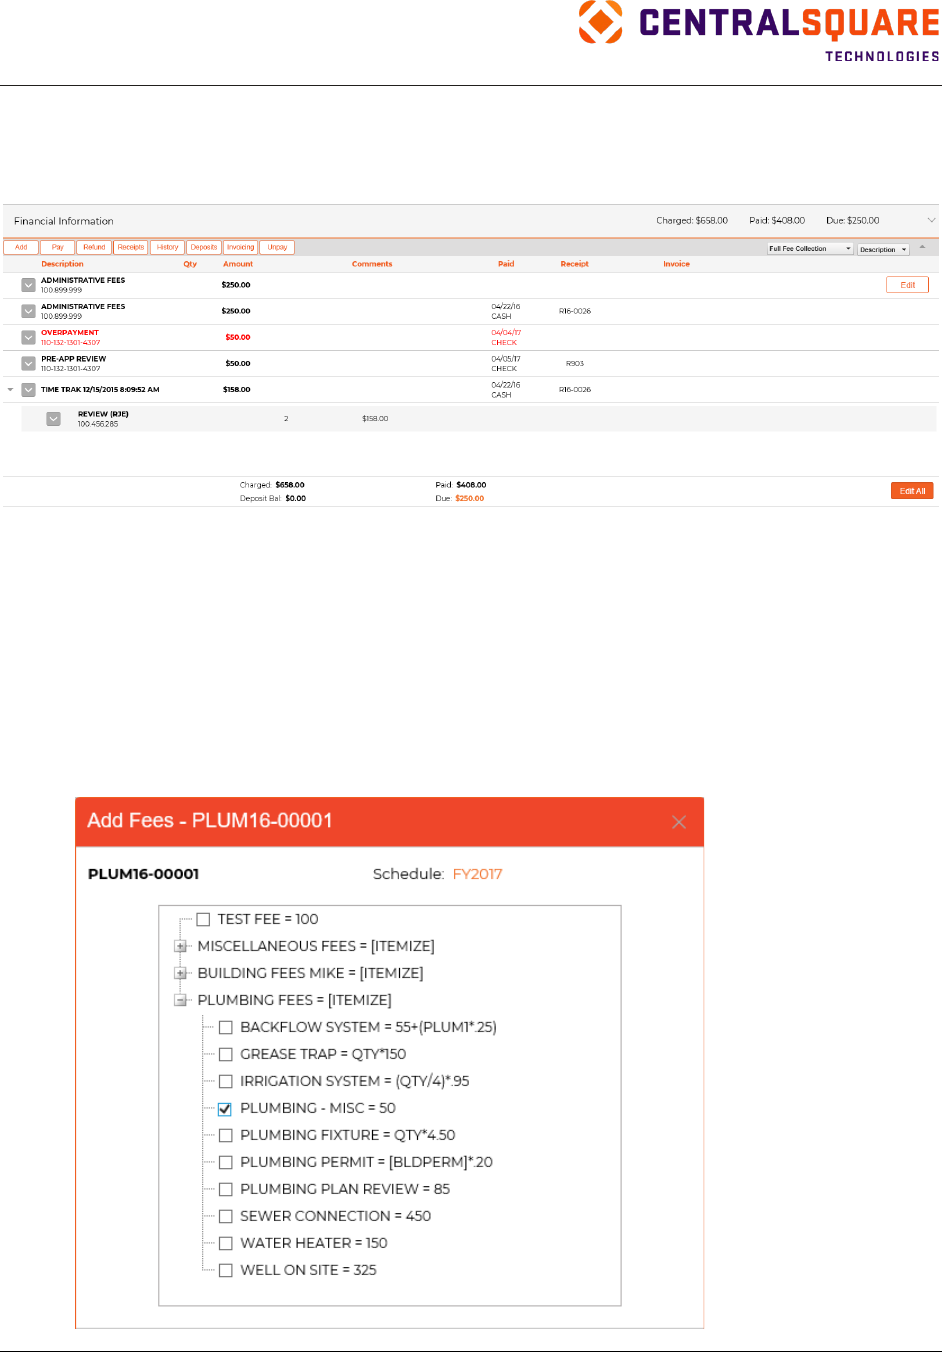
TRAKiT User Guide 18.1
Proprietary
May not be reproduced or distributed without written permission of CentralSquare Technologies.
Copyright 2018 CentralSquare Technologies. All rights reserved.
20181212JC Page 106
Fees
You can assess fees, collect payments, print receipts, and perform other cashiering functions from the
Financial Information pane.
Note: If cashiering is disabled in your database, some of these functions are not available. Contact
your system administrator for more information.
Assessing Fees
To assess fees, complete the following steps:
1.
Open the Financial Information pane.
2.
Click Add.
3.
Select one or more fees to assess. To expand a fee category, click the plus sign or double‐click
the category name.
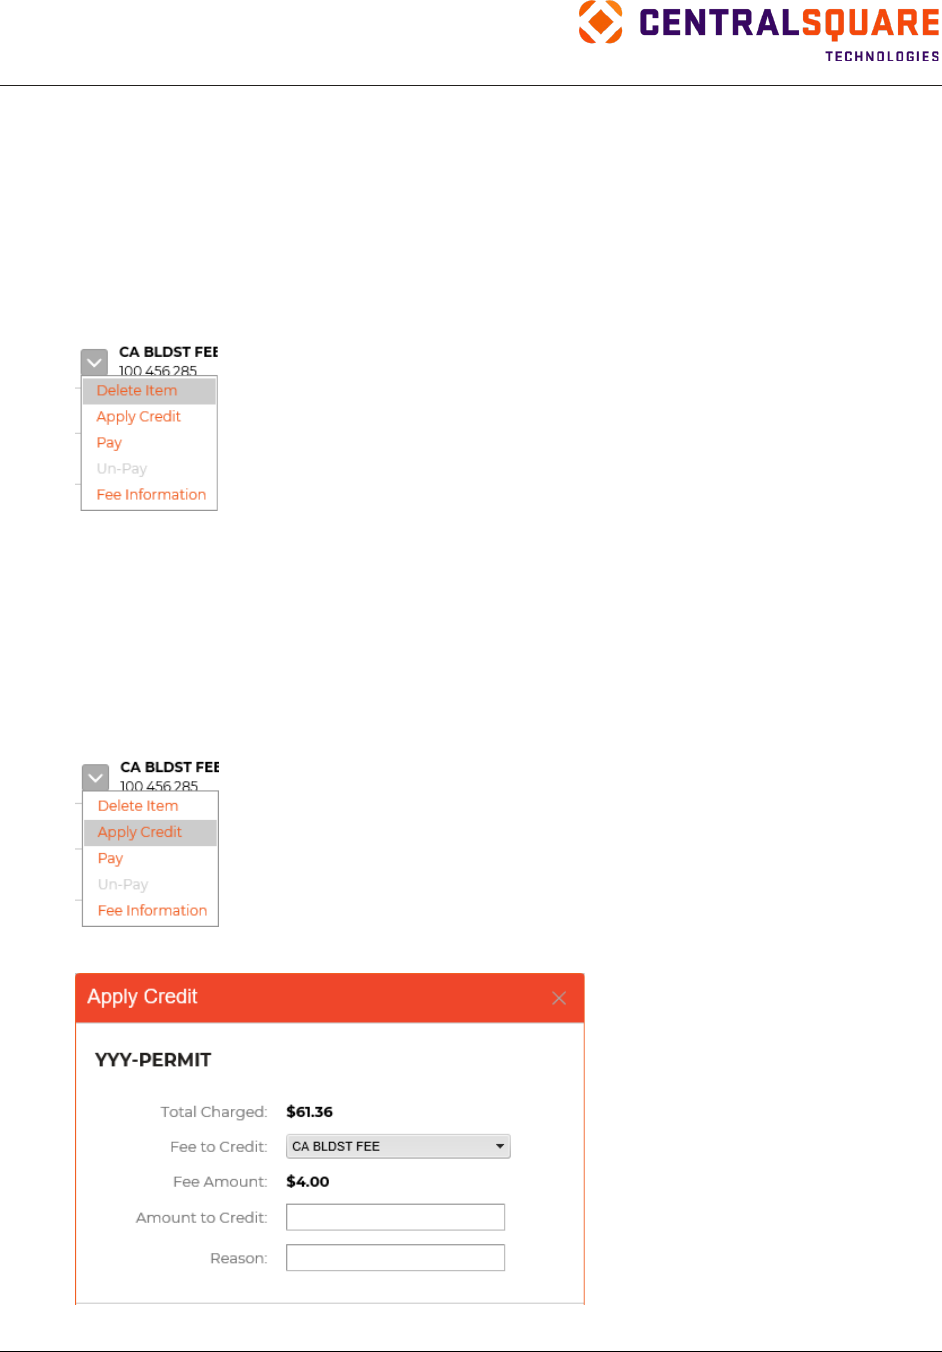
TRAKiT User Guide 18.1
Proprietary.
May not be reproduced or distributed without written permission of CentralSquare Technologies.
Copyright 2018 CentralSquare Technologies. All rights reserved.
20181212JC Page 107
4.
Click Add.
Tip: In LicenseTRAK, you can assess a prorated fee (less than 100 percent) or a penalty fee (more
than 100 percent). Select the fees to assess, and then select a percentage from the Pro
‐
Rate/Penalty % drop‐down list.
Deleting a Fee or Subfee
1.
Open the Financial Information pane.
2.
Click Delete Item from the functions menu next to the fee or subfee that you want to delete.
3.
Click Yes to confirm the deletion.
Tip: If a fee has already been paid, you must unpay it before it can be deleted.
Applying a Credit
To apply a credit toward a fee that has been assessed on a record:
1.
Open the Financial Information pane.
2.
Select Apply Credit from the functions menu.
3.
Select the fee to which you are applying a credit.

TRAKiT User Guide 18.1
Proprietary
May not be reproduced or distributed without written permission of CentralSquare Technologies.
Copyright 2018 CentralSquare Technologies. All rights reserved.
20181212JC Page 108
4.
Enter the credit amount.
5.
Enter a description of the credit (maximum length of 12 characters).
6.
Click Pay. The credit is added as a subfee item and appears in red.
Overriding a Fee
1.
Open the Financial Information pane.
2.
Click Edit in the row for the fee you want to override. Boxes appear for information you can
change.
3.
Type the new amount, comments, and other details, if available.
4.
Click Save.
Note: The ability to override a fee is controlled by user privileges.
Note: To override or edit more than one fee, click Edit All in the Financial Information pane. Boxes
appear for each fee for information you can change. Make all changes and then click Save.
Paying Fees or Subfees
1.
Open the Financial Information pane.
2.
Click Pay. All unpaid fees are listed in the Cashiering dialog box.
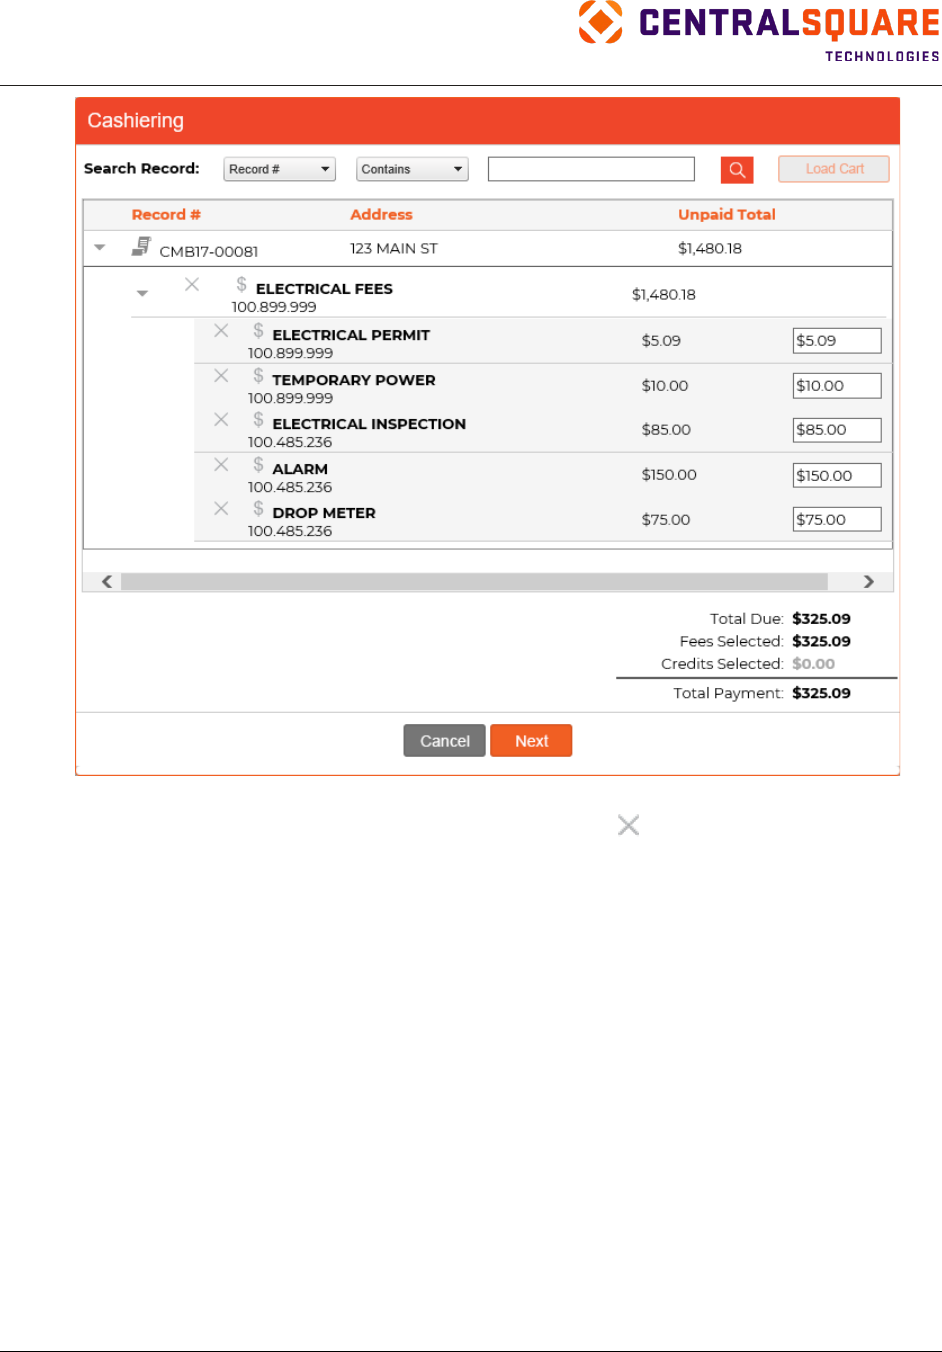
TRAKiT User Guide 18.1
Proprietary.
May not be reproduced or distributed without written permission of CentralSquare Technologies.
Copyright 2018 CentralSquare Technologies. All rights reserved.
20181212JC Page 109
3.
Remove any fees that will not be paid by this transaction. (This removes the fee from the dialog
box but the fee remains on the record.) To remove fees, click
next to the fee you want to
remove or use the search fields to narrow the list to fees related to a specific record number,
address, contact, or reference number.
4.
In the Unpaid Total column, type the payment amount if different from the amount due.
5.
Click Next.
6.
Complete the payment information:
a.
In the Paid By field, enter the name of the person who is paying the fee. You can select a
contact name from the list or type a name.
b.
Select an option from the Pay Method list.
•
If you select Check, then a check number is required.
•
If you select Credit Card, then a credit card authorization number (reference number) is
recommended.
•
If you select Cash and are using TRAKiT Connect and Cash Drawer, see “Using a Cash
Drawer.”
•
If you select Trust Account, see “Using a Trust Account.”
c.
Add payment method-specific information, such as check or reference number, if applicable.
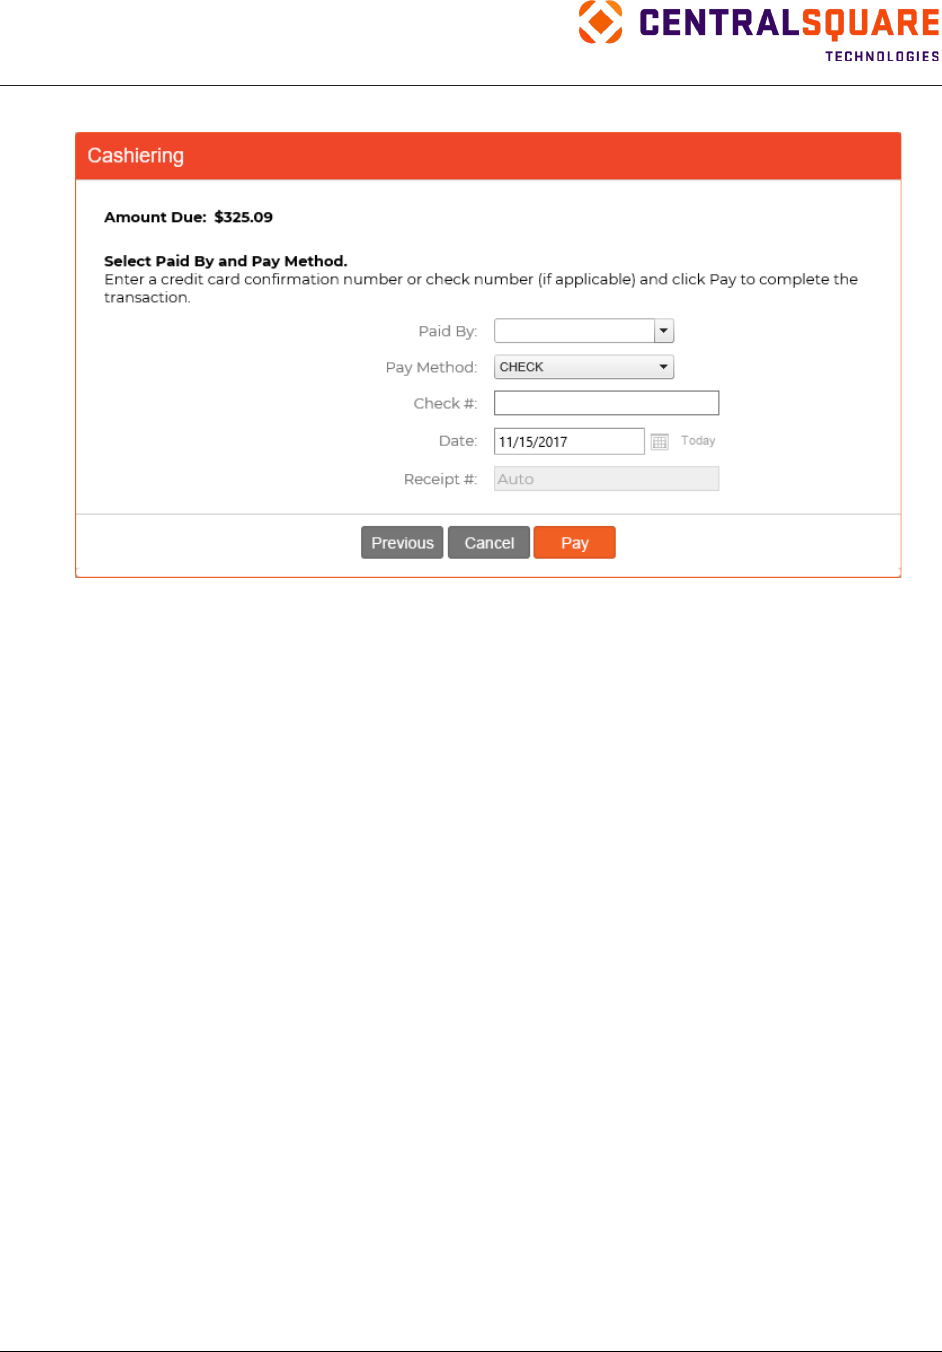
TRAKiT User Guide 18.1
Proprietary
May not be reproduced or distributed without written permission of CentralSquare Technologies.
Copyright 2018 CentralSquare Technologies. All rights reserved.
20181212JC Page 110
d.
Change the payment date, if needed. The default date is the current date.
7.
To complete the transaction, click Pay. To view the list of fees and make additional changes, click
Previous. To close the dialog box without saving changes, click Cancel.
Using a Cash Drawer
If an individual pays fees in cash and you use TRAKiT Connect and Cash Drawer, the system performs
the following actions after you click Pay in the Cashiering window:
Note: TRAKiT Connect must be running before you click Pay.
•
Checks the status of the cash drawer and attempts to open the cash drawer. A status window
appears and displays the status of the cash drawer (for example, the cash drawer is opening).
•
Processes and logs the transaction.
•
Produces a receipt in pdf format and saves the receipt to the record.
Note: To view the receipt, go to the Financial Information pane and click Receipts.
Using a Trust Account
1.
Ensure that the individual or contractor record from AEC TRAK is associated in the Contacts
pane.
2.
In the Financial Information pane, click Pay.
3.
Remove fees that will not be paid by this transaction, change payment amounts if needed, and
then click Next.
Note: Refer to “Paying Fees or Subfees” for more details about removing fees and changing
payment amounts.
4.
Select the individual or contractor AEC TRAK record from the Paid By list.
Note: If you do not see the individual or contractor in the Paid By list, then the record is not
correctly linked in the Contacts pane.

TRAKiT User Guide 18.1
Proprietary.
May not be reproduced or distributed without written permission of CentralSquare Technologies.
Copyright 2018 CentralSquare Technologies. All rights reserved.
20181212JC Page 111
5.
In the Pay Method field, select Trust Account. The trust account number appears. Click this link
to display the trust account’s current balance.
Note: If the Paid By name does not have an attached trust account, a warning message appears.
6.
Change the payment date, if needed. The default date is the current date.
7.
To complete the transaction, click Pay. To view the list of fees and make additional changes, click
Previous. To close the dialog box without saving changes, click Cancel.
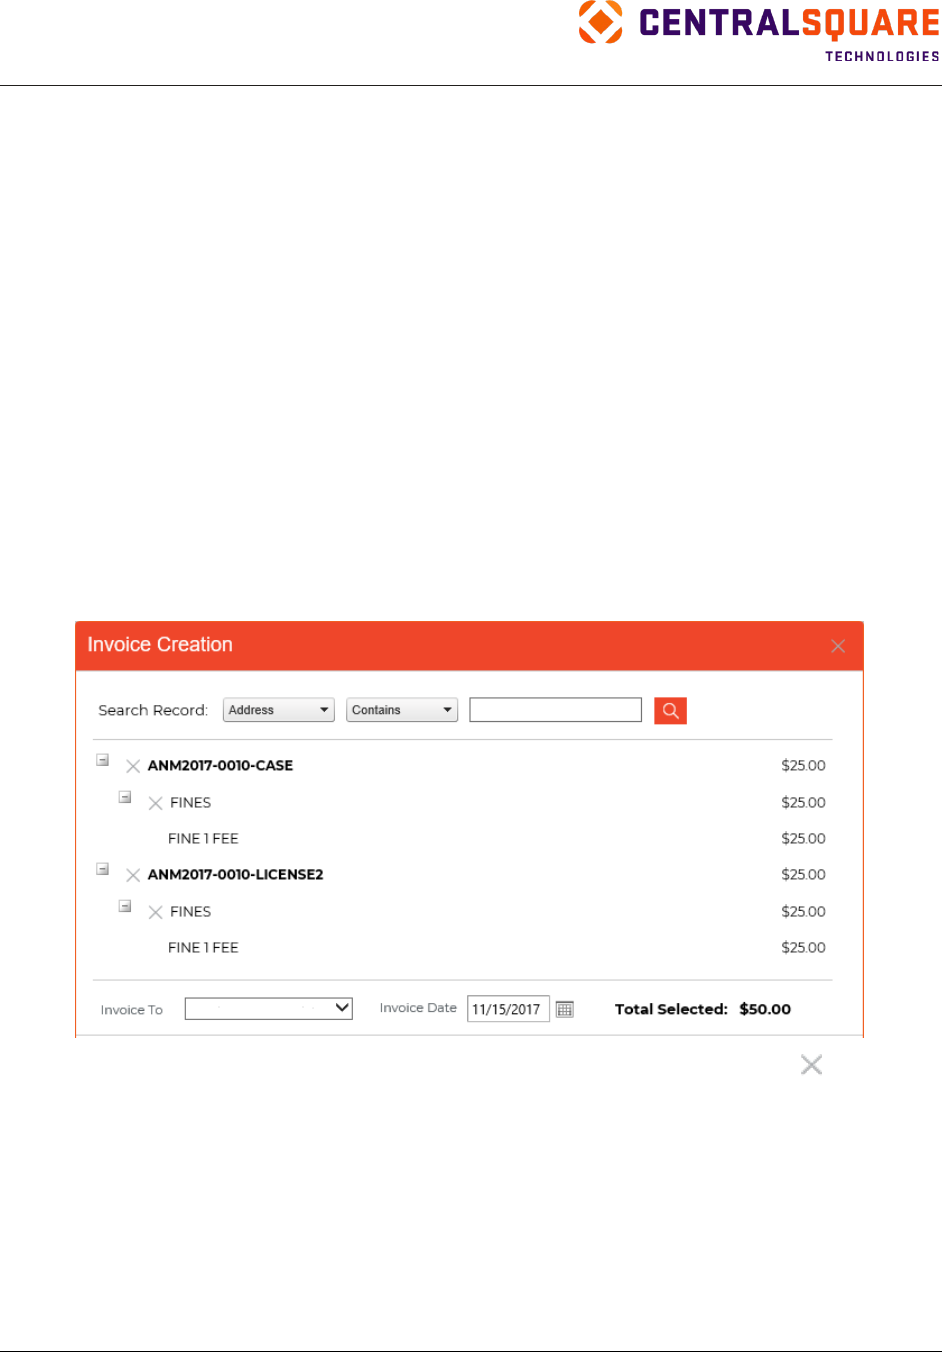
TRAKiT User Guide 18.1
Proprietary
May not be reproduced or distributed without written permission of CentralSquare Technologies.
Copyright 2018 CentralSquare Technologies. All rights reserved.
20181212JC Page 112
Invoicing
Use the Invoicing feature to generate new invoices; modify, pay, or reprint invoices; or search for and
view invoices.
Use one of the following methods to access the Invoicing feature:
•
Click Invoicing in the Financial Information pane. Use this access method when you want to
generate a new invoice.
•
Point to Favorites and then click Invoicing. Use this method when you want to work with existing
invoices.
To use this access method, you must first add Invoicing to your Favorites list. See “Favorites” for
more information about adding features to your Favorites list.
Note: If cashiering is disabled in your database, some of the functions described in this section are
not available. Contact your system administrator for more information.
Generating an Invoice
To generate an invoice, access the activity record in PermitTRAK, ProjectTRAK, LicenseTRAK,
CodeTRAK, or AEC TRAK and then complete the following steps:
1.
In the Financial Information pane, click Invoicing.
2.
Remove any items that will not be paid by this transaction. To remove items, click
next to the
item you want to remove or use the search fields to narrow the list to items related to a specific
record number, address, contact, or reference number.
Note: This removes the item from the dialog box but the item remains on the record.
3.
Select a contact from the Invoice To list.
4.
Change the payment date, if needed. The default date is the current date.
5.
Click Create to generate the invoice. Click Close to close the dialog box without generating an
invoice.
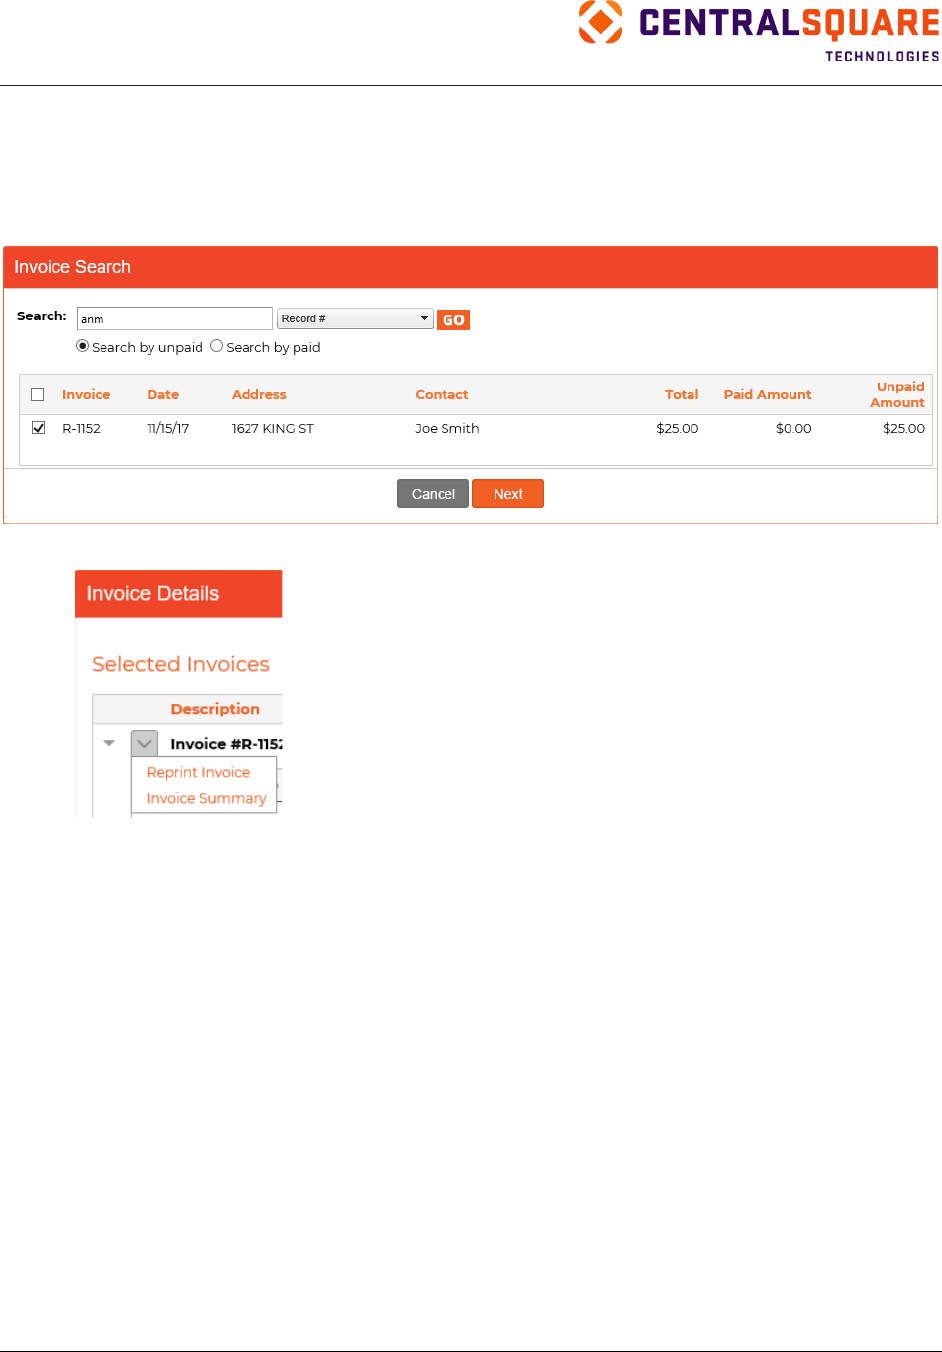
TRAKiT User Guide 18.1
Proprietary.
May not be reproduced or distributed without written permission of CentralSquare Technologies.
Copyright 2018 CentralSquare Technologies. All rights reserved.
20181212JC Page 113
Modifying an Invoice
To modify an invoice, access Invoicing from your Favorites list and then complete the following steps:
1.
Search for the invoice by record number or invoice number.
2.
Select the invoice you want to modify and then click Next.
3.
Use options on the functions menu to reprint the invoice or view an invoice summary.
4.
Click Next to continue to modify the invoice.
5.
Complete the payment information:
a.
In the Paid By field, enter the name of the person who is paying the fee. You can select a
contact name from the list or type a name.
b.
Select an option in the Pay Method list.
•
If you select Check, then a check number is required.
•
If you select Credit Card, then a credit card authorization number (reference number) is
recommended.
•
If you select Cash and are using TRAKiT Connect and Cash Drawer, see “Using a Cash
Drawer.”
•
If you select Trust Account, see “Using a Trust Account.”
c.
Add payment-method-specific information, such as check or reference number, if applicable.
d.
Change the payment date, if needed. The default date is the current date.

TRAKiT User Guide 18.1
Proprietary
May not be reproduced or distributed without written permission of CentralSquare Technologies.
Copyright 2018 CentralSquare Technologies. All rights reserved.
20181212JC Page 114
6.
To complete the transaction and generate an itemized receipt, click Pay. To view the list of fees,
click Previous. To close the dialog box without saving changes, click Cancel.
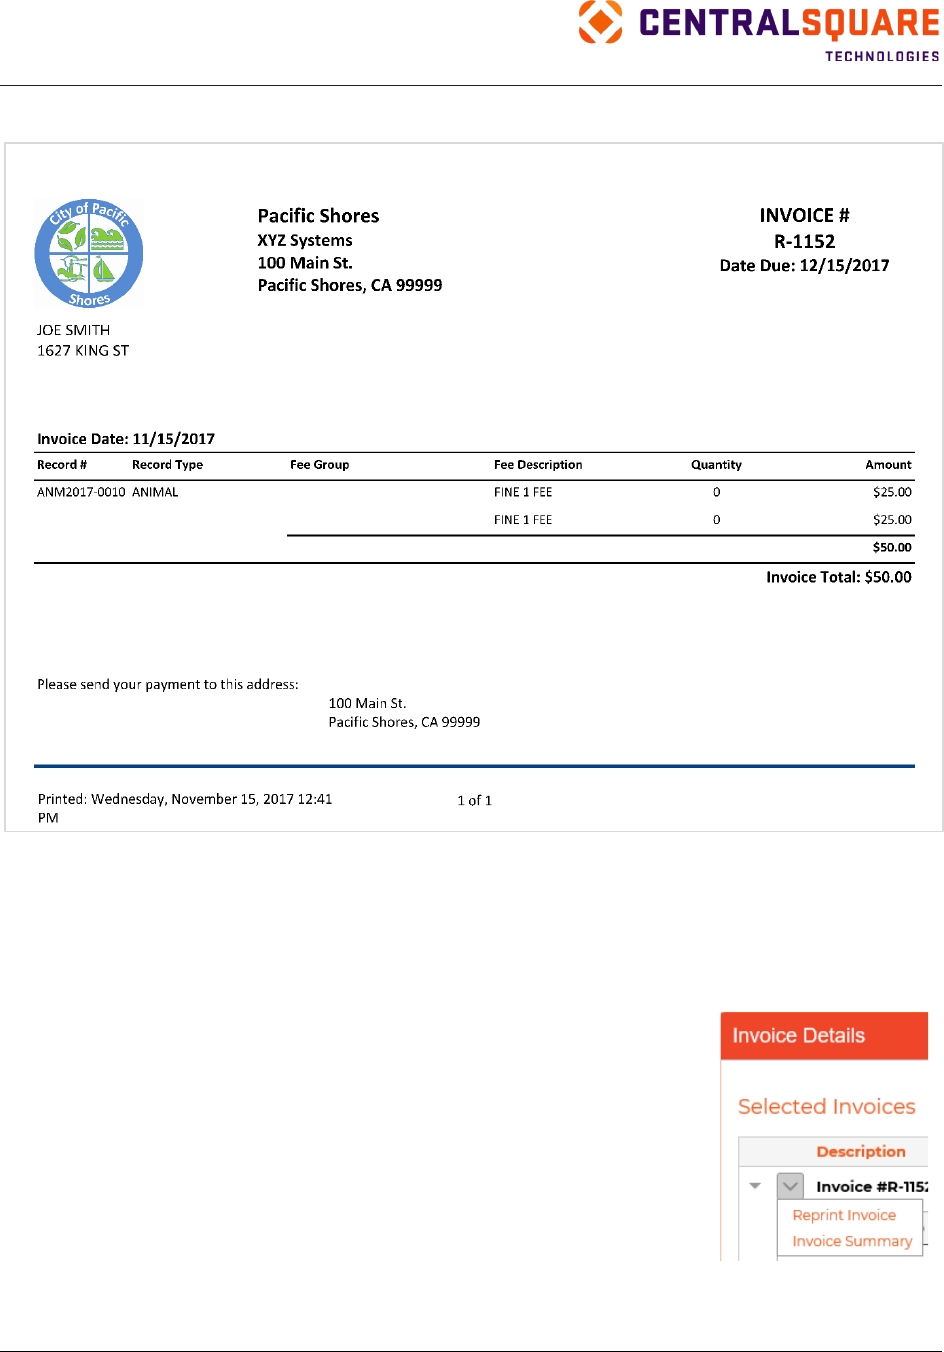
TRAKiT User Guide 18.1
Proprietary.
May not be reproduced or distributed without written permission of CentralSquare Technologies.
Copyright 2018 CentralSquare Technologies. All rights reserved.
20181212JC Page 115
Invoice Sample
Note: If only some fees on the invoice are paid and a balance still remains, the Invoice Details
screen shows the original amount, the outstanding balance in red, and both the paid date and method
in green next to the paid fees.
Reprinting an Invoice
To reprint an invoice, access Invoicing from your Favorites list and then complete the following steps:
1.
Search for the invoice by record number or invoice number.
2.
Select the invoice you want to reprint and then click Next.
3.
Point to the functions menu and then click Reprint Invoice.
TRAKiT generates the invoice and the invoice opens in the default
program. You can view and save the invoice. The word Reprint
appears in the invoice header.
4.
In the TRAKiT Invoice Search dialog box, click Cancel to close the
dialog box.
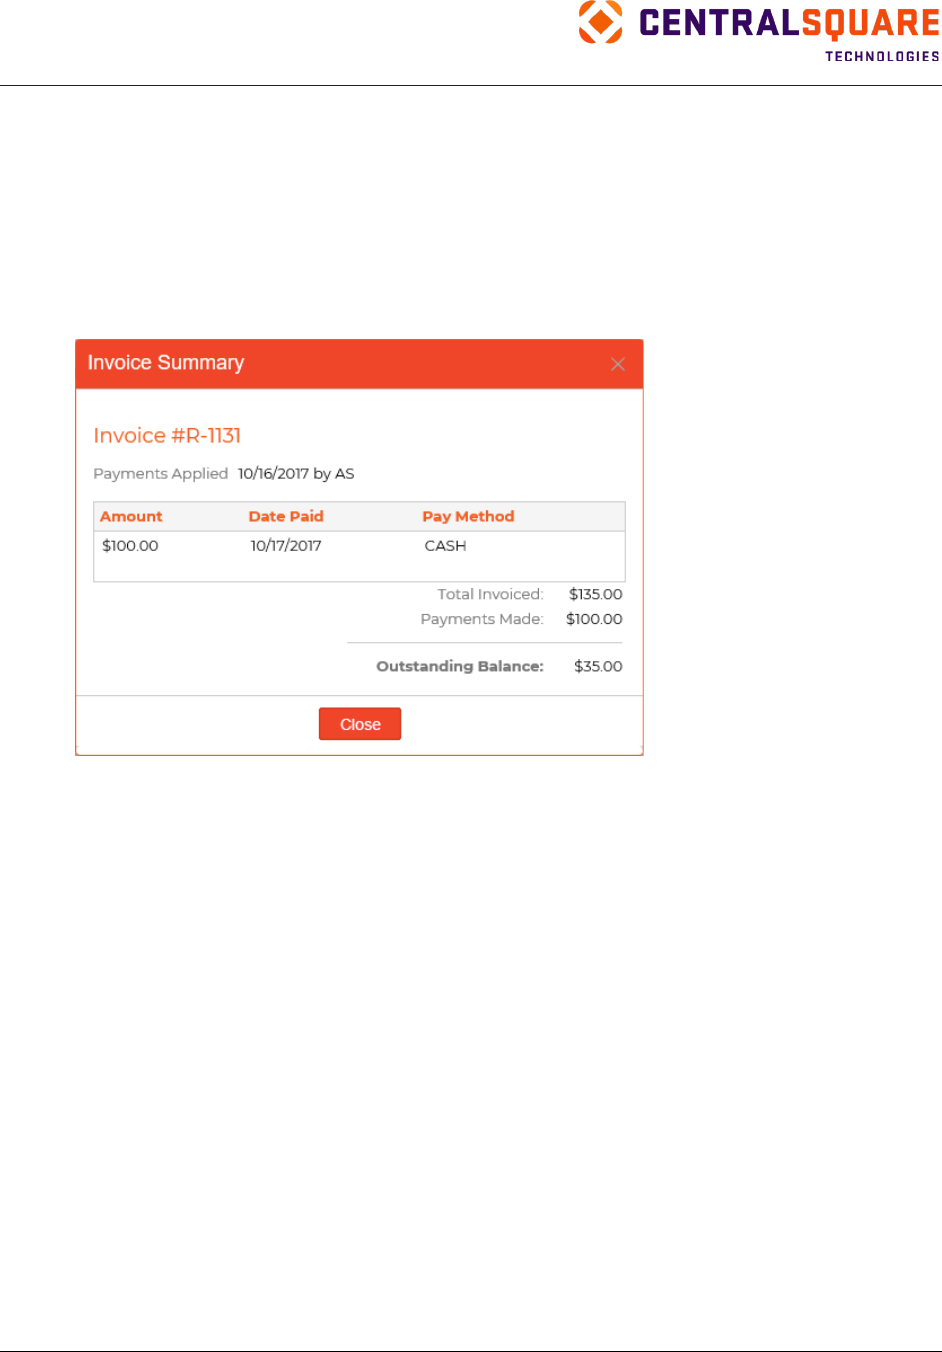
TRAKiT User Guide 18.1
Proprietary
May not be reproduced or distributed without written permission of CentralSquare Technologies.
Copyright 2018 CentralSquare Technologies. All rights reserved.
20181212JC Page 116
Invoice Summary
To view a summary of an invoice, access Invoicing from your Favorites list and then complete the
following steps:
1.
Search for the invoice by record number or invoice number.
2.
Select the invoice you want and then click Next.
3.
Point to the functions menu and then click Invoice Summary.
4.
After you view the invoice summary, click Close.
5.
Click Cancel to close the Invoice Details dialog box.
Cashiering
Cashiering provides the ability to pay fees on multiple records and provide a single receipt.
Use one of the following methods to access the Cashiering feature:
•
In the Financial Information pane for an activity record, click Pay. See “Paying Fees or Subfees”
for details about paying fees using this method.
•
Point to Favorites and then click Cashiering. To use this access method, you must first add
Cashiering to your Favorites list. See “Favorites” for more information about adding features to
your Favorites list.
To process a payment for fees on multiple records, complete the following steps:
1.
Point to Favorites and then click Cashiering.
2.
Search for the record that has fees you want to pay.
If only one record matches your search criteria, the record is automatically loaded to the Cash
Register.
If multiple records match your search criteria, a selection list appears. Select the records and click
Add.
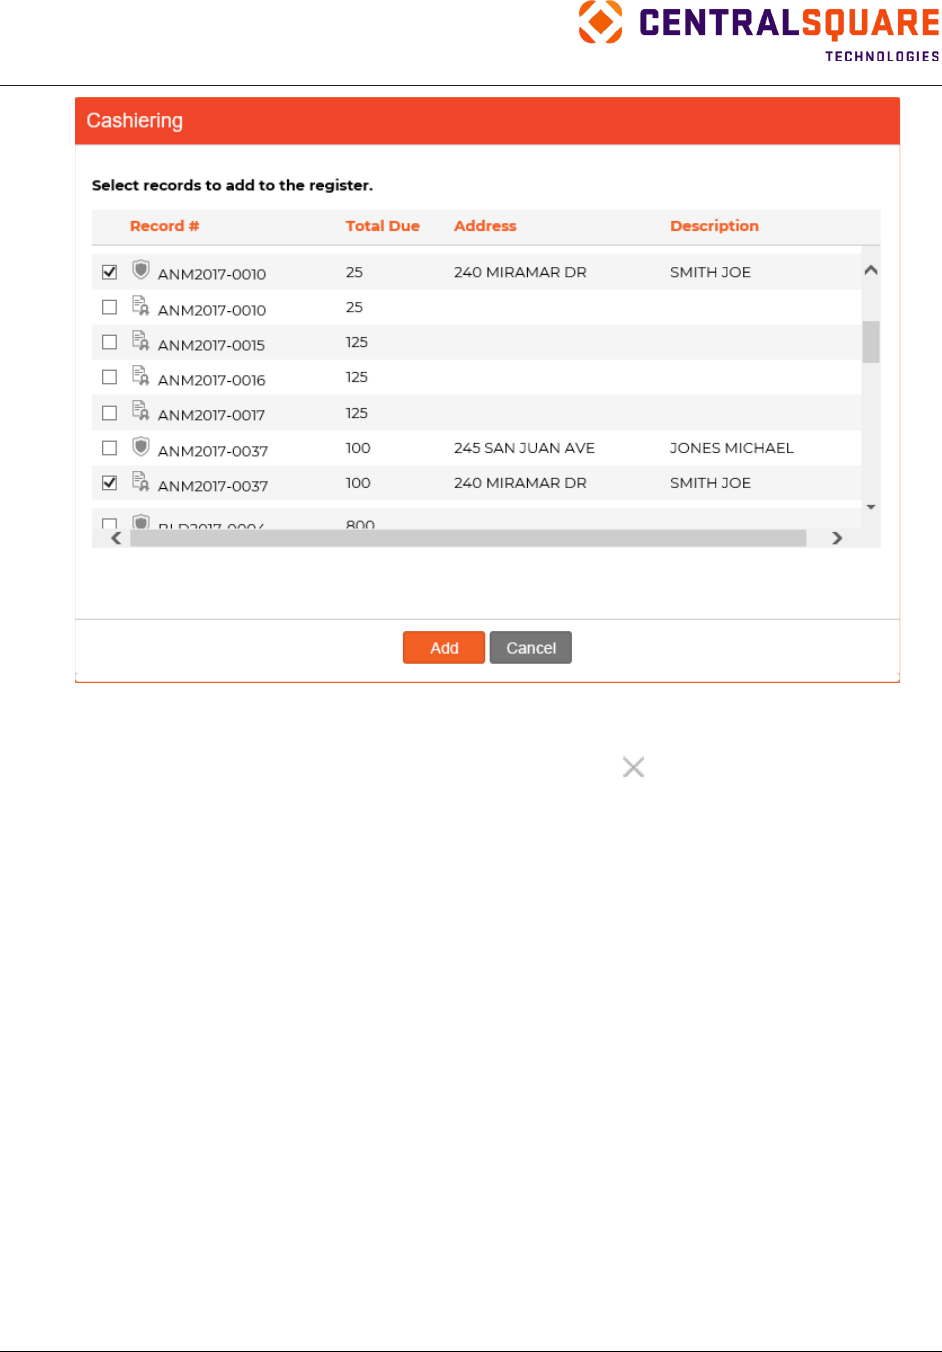
TRAKiT User Guide 18.1
Proprietary.
May not be reproduced or distributed without written permission of CentralSquare Technologies.
Copyright 2018 CentralSquare Technologies. All rights reserved.
20181212JC Page 117
Repeat this step until you have selected all records that are being paid.
3.
Remove any fees that will not be paid by this transaction. (This removes the fee from the dialog
box but the fee remains on the record.) To remove fees, click
next to the fee you want to
remove.
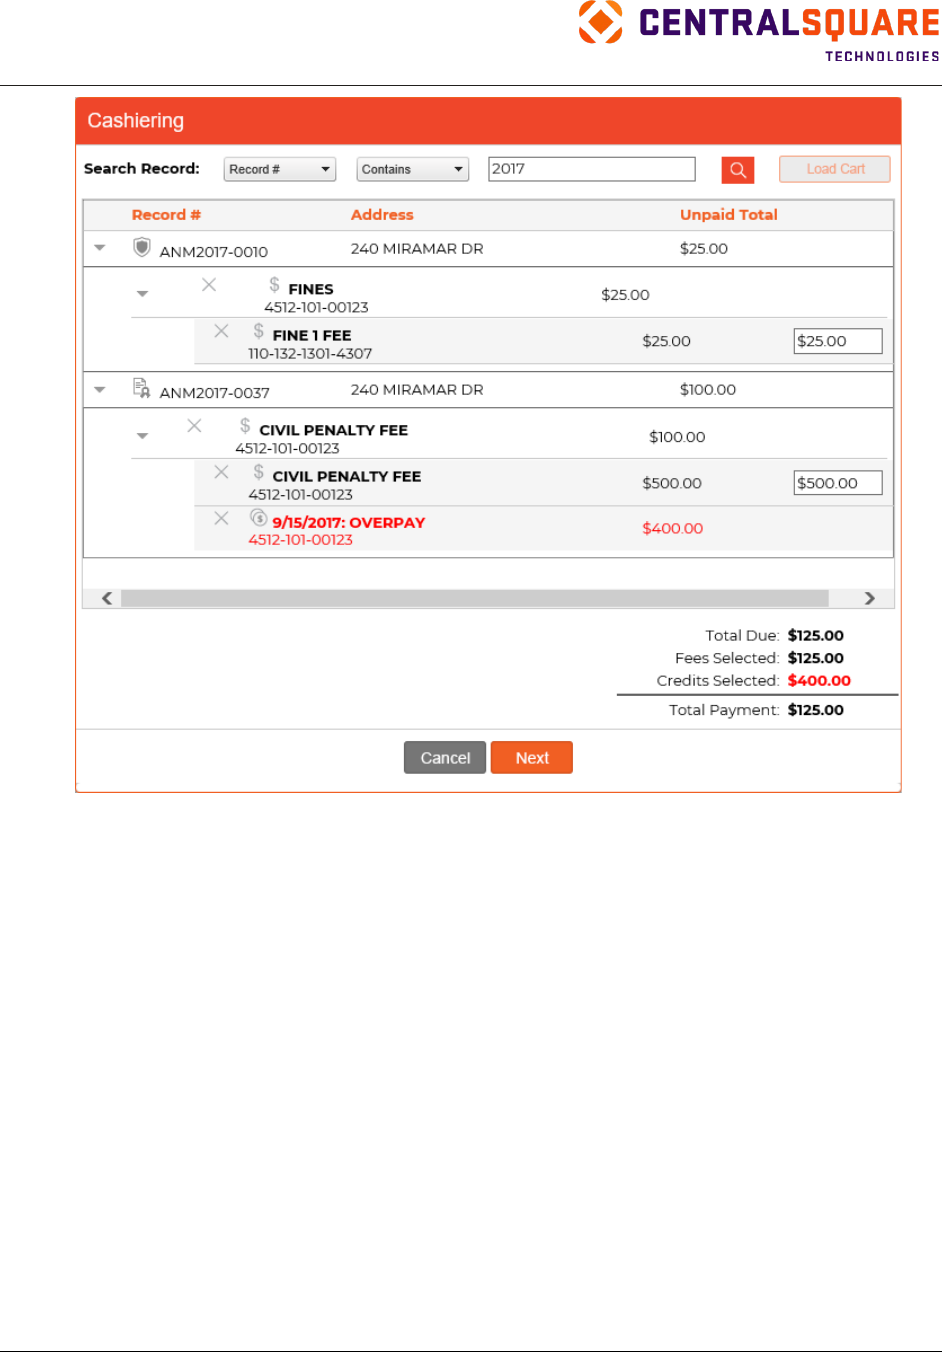
TRAKiT User Guide 18.1
Proprietary
May not be reproduced or distributed without written permission of CentralSquare Technologies.
Copyright 2018 CentralSquare Technologies. All rights reserved.
20181212JC Page 118
4.
Click Next.
5.
Enter the name of the person who is paying the fee. You can select a contact name from the list
or type a name.
6.
Select an option from the Pay Method list.
•
If you select Check, then a check number is required.
•
If you select Credit Card, then a credit card authorization number (reference number) is
recommended.
•
If you select Cash and are using TRAKiT Connect and Cash Drawer, see “Using a Cash
Drawer.”
•
If you select Trust Account, see “Using a Trust Account.”
7.
Add payment-method-specific information, such as check or reference number, if applicable.
8.
Change the payment date, if needed. The default date is the current date.
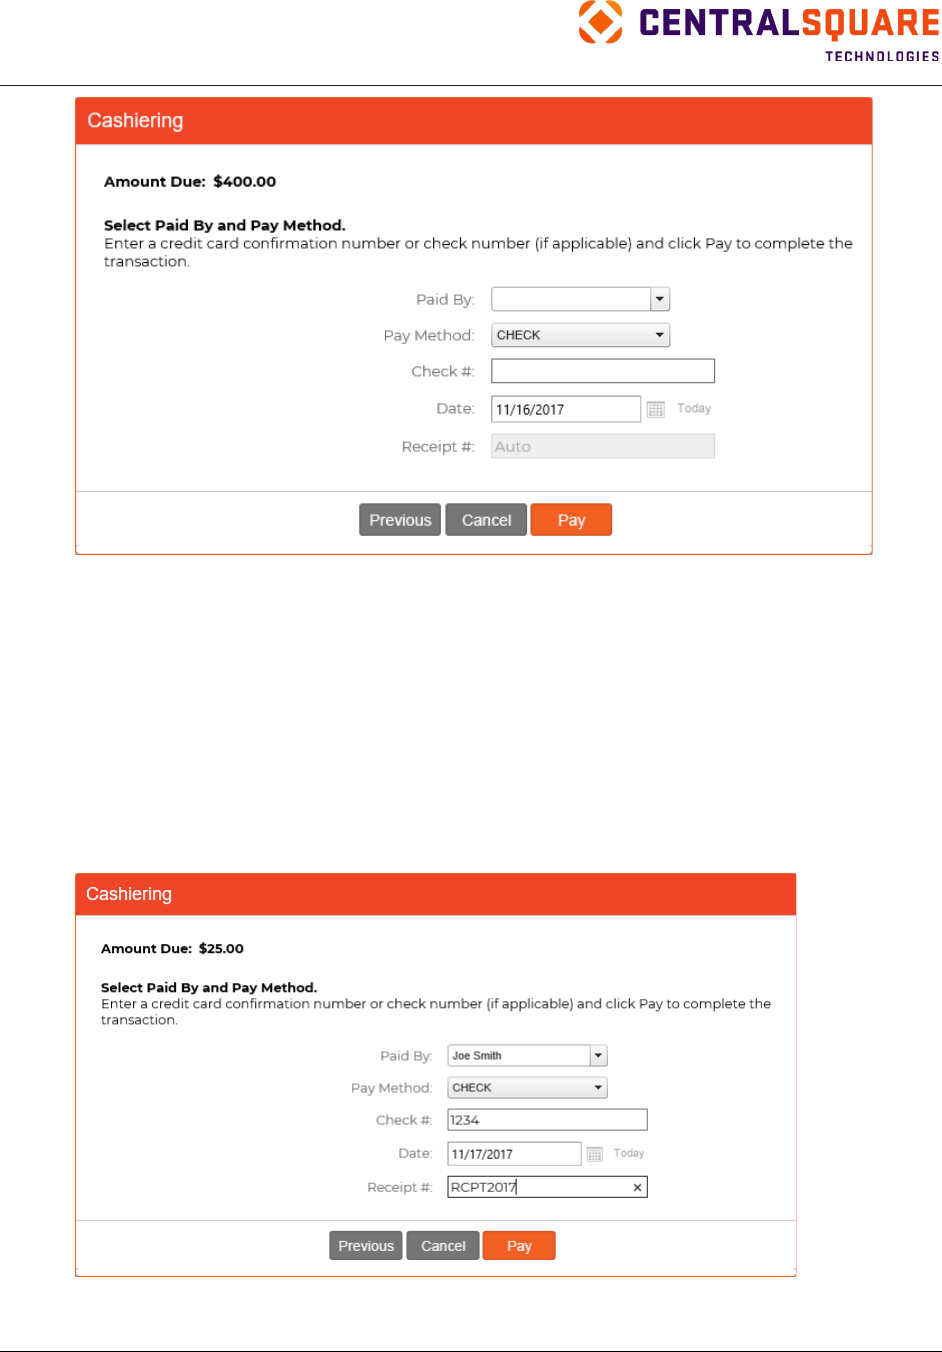
TRAKiT User Guide 18.1
Proprietary.
May not be reproduced or distributed without written permission of CentralSquare Technologies.
Copyright 2018 CentralSquare Technologies. All rights reserved.
20181212JC Page 119
9.
To complete the transaction, click Pay. To view the list of fees and make additional changes, click
Previous. To close the dialog box without saving changes, click Cancel.
Cashiering Receipts
TRAKiT provides two types of cashiering receipts: manual numbering for individual receipts and
automatically generated (known as autogen) numbering for multiple receipts. Your system administrator
sets the type of numbering you use in TRAKiT Web Utilities & Maintenance (WUM).
Individual (Manual) Receipts
If an autogen name is not configured for receipts in PermitTRAK, ProjectTRAK, CodeTRAK,
LicenseTRAK, and AEC TRAK, type the receipt number prefix in the Receipt # field when the fee is paid.
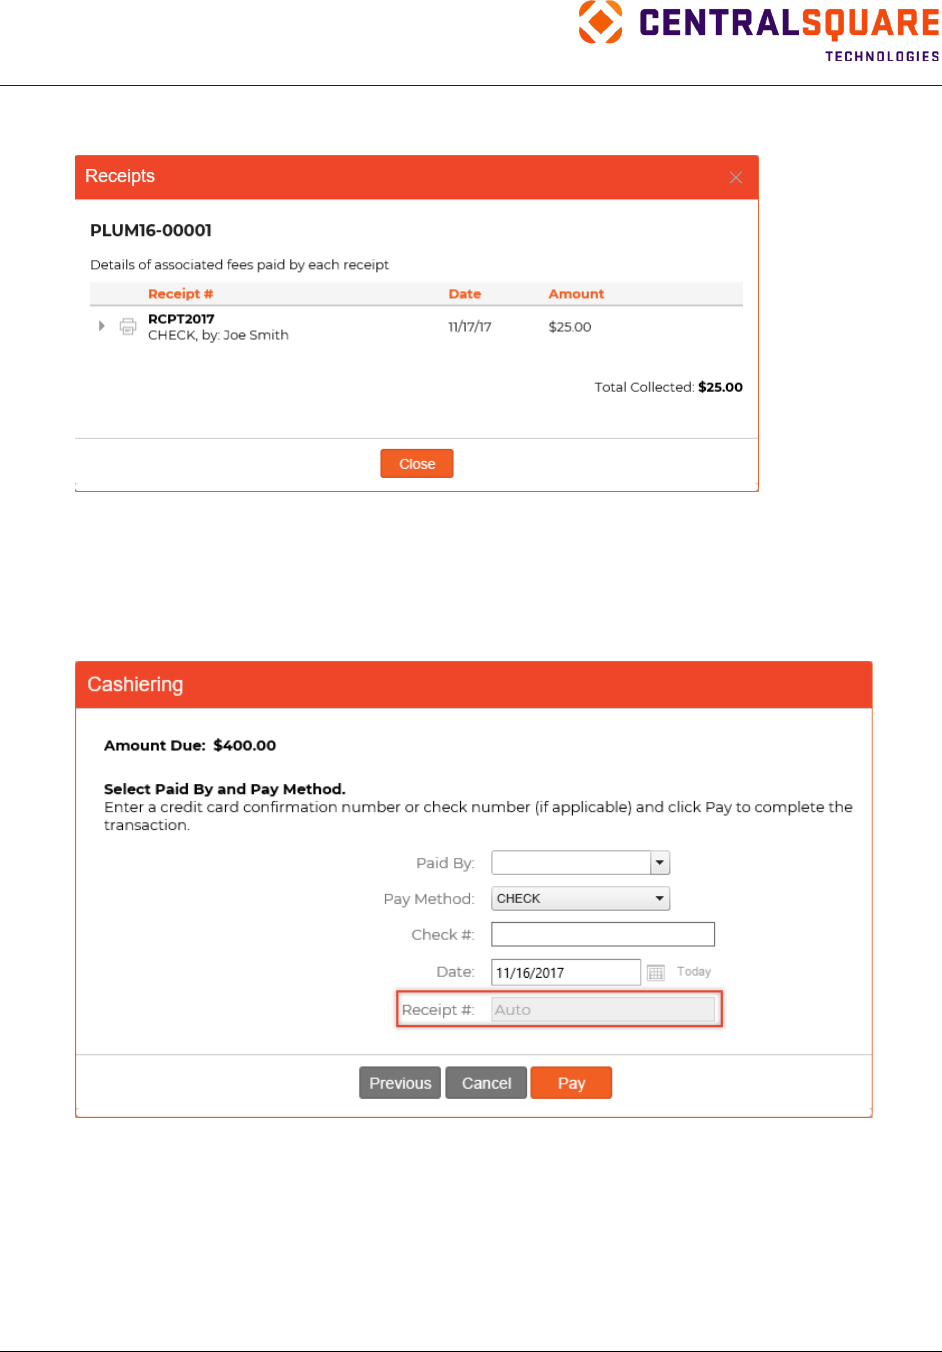
TRAKiT User Guide 18.1
Proprietary
May not be reproduced or distributed without written permission of CentralSquare Technologies.
Copyright 2018 CentralSquare Technologies. All rights reserved.
20181212JC Page 120
The receipt name is reflected in the Receipts dialog box, which you access from the Financial
Information pane by clicking Receipts.
Multiple (Autogen) Receipts
If an autogen name is configured for receipts in PermitTRAK, ProjectTRAK, CodeTRAK, LicenseTRAK,
and AEC TRAK, the receipt prefix defaults to the configuration setup for that type of receipt. When
multiple receipts from different modules are paid at the same time, the default configuration is the one set
up for Multi_Receipt.
Paying Fees from AEC TRAK
To pay fees on permit, project, and code records that are associated with an AEC record, complete the
following steps:
1.
Locate the record in AEC TRAK.
2.
Select Pay Related Records from the functions menu.

TRAKiT User Guide 18.1
Proprietary.
May not be reproduced or distributed without written permission of CentralSquare Technologies.
Copyright 2018 CentralSquare Technologies. All rights reserved.
20181212JC Page 121
3.
In the Cashiering dialog box, complete the following steps:
a. Search for the record that has fees you want to pay.
b. Select fees to add.
c. Remove fees as necessary.
d. Click Next.
Note: See “Cashiering” for details about how to search for, add, and remove fees.
e. Enter payment information.
f. Click Pay.
Note: See “Cashiering” for details about entering payment information.
Unpaying Fees
Use the Un‐Pay feature to correct a data entry mistake made during the fee collection process.
Note: If you want to return fees that have already been collected and processed, follow the procedure
in “Issuing a Refund.”
1.
On the Financial Information pane, select Un‐Pay from the functions menu.
2.
Select the fees to be unpaid.
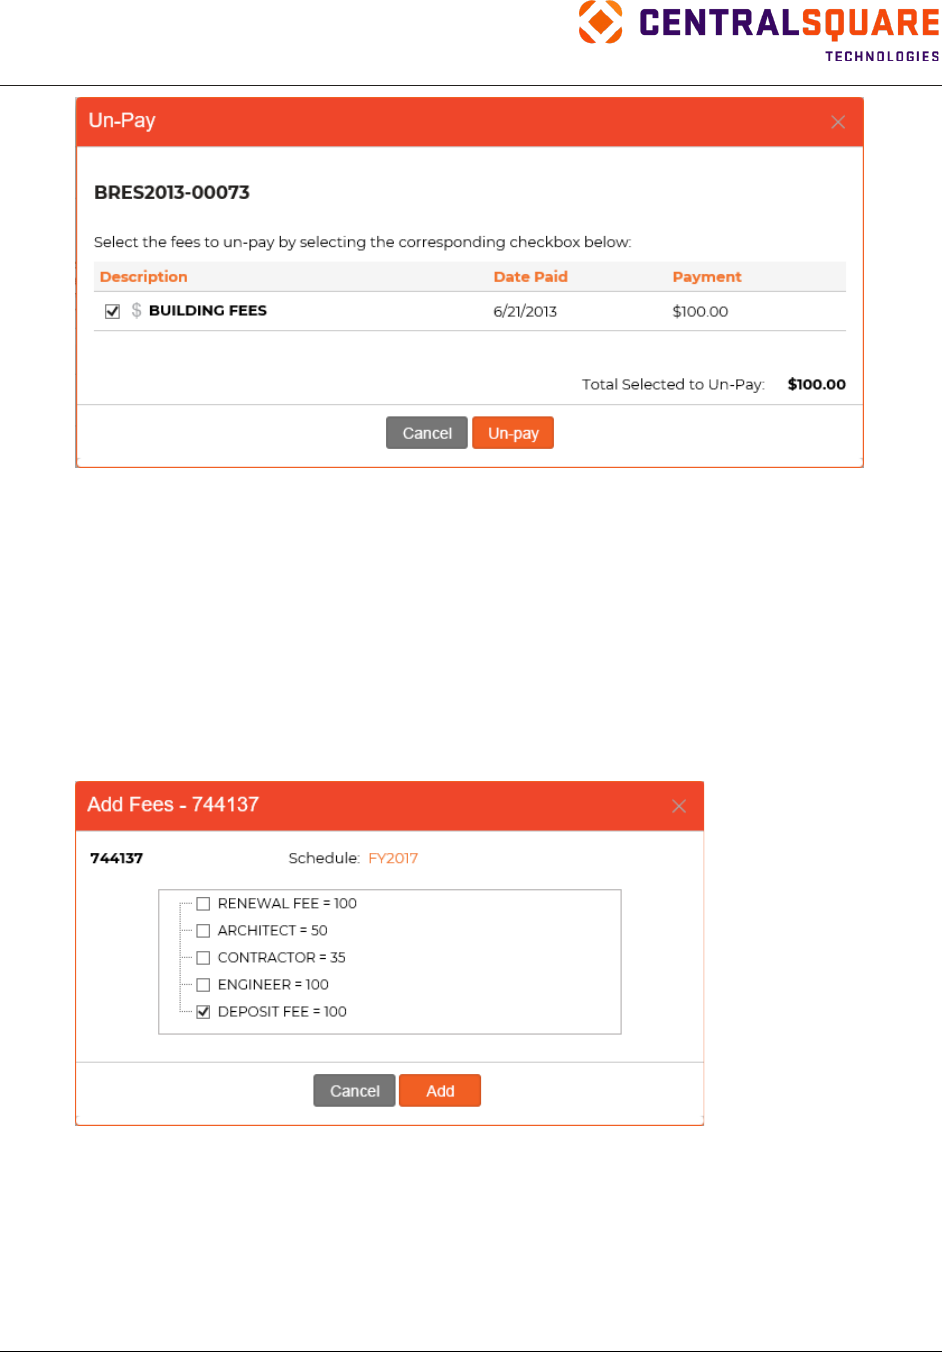
TRAKiT User Guide 18.1
Proprietary
May not be reproduced or distributed without written permission of CentralSquare Technologies.
Copyright 2018 CentralSquare Technologies. All rights reserved.
20181212JC Page 122
3.
Click Un‐pay.
Note: The ability to override a fee is controlled by user privileges.
Collecting Deposits
Tip: This feature must be set up by a system administrator in TRAKiT Web Utilities & Maintenance.
To collect deposits on a TRAKiT record, complete the following steps:
1.
Open the Financial Information pane.
2.
Click Add.
3.
Select one or more deposits to collect.
4.
Click Add.
5.
Enter comments and the amount of the deposit(s), if required. Depending on your setup, deposit
amounts might be calculated automatically.
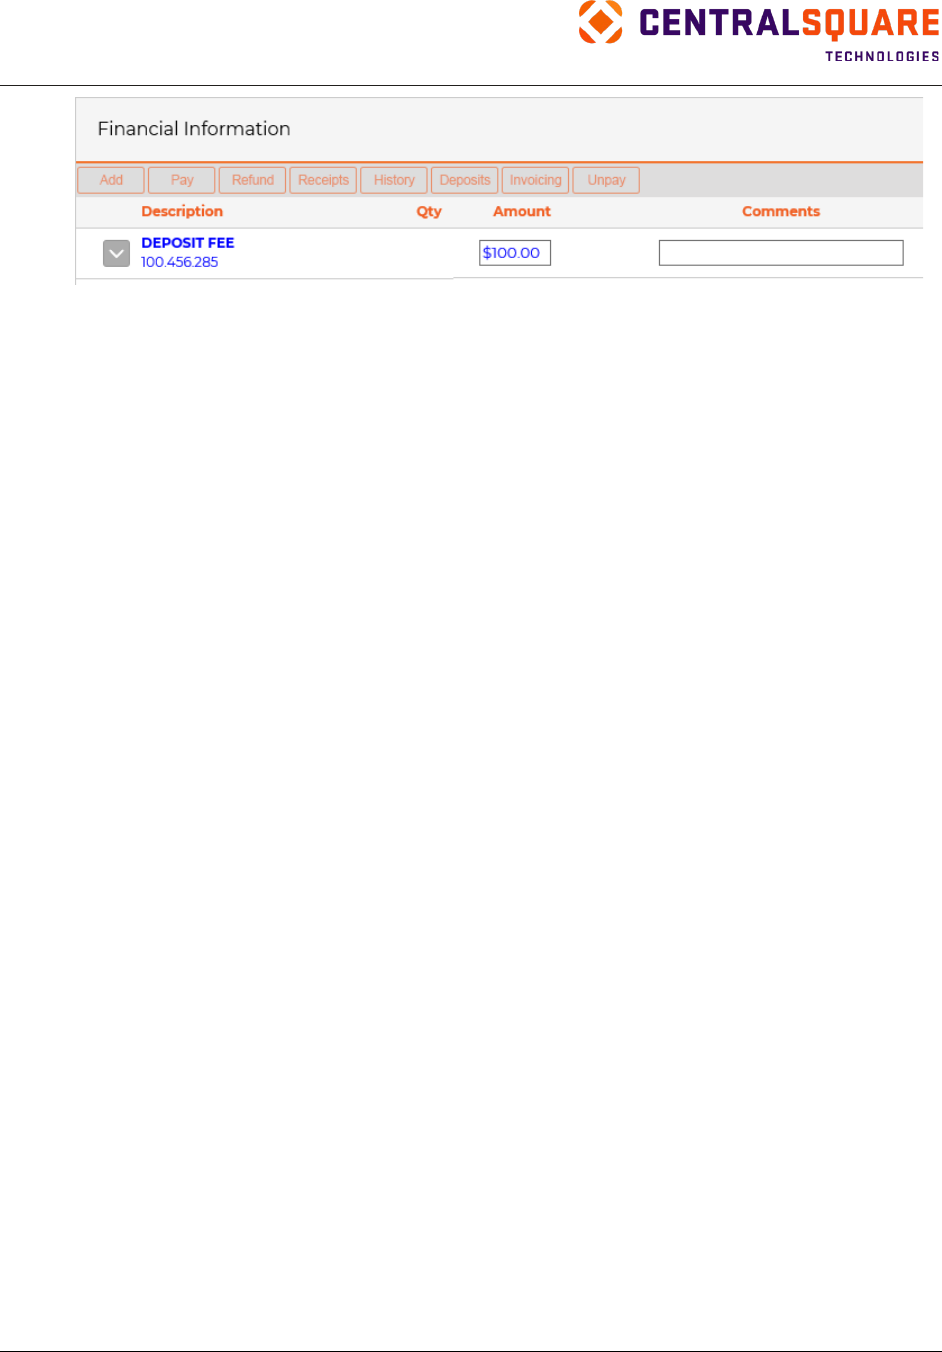
TRAKiT User Guide 18.1
Proprietary.
May not be reproduced or distributed without written permission of CentralSquare Technologies.
Copyright 2018 CentralSquare Technologies. All rights reserved.
20181212JC Page 123
6.
Click Save.
7.
Process the deposit payment as you would process a fee.
Note: If your system is set up to pay fees with the deposit, after a deposit is collected for a record,
TRAKiT prompts you to pay fees with the deposit amount whenever new fees are assessed. Click
Yes to pay outstanding fees with the deposit or click No to process payments by another method.
Issuing a Refund
To issue a refund of fees or deposits that have been collected and processed, complete the following
steps:
1.
Open the Financial Information pane.
2.
Click Refund.
Tip: Ensure that an account number is assigned to the fee you want to refund. Depending on
your setup, account numbers might be assigned automatically or added on the Fee Information
pane Account # column.
3.
Enter the amount of the refund in the Refund Amount column.
4.
Enter the name of the person who will receive the refund. You can select a name from the list or
type a name.
5.
Select the method of refund.
6.
Enter the date of the refund.
7.
Enter a reason for the refund.
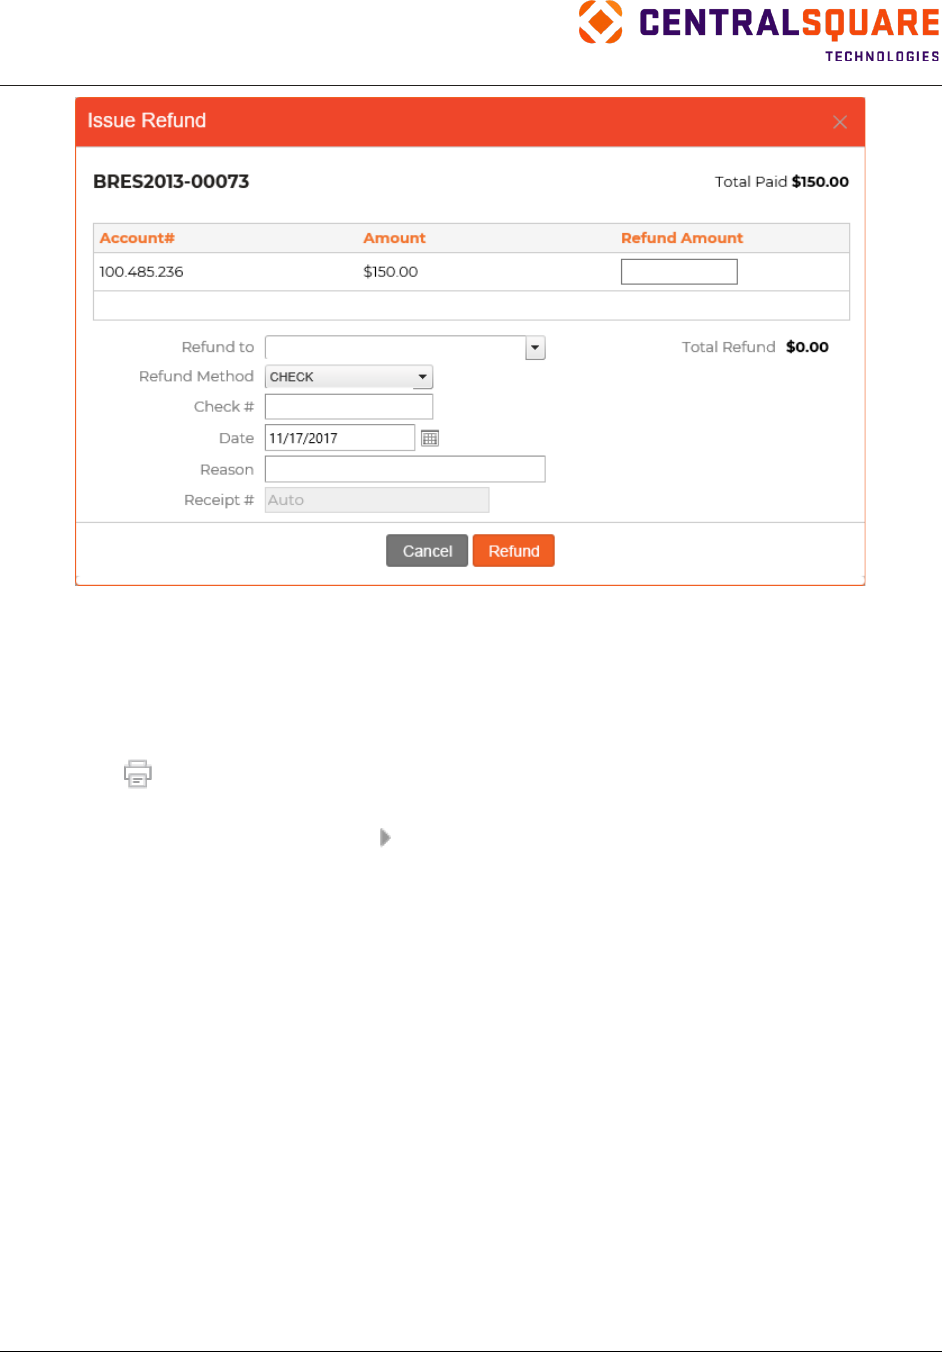
TRAKiT User Guide 18.1
Proprietary
May not be reproduced or distributed without written permission of CentralSquare Technologies.
Copyright 2018 CentralSquare Technologies. All rights reserved.
20181212JC Page 124
8.
Click Refund.
Printing a Receipt
1.
Open the Financial Information pane.
2.
Click Receipts.
3.
Click
next to the receipt you want to print. TRAKiT produces the receipt as a pdf file and
opens the file. You can print a paper receipt using the Print function in Adobe Acrobat.
Tip: In the Receipts dialog box, click
next to the receipt number to view all fees that were paid on
that receipt.
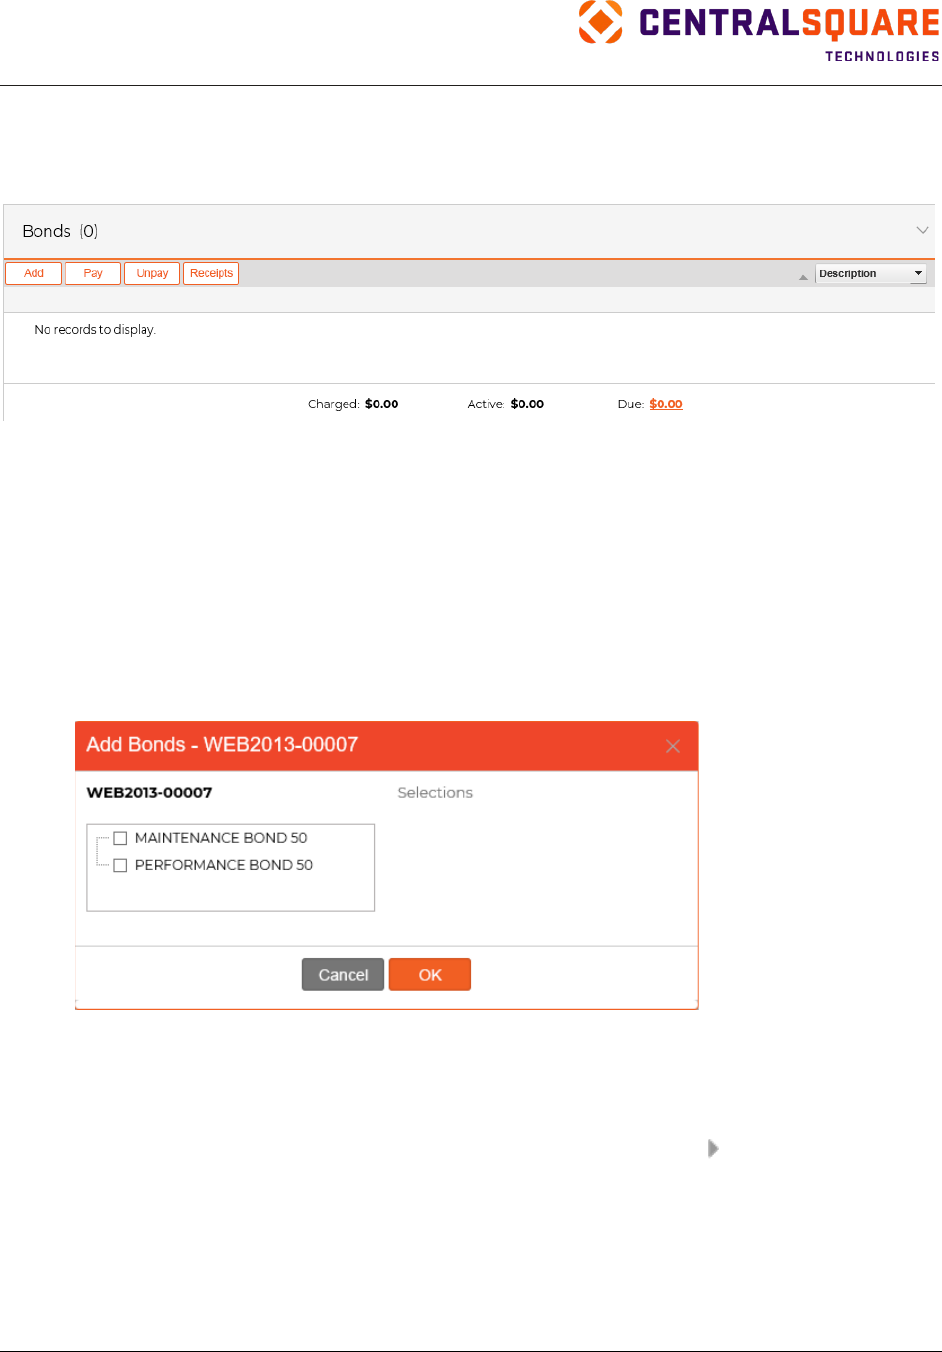
TRAKiT User Guide 18.1
Proprietary.
May not be reproduced or distributed without written permission of CentralSquare Technologies.
Copyright 2018 CentralSquare Technologies. All rights reserved.
20181212JC Page 125
Bonds
Use the Bonds pane to add, edit, reduce, release, and delete bond information. This feature is available
in PermitTRAK and ProjectTRAK.
Note: If cashiering is disabled in your database, some of these functions are not available. Contact
your system administrator for more information.
Adding Bonds
To add bonds, locate the record in PermitTRAK or ProjectTRAK and then complete the following steps:
1.
Expand the Bonds pane.
2.
Click Add.
3.
Select one or more bonds.
4.
Click OK.
Adding Details to Bonds
To add the detail information about the bond (amount, remarks, notes, expiration, or pulled date),
complete the following steps:
1.
In the Bonds pane, find the bond you want to work with and then click
.
2.
Click Edit in the row.
3.
Enter the bond amount in the Amount field.
4.
Enter remarks in the Remarks field.
5.
Enter the expiration date.
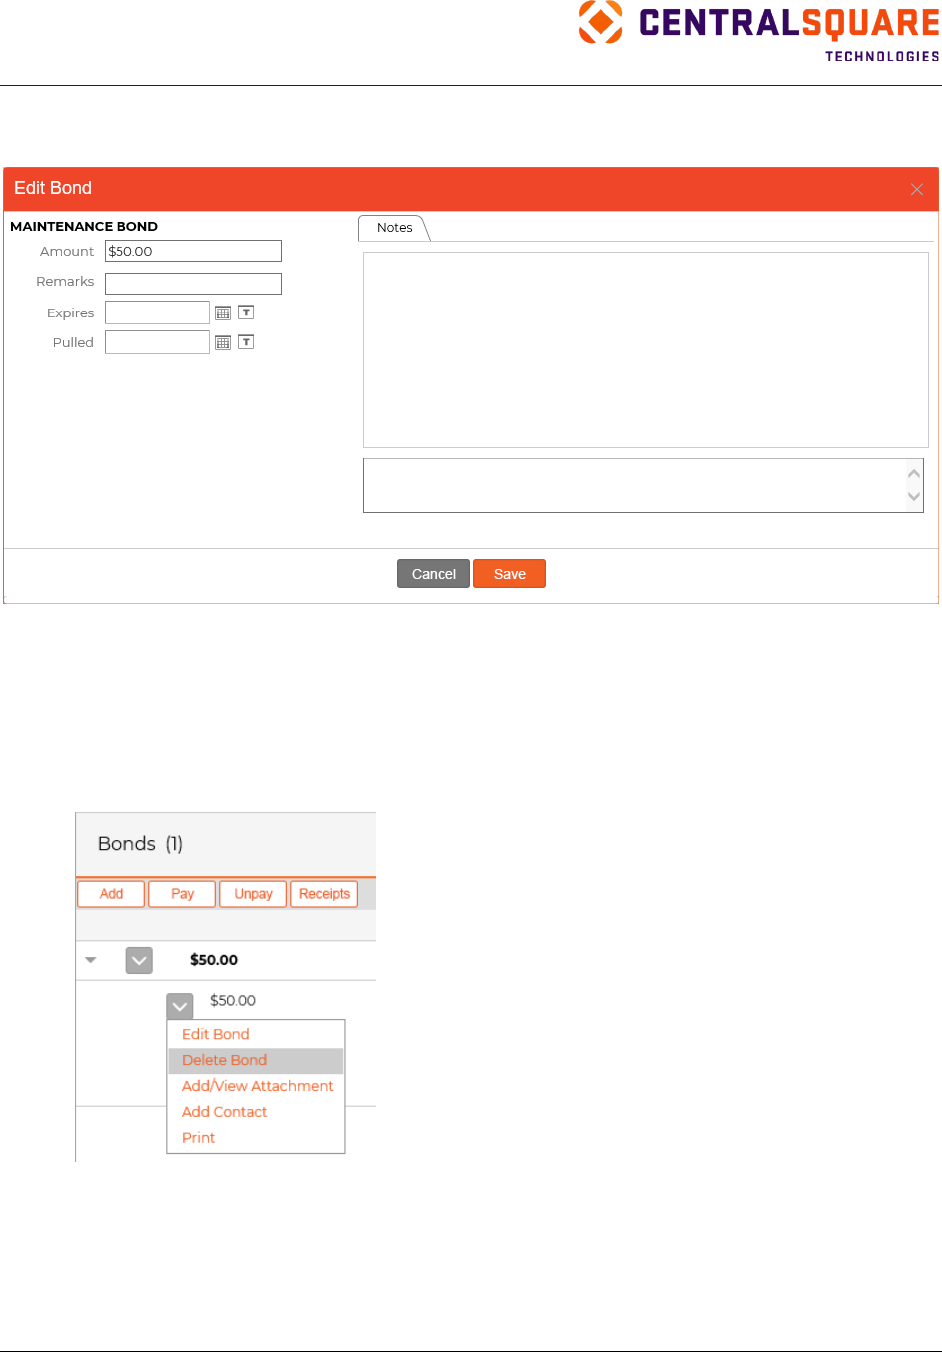
TRAKiT User Guide 18.1
Proprietary
May not be reproduced or distributed without written permission of CentralSquare Technologies.
Copyright 2018 CentralSquare Technologies. All rights reserved.
20181212JC Page 126
6.
Enter the pulled date.
7.
Enter notes.
8.
Click Save.
Deleting Bonds
To delete a bond, complete the following steps:
1.
Expand the bond you want to delete.
2.
Select Delete Bond from the functions menu.
3.
Click Yes.
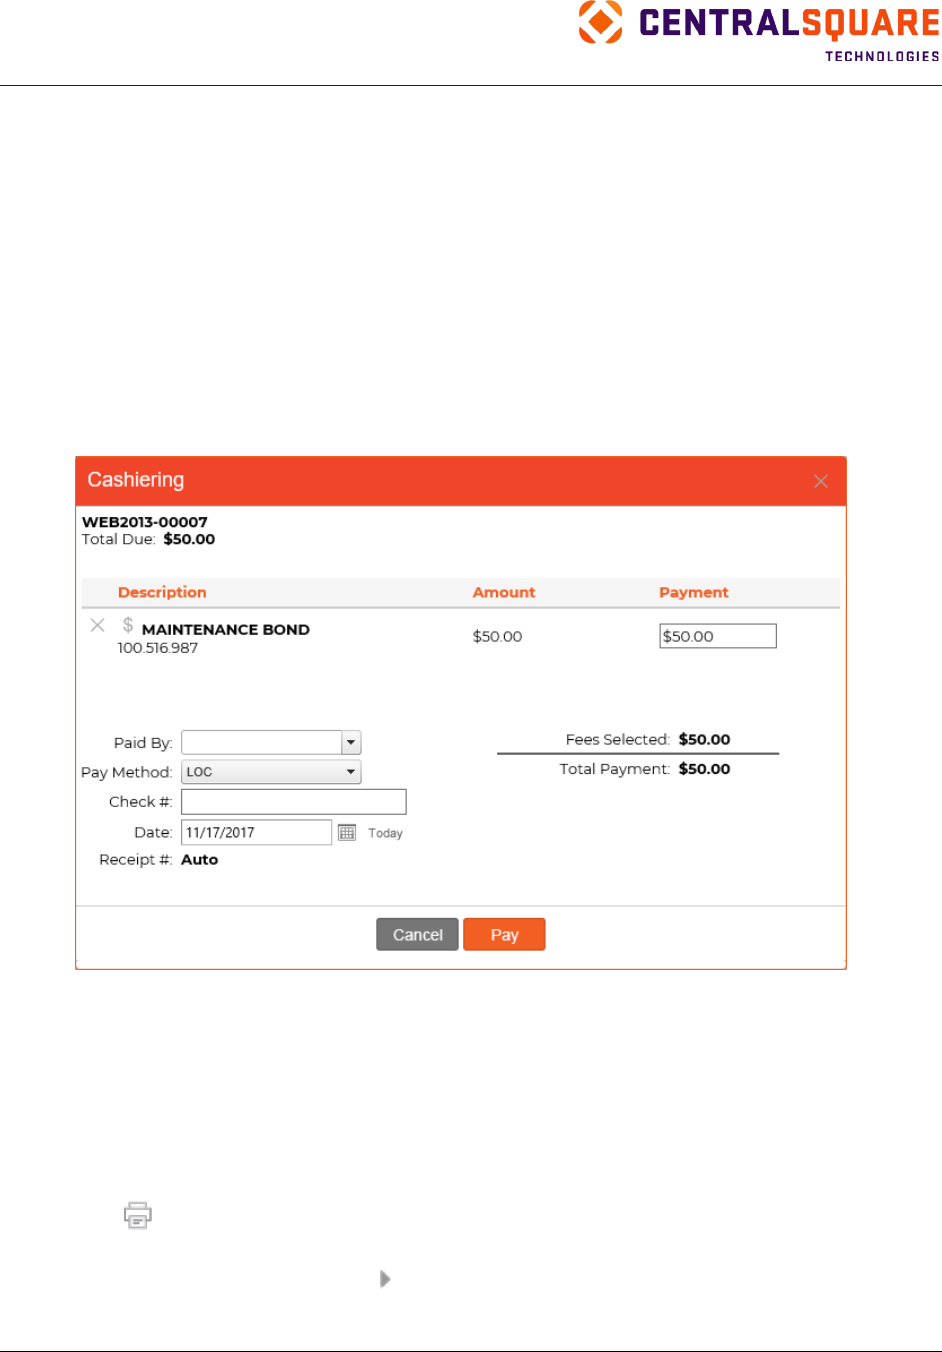
TRAKiT User Guide 18.1
Proprietary.
May not be reproduced or distributed without written permission of CentralSquare Technologies.
Copyright 2018 CentralSquare Technologies. All rights reserved.
20181212JC Page 127
Paying Bonds
To pay bonds, complete the following steps:
1.
Open the Bonds pane and then click Pay.
Note: You can click the Due link instead of clicking Pay.
2.
Remove bonds that are not being paid by this transaction, if necessary.
3.
Adjust payment amounts, if necessary.
4.
Select or type the paid-by name.
5.
Select the payment method.
6.
Enter a check number, if required.
7.
Change the paid date, if required. The default date is the current date.
8.
Click Pay. TRAKiT produces the receipt as a pdf file and opens the file. You can print a paper
receipt using the Print function in Adobe Acrobat.
Printing a Receipt
To view or print a bonds receipt, complete the following steps:
1.
Open the Bonds pane.
2.
Click Receipts.
3.
Click
next to the receipt you want to print. TRAKiT produces the receipt as a pdf file and
opens the file. You can print a paper receipt using the Print function in Adobe Acrobat.
Tip: In the Receipts dialog box, click
next to the receipt number to view all fees that were paid on
that receipt.
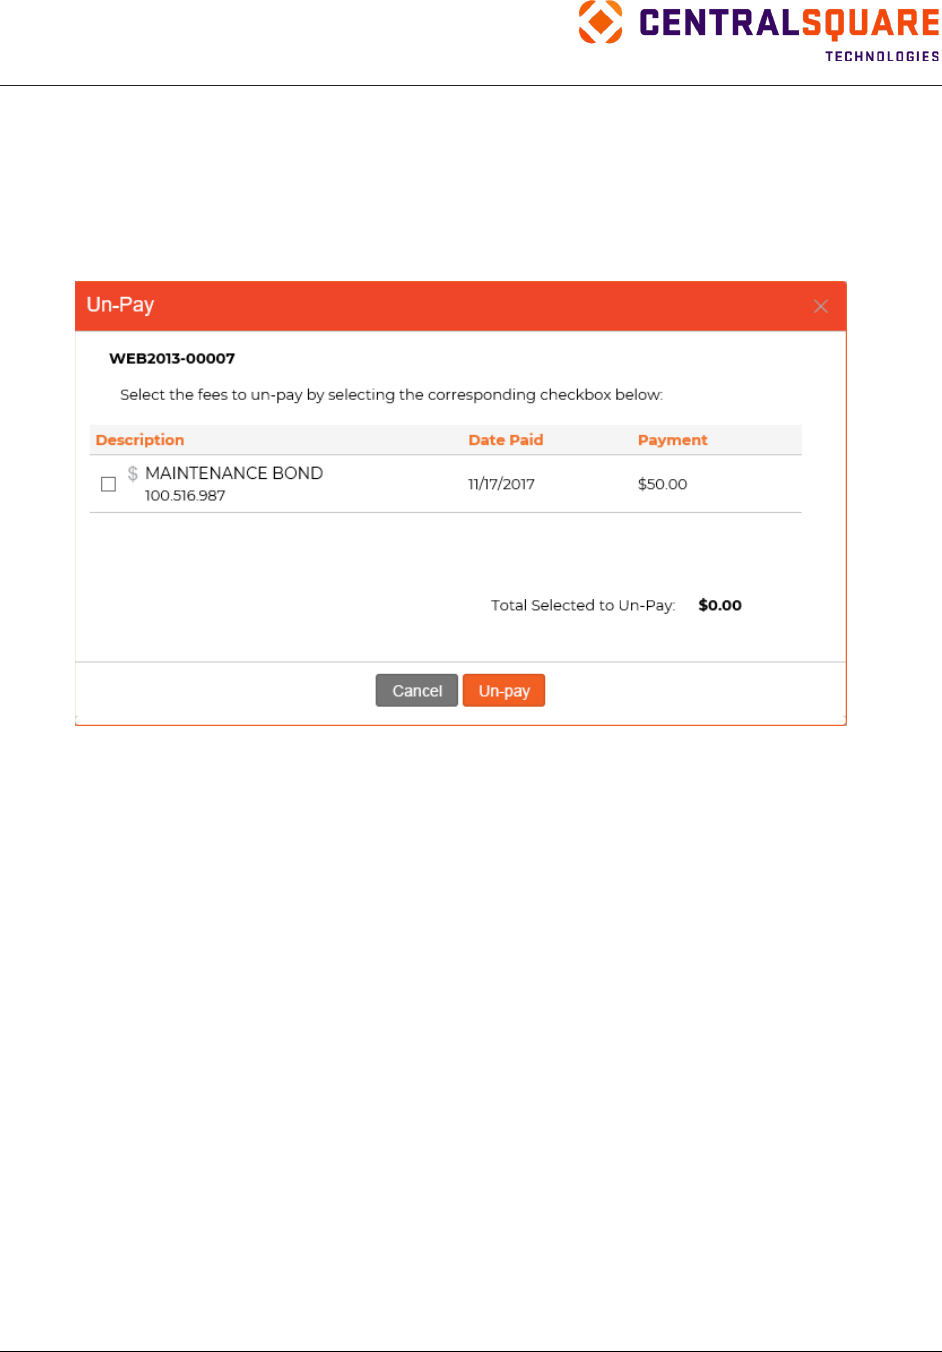
TRAKiT User Guide 18.1
Proprietary
May not be reproduced or distributed without written permission of CentralSquare Technologies.
Copyright 2018 CentralSquare Technologies. All rights reserved.
20181212JC Page 128
Unpaying a Bond
To unpay a bond, complete the following steps:
1.
Open the Bonds pane.
2.
Click Unpay.
3.
Select the bond to unpay.
4.
Click Un‐pay.
Reducing a Bond
To reduce a bond, complete the following steps:
1.
Select Reduce Bond from the bond’s functions menu.
2.
Type the new bond amount. The new bond amount must be less than the current bond amount.
3.
Select the Use the same payment information check box if you want to reduce the bond using
the same payment information used for the original bond. Clear this option if you want to use
different payment information.
Note: If you want to use different payment information, pay the bond using the new payment
information after you complete the reduction. See “Paying Bonds” for more information about
paying bonds.
4.
Click Yes.
Releasing a Bond
To release a bond, complete the following steps:
1.
Select Release Bond from the bond’s functions menu.
2.
Click Yes to confirm the release.
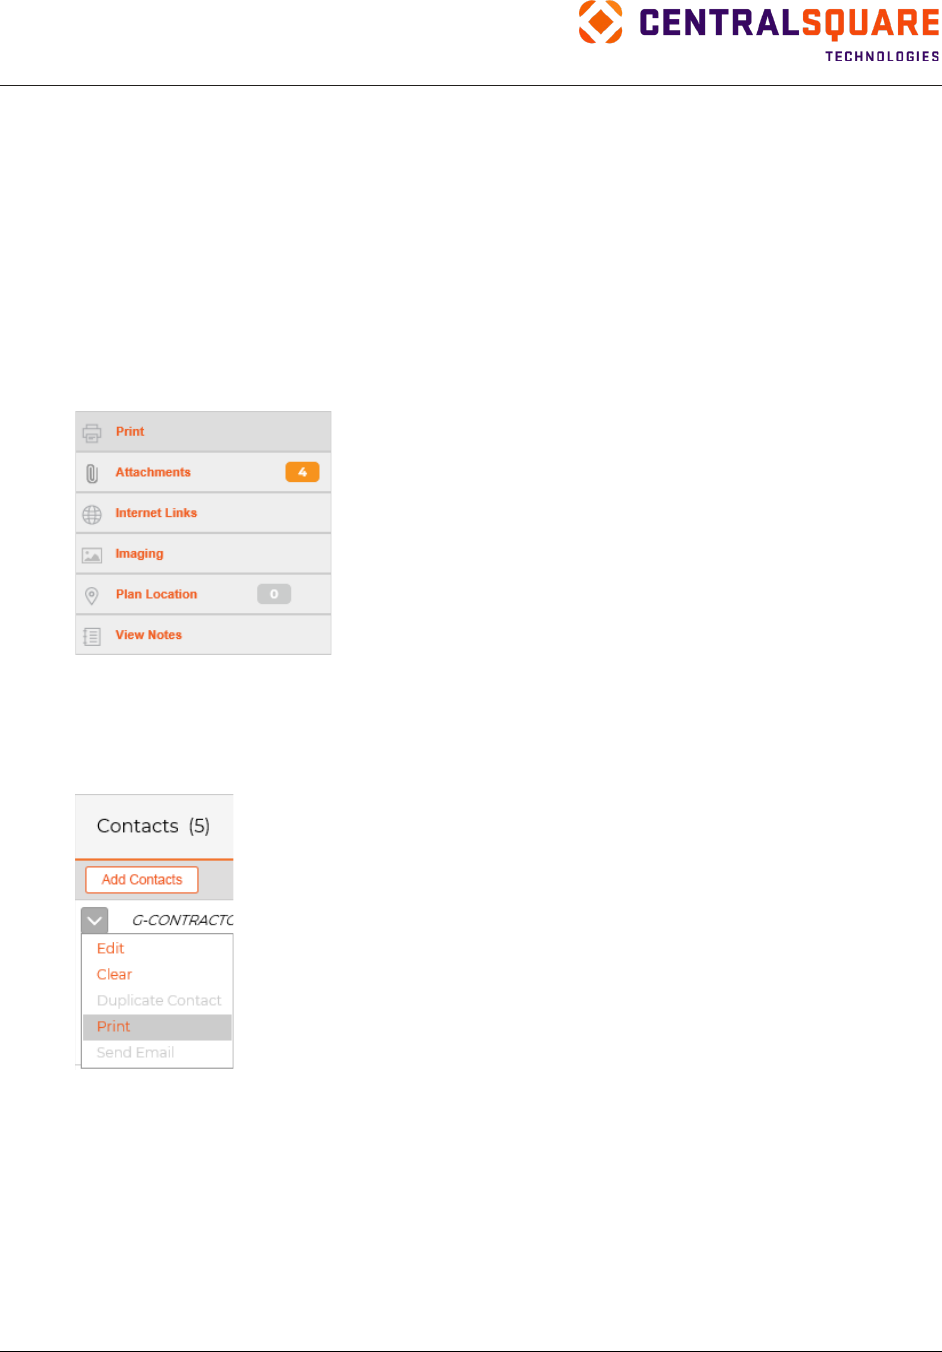
TRAKiT User Guide 18.1
Proprietary.
May not be reproduced or distributed without written permission of CentralSquare Technologies.
Copyright 2018 CentralSquare Technologies. All rights reserved.
20181212JC Page 129
Documents
You can create documents, such as inspection cards, notification letters, and certificates of occupancy,
by using the Print tool in PermitTRAK, ProjectTRAK, CodeTRAK, LicenseTRAK, or AEC TRAK. You can
also create your own merge documents to use with TRAKiT. All documents can be printed, sent to
contacts via email, displayed on your screen, and attached to a record.
Print Tool
To use the Print tool for a record:
1.
Locate the activity record.
2.
Click Print in the TRAKiT tools area.
To print a document at the function level (Chronology, Contacts, Conditions, Inspections, or Reviews),
complete the following steps:
1.
Locate the activity record.
2.
Click Print in the TRAKiT tools area.
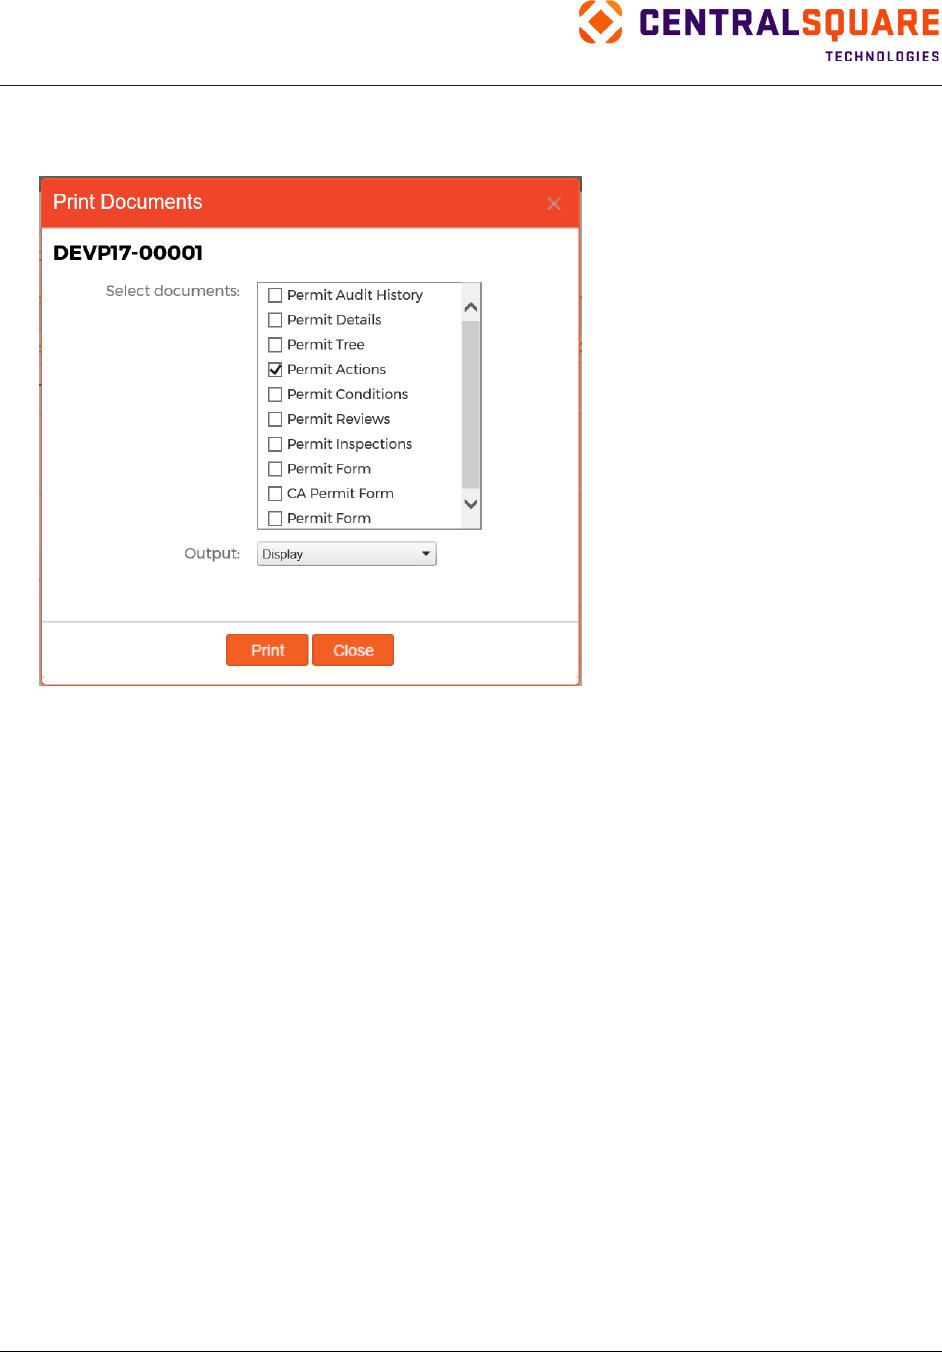
TRAKiT User Guide 18.1
Proprietary
May not be reproduced or distributed without written permission of CentralSquare Technologies.
Copyright 2018 CentralSquare Technologies. All rights reserved.
20181212JC Page 130
Print Documents
1.
Open the Print screen by clicking Print in the TRAKiT tools area.
2.
Select one or more documents.
3.
Select the output type.
•
To print the document without previewing it, select Default Printer 1 or 2.
•
To preview the document, select Display. You can print, save, or modify the document in the
application that created it (for example, Microsoft Word).
•
To export the document to pdf format, select PDF. You will need to specify the file name and
an export location.
•
To display the document and attach a copy to the activity record, select Attach & Display.
•
To send the document via email as an attachment, select Email. You can add comments and
recipients before sending the email.
•
To attach and email a copy of the document, select Attach & Email.
4.
Click Print.
Note: Some documents might require a signature before they can be printed. See “Using a Signature
Pad” for more information.
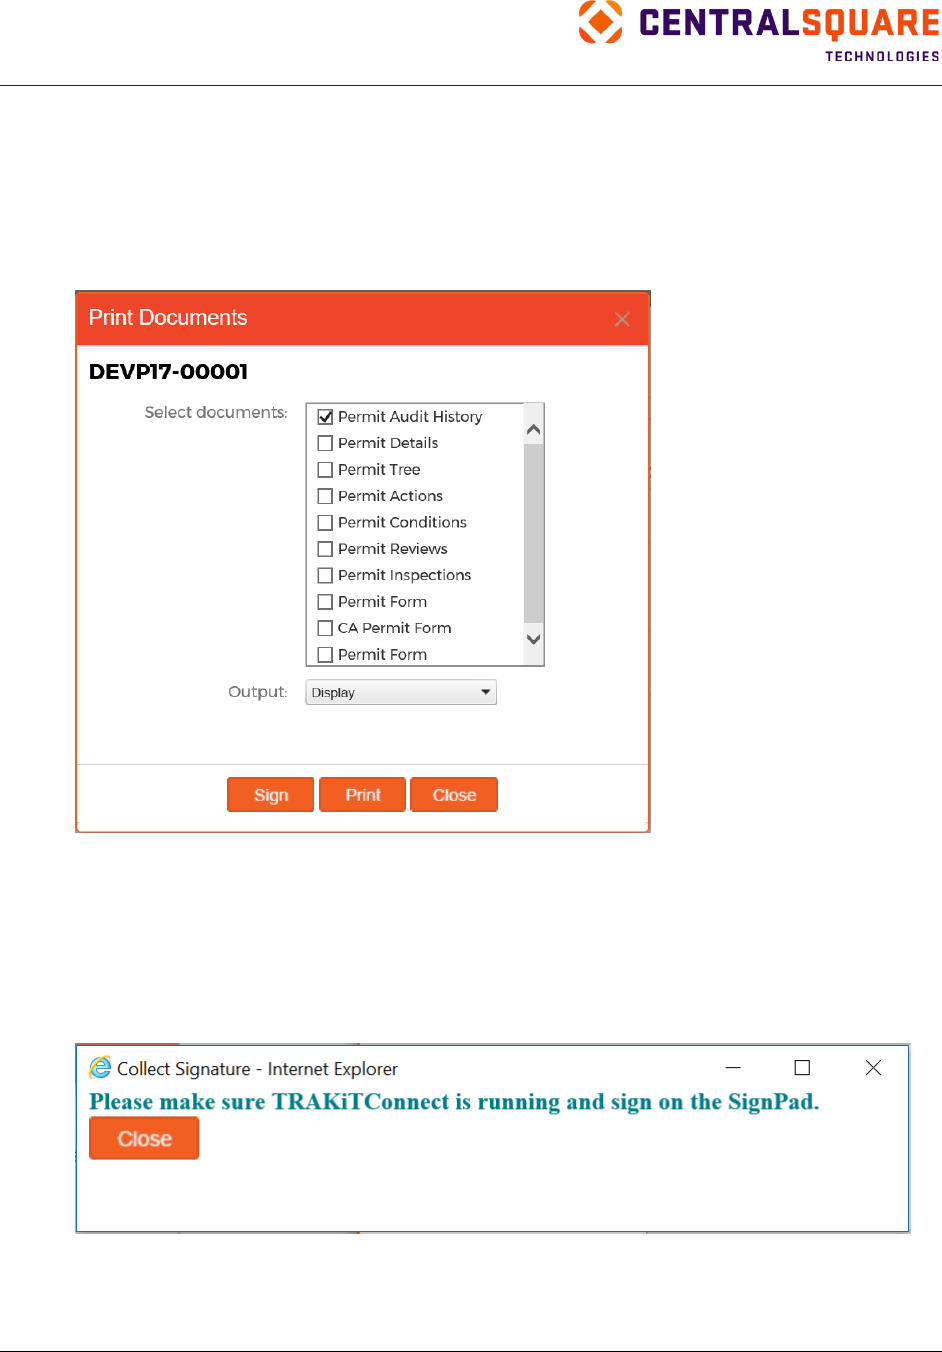
TRAKiT User Guide 18.1
Proprietary.
May not be reproduced or distributed without written permission of CentralSquare Technologies.
Copyright 2018 CentralSquare Technologies. All rights reserved.
20181212JC Page 131
Using a Signature Pad
Some documents require a signature before they can be printed.
Note: Contact your system administrator for more information about which documents are configured
to require a signature.
If you use a signature pad and TRAKiT Connect, the Sign button appears in the Print Documents dialog
box when you select a document that requires a signature.
You must complete the following steps to be able to print the document:
Note: TRAKiT Connect must be running before you begin these steps.
1.
In the Print Documents dialog box, select the document and the output type.
2.
Click Sign. TRAKiT Connect runs and a pop-up window appears.
Note: Your browser must be set to enable pop-up windows for the TRAKiT website. Contact your
IT department if you need help enabling this setting.
3.
Sign on the signature pad and then click one of the following buttons:
•
Click Accept to save the signature and include it on the printed document. After you click
Accept, the pop-up window closes and you can print the document.
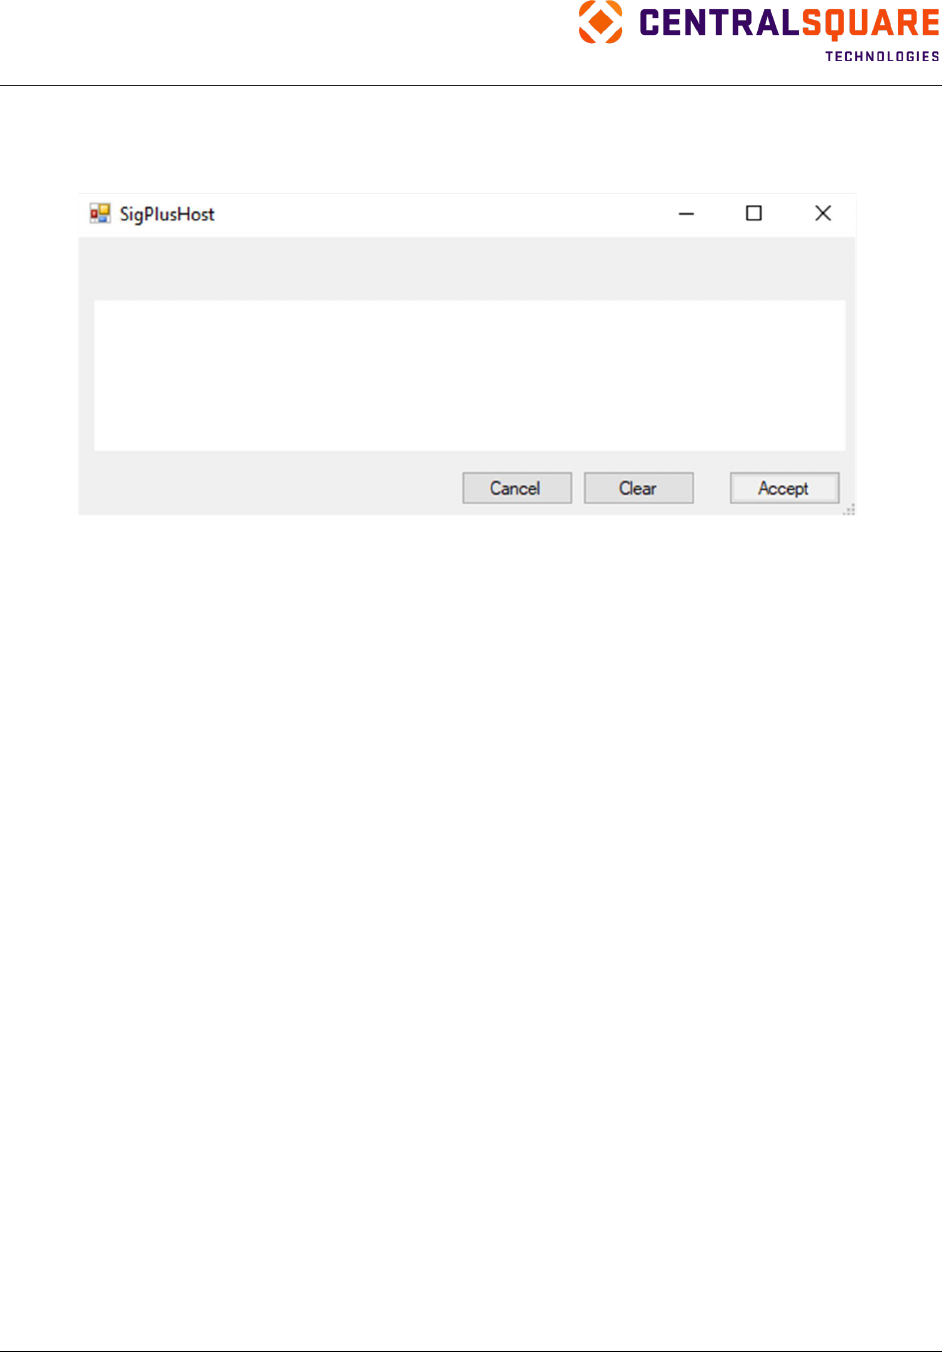
TRAKiT User Guide 18.1
Proprietary
May not be reproduced or distributed without written permission of CentralSquare Technologies.
Copyright 2018 CentralSquare Technologies. All rights reserved.
20181212JC Page 132
•
Click Clear to erase the signature and sign again.
•
Click Cancel to close the signature window without saving a signature. You will not be able to
print the document.
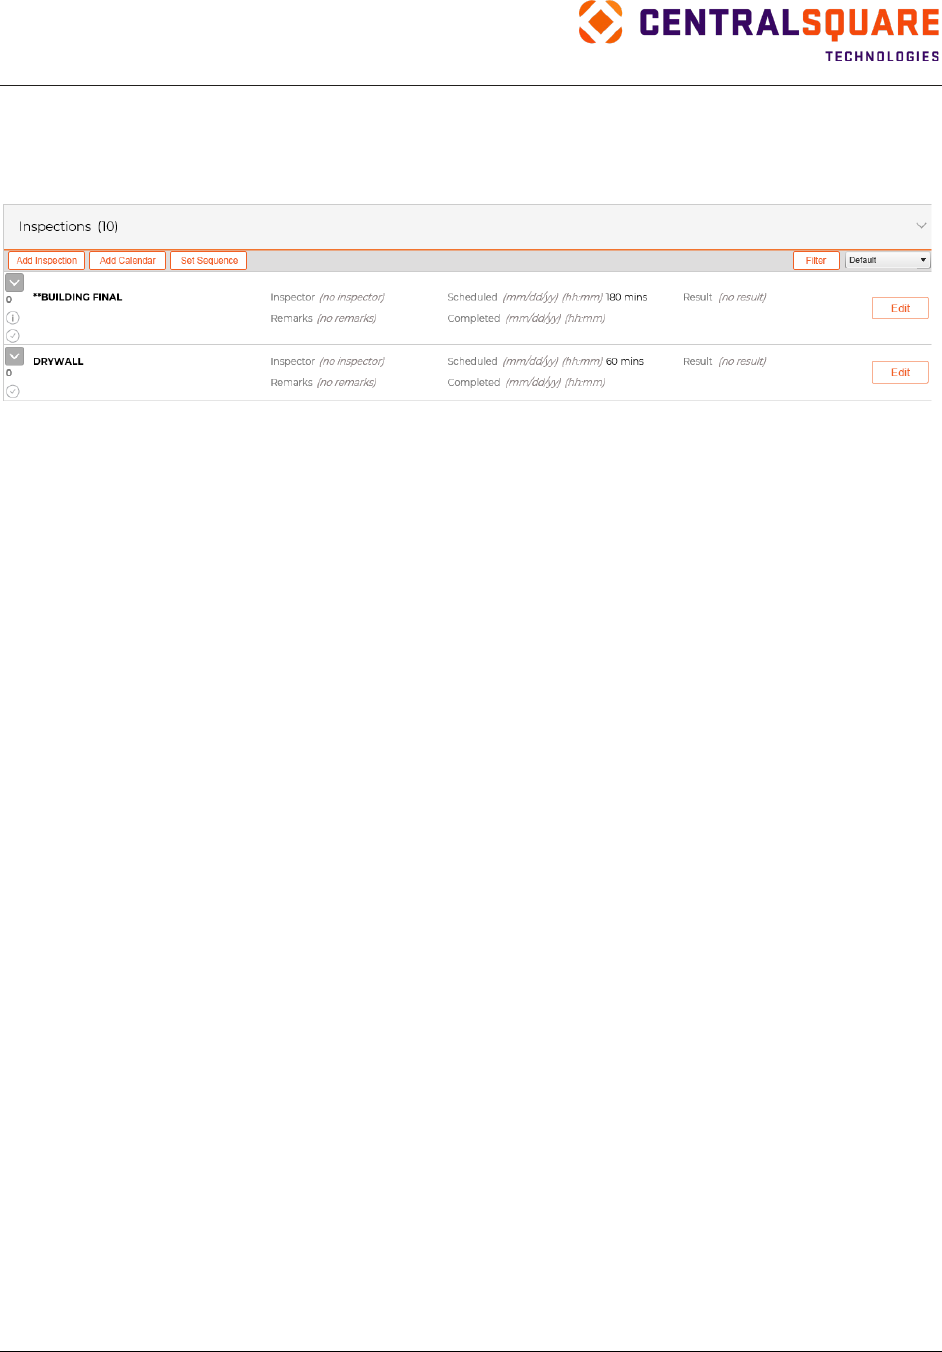
TRAKiT User Guide 18.1
Proprietary.
May not be reproduced or distributed without written permission of CentralSquare Technologies.
Copyright 2018 CentralSquare Technologies. All rights reserved.
20181212JC Page 133
Inspections
Use the Inspections pane to manage inspection information associated with a record in PermitTRAK,
ProjectTRAK, CodeTRAK, or LicenseTRAK.
Scheduling Inspections
You can schedule inspections from the Inspections pane, from the TRAKiT calendar, or using the Batch
Scheduler feature. From the Inspections pane you can schedule inspections for a single record. From
the TRAKiT calendar and Batch Scheduler, you can schedule inspections for multiple records.
Note: Depending on your setup, some inspections might require prerequisite inspections to be
completed with a specified status before you can schedule the inspection. If you attempt to schedule
an inspection before the prerequisites are completed, the inspection is not scheduled and TRAKiT
displays a message indicating which prerequisites are not met.
Your system administrator defines the prerequisites in TRAKiT Web Utilities & Maintenance (WUM).
Using the Inspections Pane
To schedule inspections on a single record, complete the following steps:
1.
Open the Inspections pane.
2.
Click Add Inspection.
3.
Complete the inspections information:
•
Select an inspector.
•
In the Set Default field, select a default date setting:
○
Next Day—Sets the scheduled date to the next calendar day.
○
Today—Sets the scheduled date to the current date.
○
Specified Date—Sets the date to the date you enter in the Scheduled Date field.
○
Next Available—Sets the scheduled date to the soonest available date. This option is
valid only if the Inspection Cap feature is in use.
○
No Specified Date—No date is set.
•
Select the time of the inspection, if applicable.
•
Select one or more inspections to schedule.
TRAKiT User Guide 18.1
Proprietary
May not be reproduced or distributed without written permission of CentralSquare Technologies.
Copyright 2018 CentralSquare Technologies. All rights reserved.
20181212JC Page 134
4.
Click Add.
Note: If you set the Scheduled Date field to a date in the past, the action is logged in the audit
table and a message appears. Click OK to continue with the date you selected or click Cancel to
return to the dialog box and change the date.
TRAKiT User Guide 18.1
Proprietary.
May not be reproduced or distributed without written permission of CentralSquare Technologies.
Copyright 2018 CentralSquare Technologies. All rights reserved.
20181212JC Page 135
Using the Calendar
Use the My Calendar feature to add inspections, reschedule inspections, result inspections, reserve time,
export an inspection to Microsoft Outlook
®
, and view tasks. To access your calendar, point to your name
in the TRAKiT application header and then click My Calendar.
You can view the calendar by day, week, or month.
To use the calendar function to schedule inspections, access the calendar and then complete the
following steps:
1.
Click Add Inspection.
2.
Search for the record.
3.
In the results listing, find the record you want and click the link in the Record # column.
4.
Complete the inspections information:
•
Select an inspector.
•
In the Set Default field, select a default date setting:
○
Next Day—Sets the scheduled date to the next calendar day.
○
Today—Sets the scheduled date to the current date.
○
Specified Date—Sets the date to the date you enter in the Scheduled Date field.
○
Next Available—Sets the scheduled date to the soonest available date. This option is
valid only if the Inspection Cap feature is in use.
○
No Specified Date—No date is set.
•
Select the time of the inspection, if applicable.
TRAKiT User Guide 18.1
Proprietary
May not be reproduced or distributed without written permission of CentralSquare Technologies.
Copyright 2018 CentralSquare Technologies. All rights reserved.
20181212JC Page 136
•
Select one or more inspections to schedule.
5.
Click Add.
Note: If you set the Scheduled Date field to a date in the past, the action is logged in the audit
table and a message appears. Click OK to continue with the date you selected or click Cancel to
return to the dialog box and change the date.
Note: You can drag an inspection item to another date or another authorized inspector's calendar.
Note: To edit the details of a scheduled inspection, select settings ( ).
To add reserved time to your calendar, access the calendar and then complete the following steps:
1.
Click Reserve Time.
2.
Enter a date.
3.
Type a description (for example, Out of Office).
4.
If you want to reserve a half day or whole day, select the appropriate option in Time Options.
The options are:
•
Unavailable or All Day—Reserves the entire work day.
•
Morning—Reserves 8 a.m. to 12 p.m.
•
Afternoon—Reserves 1 p.m. to 5 p.m.
TRAKiT User Guide 18.1
Proprietary.
May not be reproduced or distributed without written permission of CentralSquare Technologies.
Copyright 2018 CentralSquare Technologies. All rights reserved.
20181212JC Page 137
5.
Select times if you did not select an option in Time Options. Time is reserved in hour increments.
Select the start time to reserve one hour (for example, select 9:00 am to reserve one hour from
9 a.m. to 10 a.m.). Select the beginning and end times to reserve more than one hour. For
example, select 12:00 pm and 3:00 pm to reserve three hours from 12 p.m. to 3 p.m.
Note: To change the details of the reserved time, double‐click the entry on the calendar.
To delete the reserved time, click in the entry on the calendar and then click OK.
To export a scheduled inspection to Microsoft Outlook, access the calendar in TRAKiT and then complete
the following steps:
1.
Select the inspection on your TRAKiT calendar.
2.
Click Export To Outlook.
3.
Click Open.
4.
Adjust the details as needed.
5.
Save and close the task.
Your tasks (Chronology activities) appear on your calendar in the Tasks pane when you view your
calendar by day or week. To show or hide the Tasks pane, click View Tasks.
From the Tasks pane, you can:
•
Select the task title to edit the task
•
Click the record number to open the record
Using the Batch Scheduler
Use the Batch Scheduler feature to schedule inspections for multiple records from a single screen.
Note: To use Batch Scheduler, you must first add Batch Scheduler to your Favorites list. See
“Favorites” for more information about adding features to your Favorites list.
To use Batch Scheduler, complete the following steps:
1.
Point to Favorites and then click Batch Scheduler.
2.
If you want to apply a default date, time, or remark to all the inspections you are scheduling,
complete the following fields:
•
Set Default Date
•
Set Default Time
•
Set Default Remarks
Note: If you change any of these fields after you add inspections to the batch, the existing
inspections are updated with the new default values.
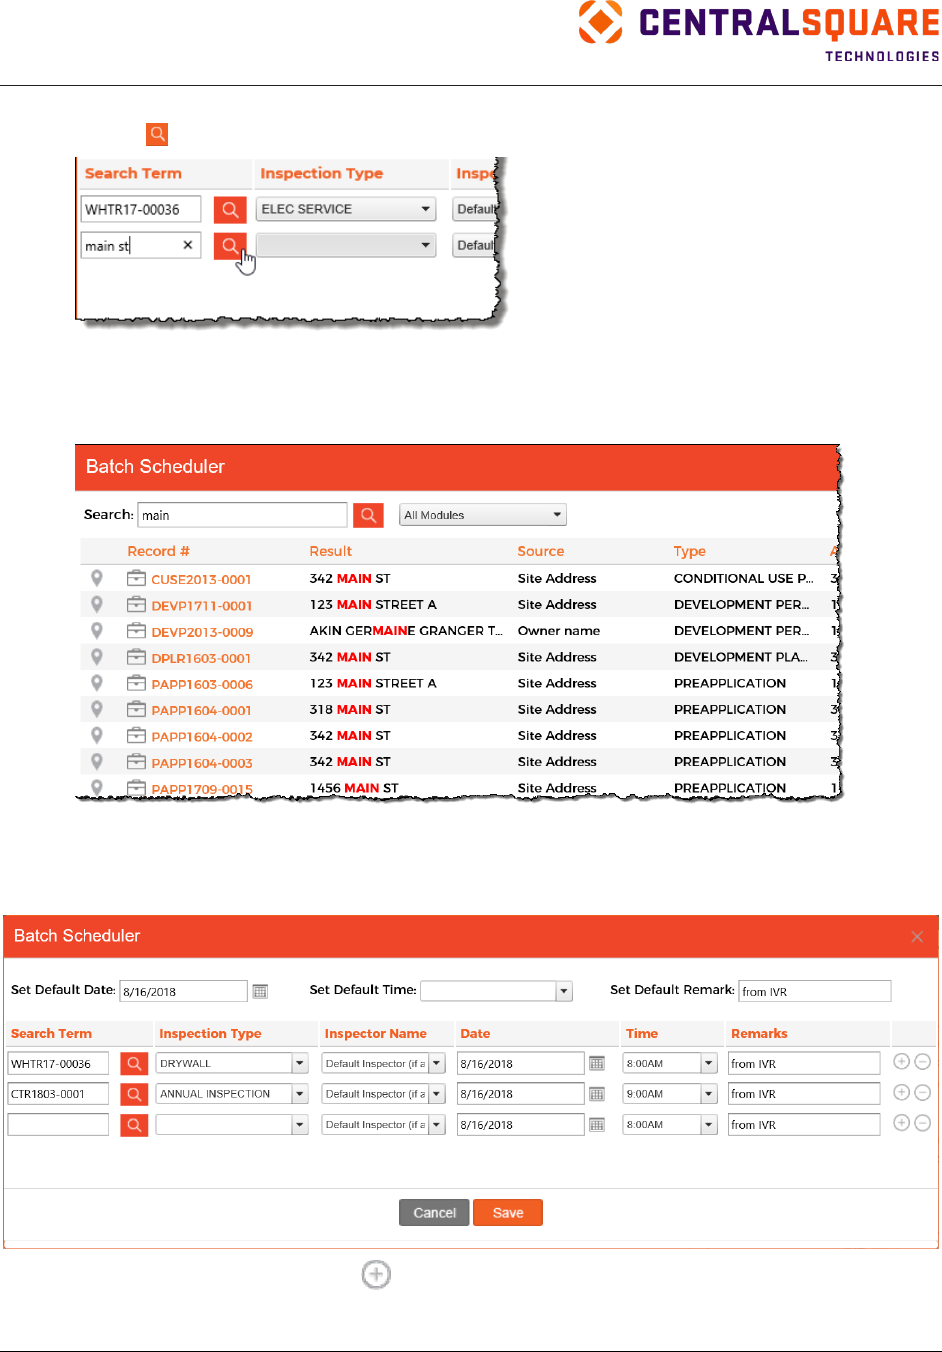
TRAKiT User Guide 18.1
Proprietary
May not be reproduced or distributed without written permission of CentralSquare Technologies.
Copyright 2018 CentralSquare Technologies. All rights reserved.
20181212JC Page 138
3.
Search for the first record you want to schedule by typing in the Search Term field and then
clicking
. You must enter at least three characters in the Search Term field.
Note: If the search returns only one result, that result is added to the inspection list. The results
listing does not appear.
4.
In the results listing, click the link in the Record # column to select the record.
5.
Select the inspection type and inspector name.
6.
If you did not set a default date, time, or remarks, or if you want to customize those fields for this
inspection, update the Date, Time, and Remarks fields.
7.
To add another inspection, click
or press Tab from the Remarks field.
8.
Repeat steps 3–7 to add the inspection.

TRAKiT User Guide 18.1
Proprietary.
May not be reproduced or distributed without written permission of CentralSquare Technologies.
Copyright 2018 CentralSquare Technologies. All rights reserved.
20181212JC Page 139
Note: To remove an inspection before you complete the batch scheduling, click in the row for
the inspection you want to remove.
9.
After you add all inspections for the batch, click Save.
Note: You cannot add inspections that cause a capped inspector to exceed his or her cap.
Entering Inspection Results
To enter inspection results on a single record in PermitTRAK, ProjectTRAK, CodeTRAK, or
LicenseTRAK, open the record in the module and complete the following steps:
1.
Expand the Inspections pane.
2.
Click Edit in the row for the inspection you want to change.
3.
Update fields in the left area of the Edit Inspection dialog box:
a.
Inspection Type—Type of inspection. Typically, you will not change this field, but you can, if
necessary.
b.
Inspector—Select the name of the inspector who completed the inspection.
c.
Scheduled Date—Enter the scheduled date of the inspection.
d.
Scheduled Time—Select the scheduled time of the inspection.
e.
Duration—Select the duration of the inspection in minutes.
f.
Sequence—For a series of inspections that must occur in a specific order, enter the
sequence number for this inspection.
g.
Result—Select the result code.
h.
Remarks—Type remarks.
i.
Completed Date—Enter the date the inspection was completed.
j.
Completed Time—Enter the time the inspection was completed.
k.
Add to Timesheet—Enter the amount of accumulated time spent on the activity.
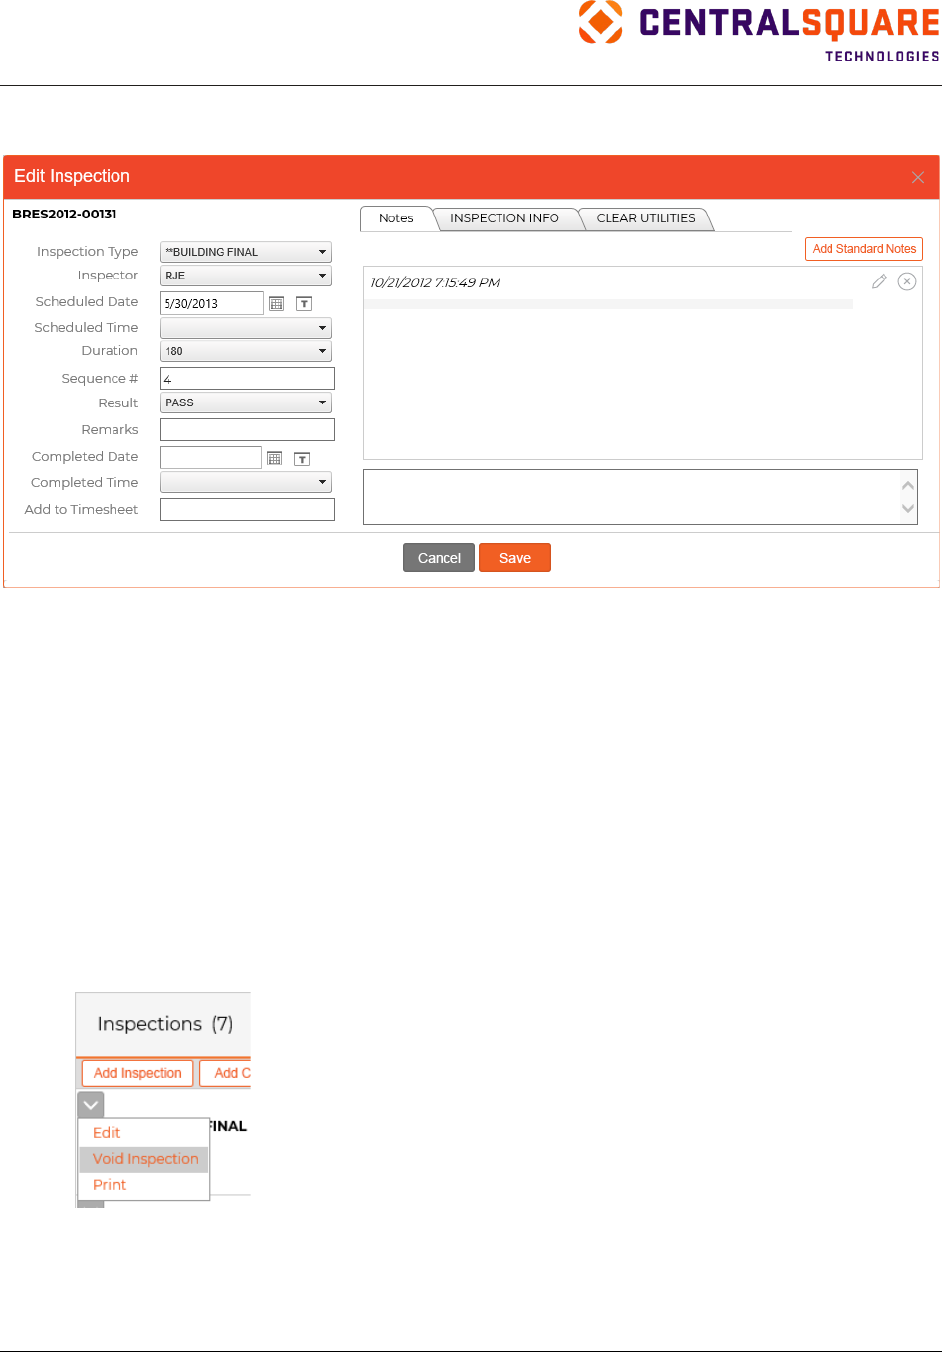
TRAKiT User Guide 18.1
Proprietary
May not be reproduced or distributed without written permission of CentralSquare Technologies.
Copyright 2018 CentralSquare Technologies. All rights reserved.
20181212JC Page 140
4.
The right area of the Edit Inspection dialog box contains one or more tabs, depending on the
inspection type. Update fields on each tab as needed.
5.
Click Save.
Note: If you set the Scheduled Date field to a date in the past, the action is logged in the audit
table and a message appears. Click OK to continue with the date you selected or click Cancel to
return to the dialog box and change the date.
Tip: Depending on your setup, inspection results might trigger automatic reinspections or reinspection
fees.
Voiding Inspections
Users who do not have the Can Delete Reviews privilege can void reviews but not delete them. An
inspection must be voided before it can be deleted.
To void an inspection, open the record in the module and complete the following steps:
1.
Expand the Inspections pane.
2.
Select Void Inspection from the functions menu.
3.
Click Yes.

TRAKiT User Guide 18.1
Proprietary.
May not be reproduced or distributed without written permission of CentralSquare Technologies.
Copyright 2018 CentralSquare Technologies. All rights reserved.
20181212JC Page 141
Deleting Inspections
Only system administrators or users with the Can Delete Inspections privilege can delete inspections. An
inspection must be voided before it can be deleted.
To delete an inspection, open the record in the module and complete the following steps:
1.
Expand the Inspections pane.
2.
Select Delete Inspection from the functions menu.
3.
Click Yes.
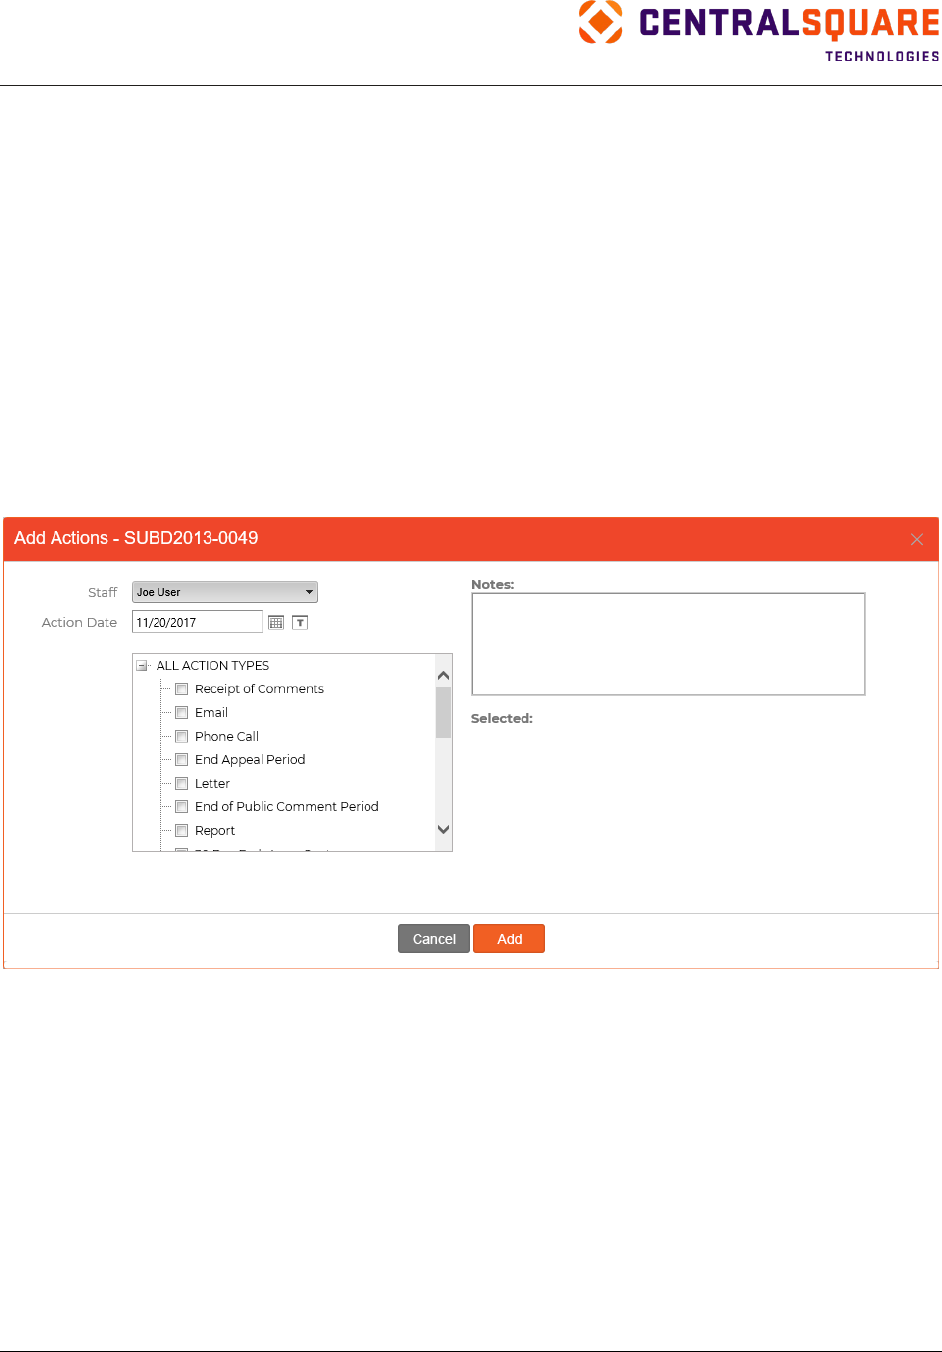
TRAKiT User Guide 18.1
Proprietary
May not be reproduced or distributed without written permission of CentralSquare Technologies.
Copyright 2018 CentralSquare Technologies. All rights reserved.
20181212JC Page 142
Chronology
Use the Chronology pane to manage actions associated with an activity record.
Adding Actions
To add a single action to a record, locate the record in the module and complete the following steps:
1.
Open the Chronology pane.
2.
Click Add Actions.
3.
Enter the following activity details for the action item:
a.
Select the staff member responsible for completing the action.
b.
Enter the date the action should be completed.
c.
Select the action type.
d.
Add notes as necessary.
1.
Click Add. The action items are added to the staff member's Workspace.
Using the Event Scheduler
The Event Scheduler automatically schedules action items that are prerequisites for a major event. The
due dates of prerequisite action items are calculated based on the target date for the major event.
For example, if you want to a schedule a public hearing for April 1, but the hearing requires a staff
meeting 30 days prior to it and a public notice 15 days prior to it, the public hearing event scheduler adds
a staff meeting on March 1 and a public notice on March 15.
Tip: Events and prerequisites must be set up by a system administrator before this feature can be
used in TRAKiT.
To use the Event Scheduler, locate the record in the module and complete the following steps:
1.
Open the Chronology pane.
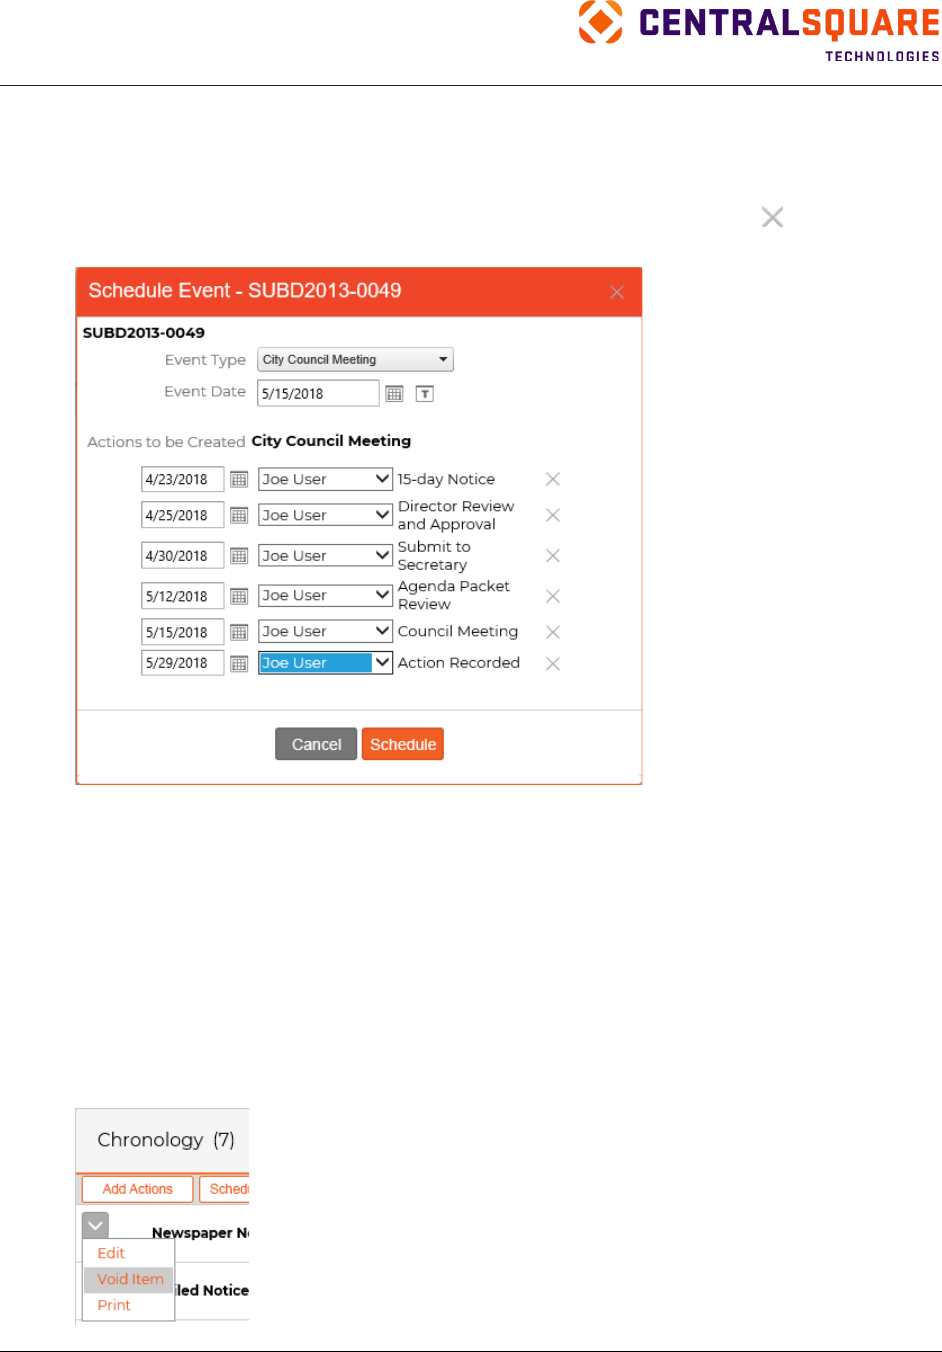
TRAKiT User Guide 18.1
Proprietary.
May not be reproduced or distributed without written permission of CentralSquare Technologies.
Copyright 2018 CentralSquare Technologies. All rights reserved.
20181212JC Page 143
2.
Click Schedule Event.
3.
Select an event type. Actions related to the event type appear in the dialog box.
4.
Select the event date.
5.
For each action, modify the date or user, if needed. To delete an action, click
next to the
action.
6.
Click Schedule. All actions associated with the event type are added to the Chronology pane.
Voiding Action Items
In PermitTRAK, ProjectTRAK, and CodeTRAK, users who do not have the Can Delete Chronology
privilege can void actions but not delete them.
In LicenseTRAK and AEC TRAK, users can delete actions without having to void them first. No special
privileges are required.
To void action items, open the record in the module and complete the following steps:
1.
Expand the Chronology pane.
2.
Select Void Item from the functions menu.
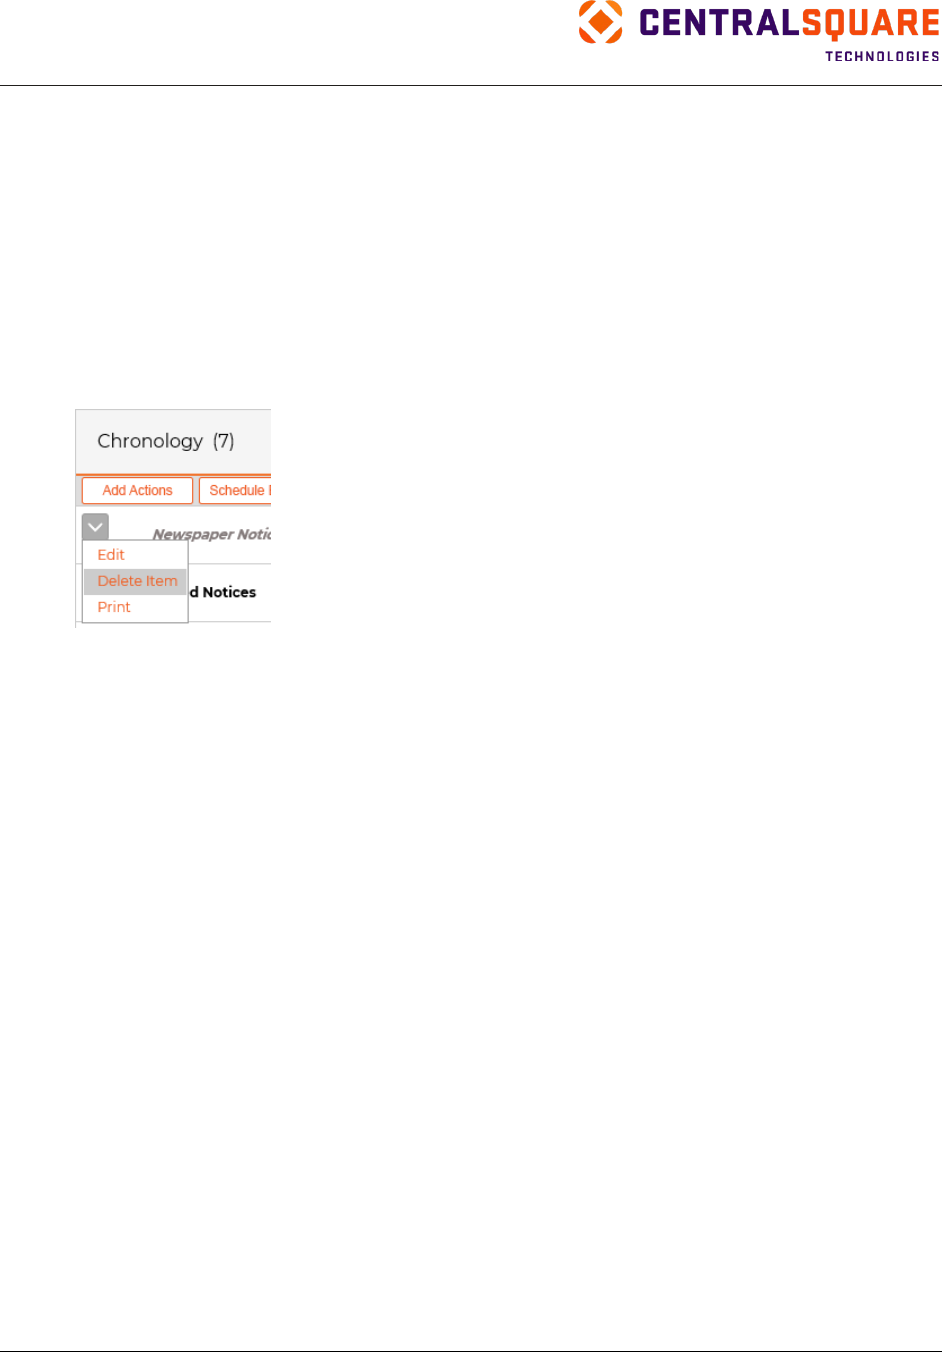
TRAKiT User Guide 18.1
Proprietary
May not be reproduced or distributed without written permission of CentralSquare Technologies.
Copyright 2018 CentralSquare Technologies. All rights reserved.
20181212JC Page 144
3.
Click Yes.
Deleting Action Items
In PermitTRAK, ProjectTRAK, and CodeTRAK, only system administrators or users with the Can Delete
Chronology privilege can delete action items. An action must be voided before it can be deleted.
In LicenseTRAK and AEC TRAK, users can delete actions without having to void the action first. No
special privileges are required.
To delete an action, open the record in the module and then complete the following steps:
1.
Expand the Chronology pane.
2.
Select Delete Item from the functions menu.
3.
Click Yes.
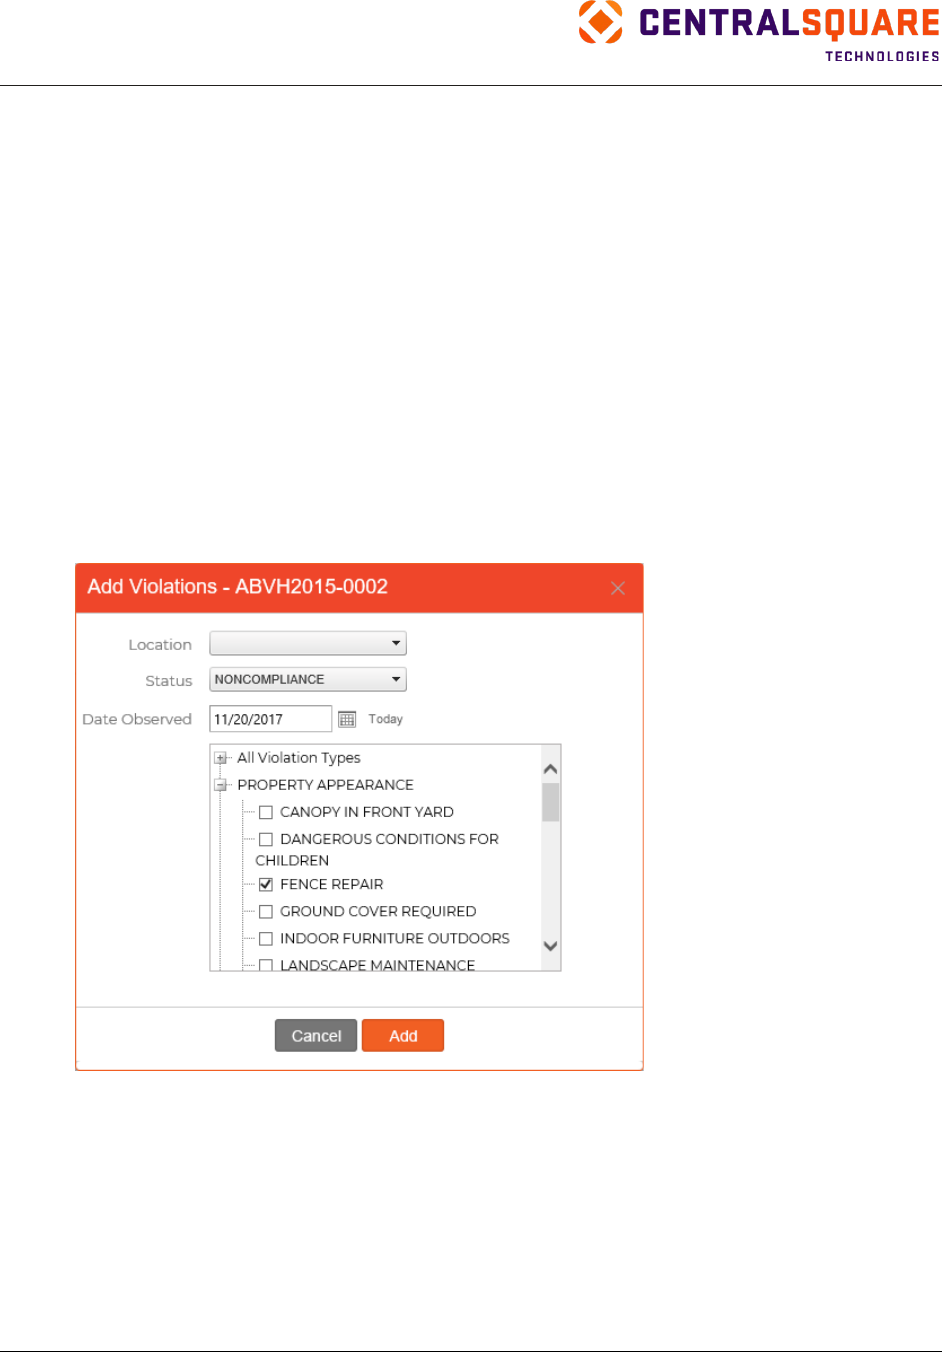
TRAKiT User Guide 18.1
Proprietary.
May not be reproduced or distributed without written permission of CentralSquare Technologies.
Copyright 2018 CentralSquare Technologies. All rights reserved.
20181212JC Page 145
Violations
TRAKiT manages code enforcement violations through the Violations pane. Depending on your setup,
CodeTRAK handles violations in one of two ways: a single violation per case record or multiple violations
per case record. Contact your system administrator for details about how your system is set up.
Adding Violations
To add violations to a case record, complete the following steps:
1.
Locate the case in CodeTRAK.
2.
Expand the Violations pane.
3.
Click Add Violations.
4.
Select a location.
5.
Select a status for the violation.
6.
Select the date that the violation was reported.
7.
Select one or more violations to add to the case.
8.
Click Add.
Note: If you set the Date Observed field to a date in the past, the action is logged in the audit
table and a message appears. Click OK to continue with the date you selected or click Cancel to
return to the dialog box and change the date.
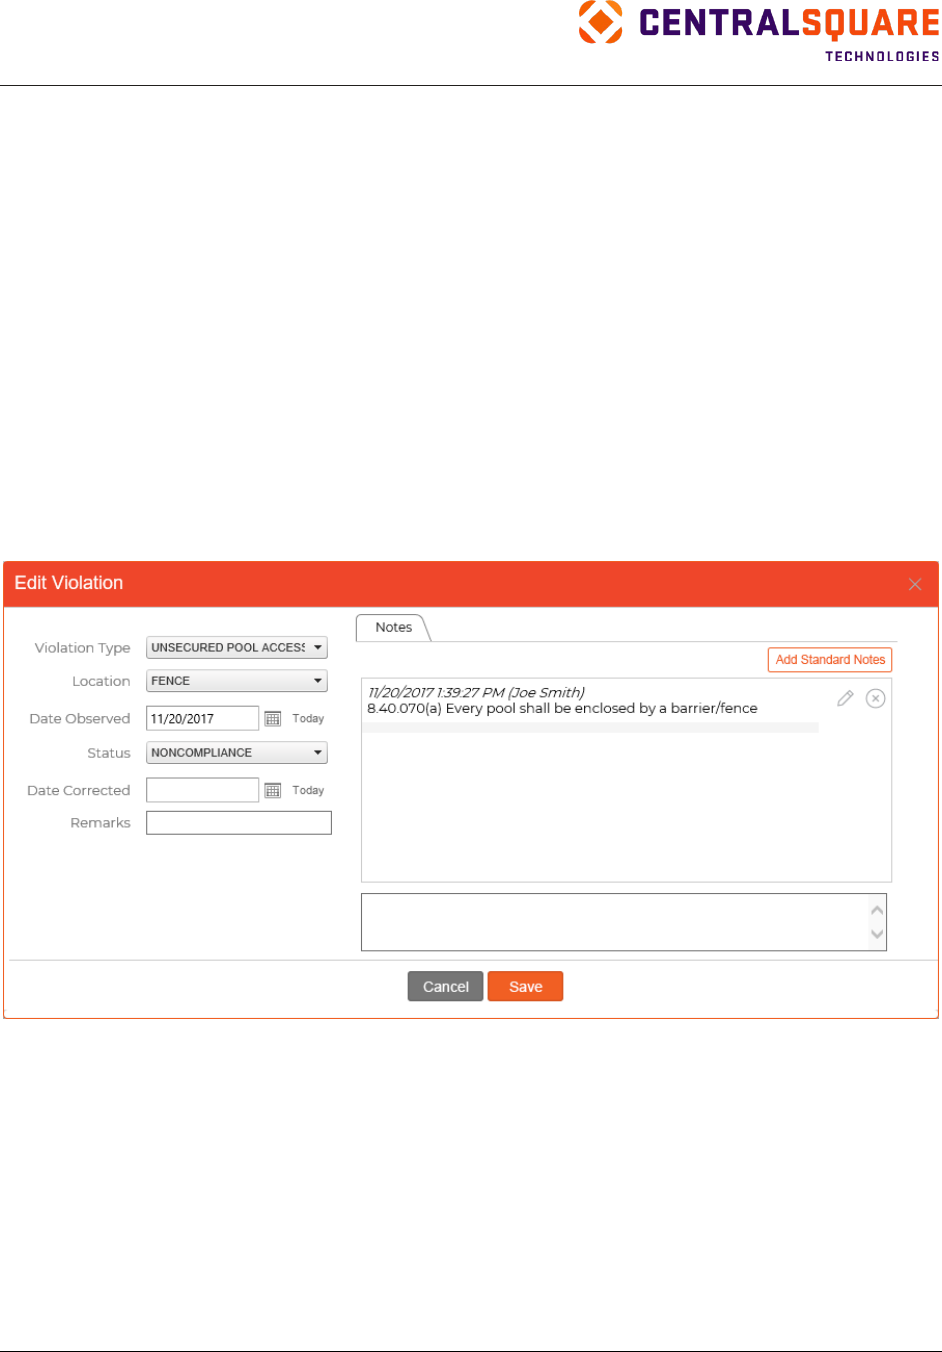
TRAKiT User Guide 18.1
Proprietary
May not be reproduced or distributed without written permission of CentralSquare Technologies.
Copyright 2018 CentralSquare Technologies. All rights reserved.
20181212JC Page 146
Editing Violations
To edit violations on a case record, complete the following steps:
1.
Locate the case in CodeTRAK.
2.
Expand the Violations pane.
3.
Click Edit in the row for the violation you want to change.
4.
Update fields in the left area of the Edit Violation dialog box:
a. Violation Type
b. Location
c. Date Observed
d. Status
e. Date Corrected
f. Remarks
5.
Add notes in the right area of the dialog box.
6.
Click Save.
Note: If you set the Date Observed field to a date in the past, the action is logged in the audit
table and a message appears. Click OK to continue with the date you selected or click Cancel to
return to the dialog box and change the date.
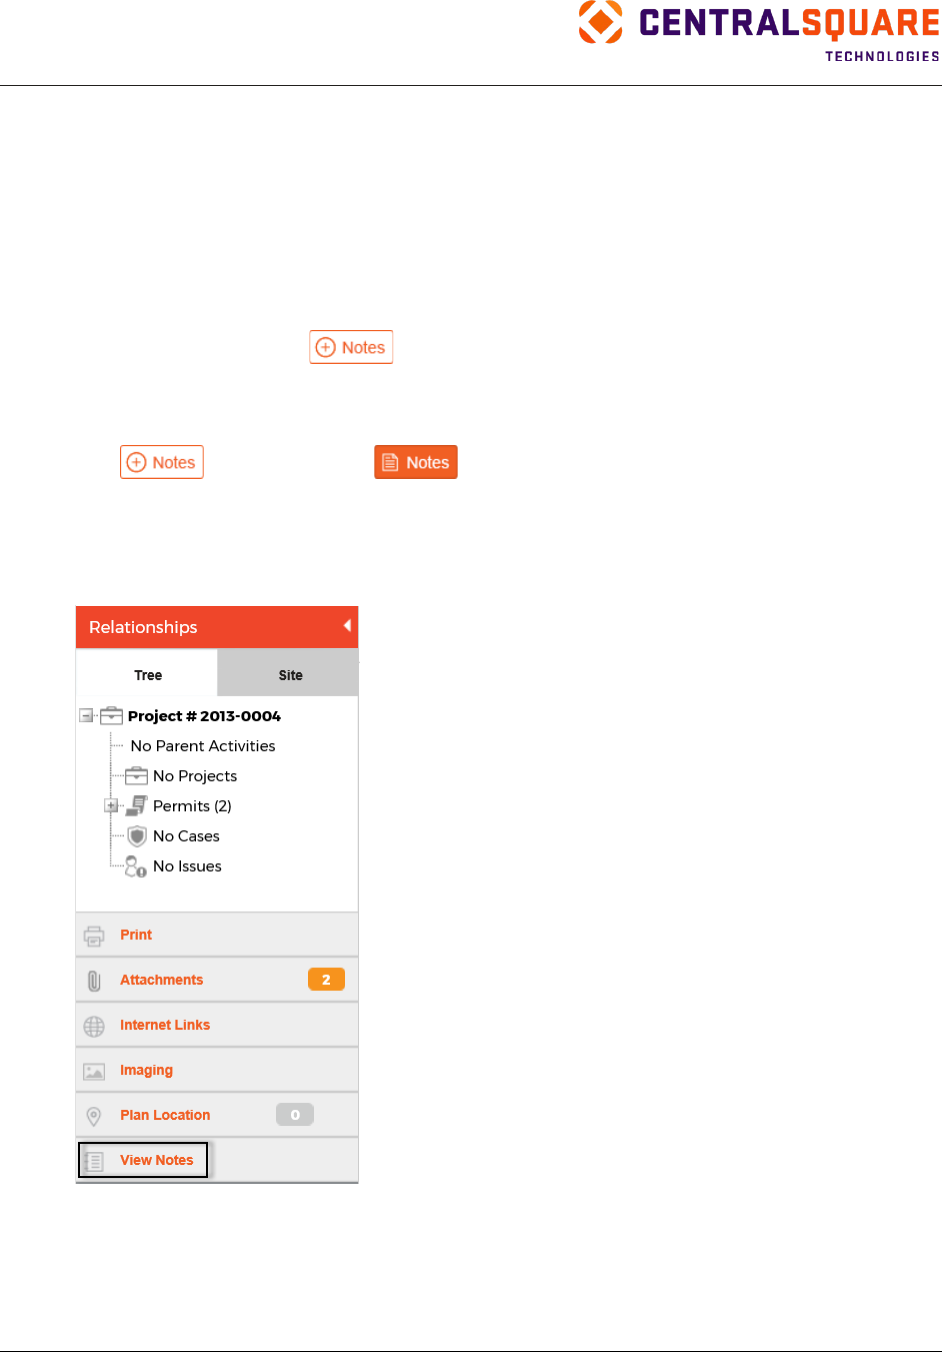
TRAKiT User Guide 18.1
Proprietary.
May not be reproduced or distributed without written permission of CentralSquare Technologies.
Copyright 2018 CentralSquare Technologies. All rights reserved.
20181212JC Page 147
Notes
Use the Notes feature to add a long description to a PermitTRAK, ProjectTRAK, CodeTRAK, or
AEC TRAK record. You can add standard (predefined) notes or custom notes.
Adding Notes
To use the Notes feature:
1.
Locate the activity record.
2.
From the main pane, click
.
3.
Enter your notes.
4.
Click Save.
Tip: The
button changes to
after a note is added to the record.
Viewing Notes
To view all notes associated with an activity record, locate the record and then click View Notes in the
Relationships pane.
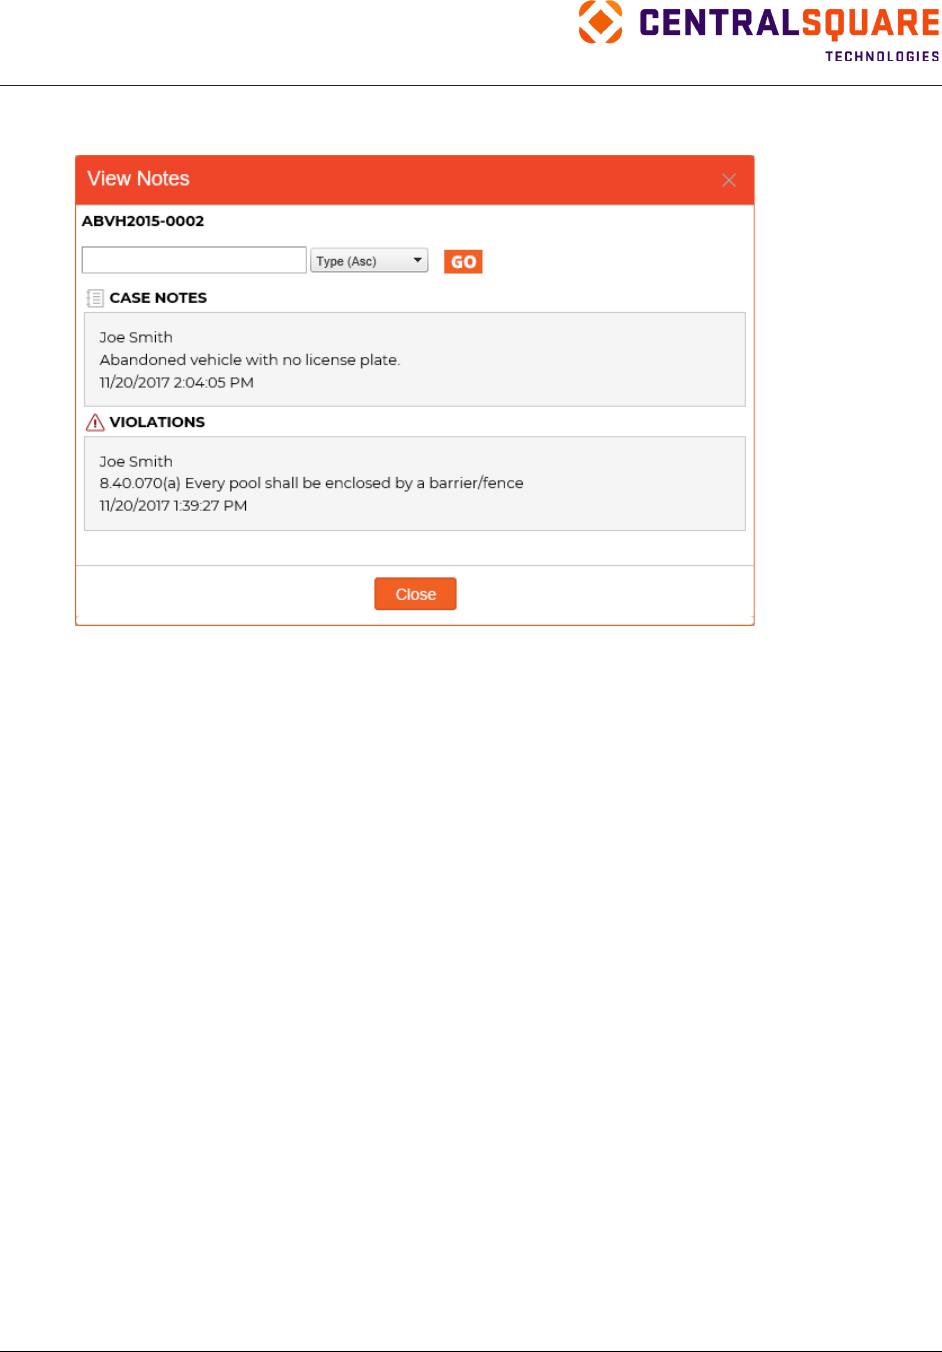
TRAKiT User Guide 18.1
Proprietary
May not be reproduced or distributed without written permission of CentralSquare Technologies.
Copyright 2018 CentralSquare Technologies. All rights reserved.
20181212JC Page 148
The View Notes dialog box appears. In this dialog box, you can view notes, filter notes, and sort the
notes in date or type order.
Tip: To limit the notes in the listing, enter a word or phrase in the search field and click Go. To clear
the filter, delete the search word or phrase and then click Go.
Standard Notes
Use the Standard Notes feature to add predefined notes to an existing inspection, review, violation, or
condition. The note can be unique to a functional area or a user. Standard notes are configured by your
system administrator.
To add a standard note, locate the record and then complete the following steps:
1.
Open the Inspections, Reviews, Violations, or Conditions pane.
2.
Click Edit in the row for the item you want to add standard notes to.
3.
Click Add Standard Notes.
4.
Select one or more standard notes from the list.
5.
Click OK.
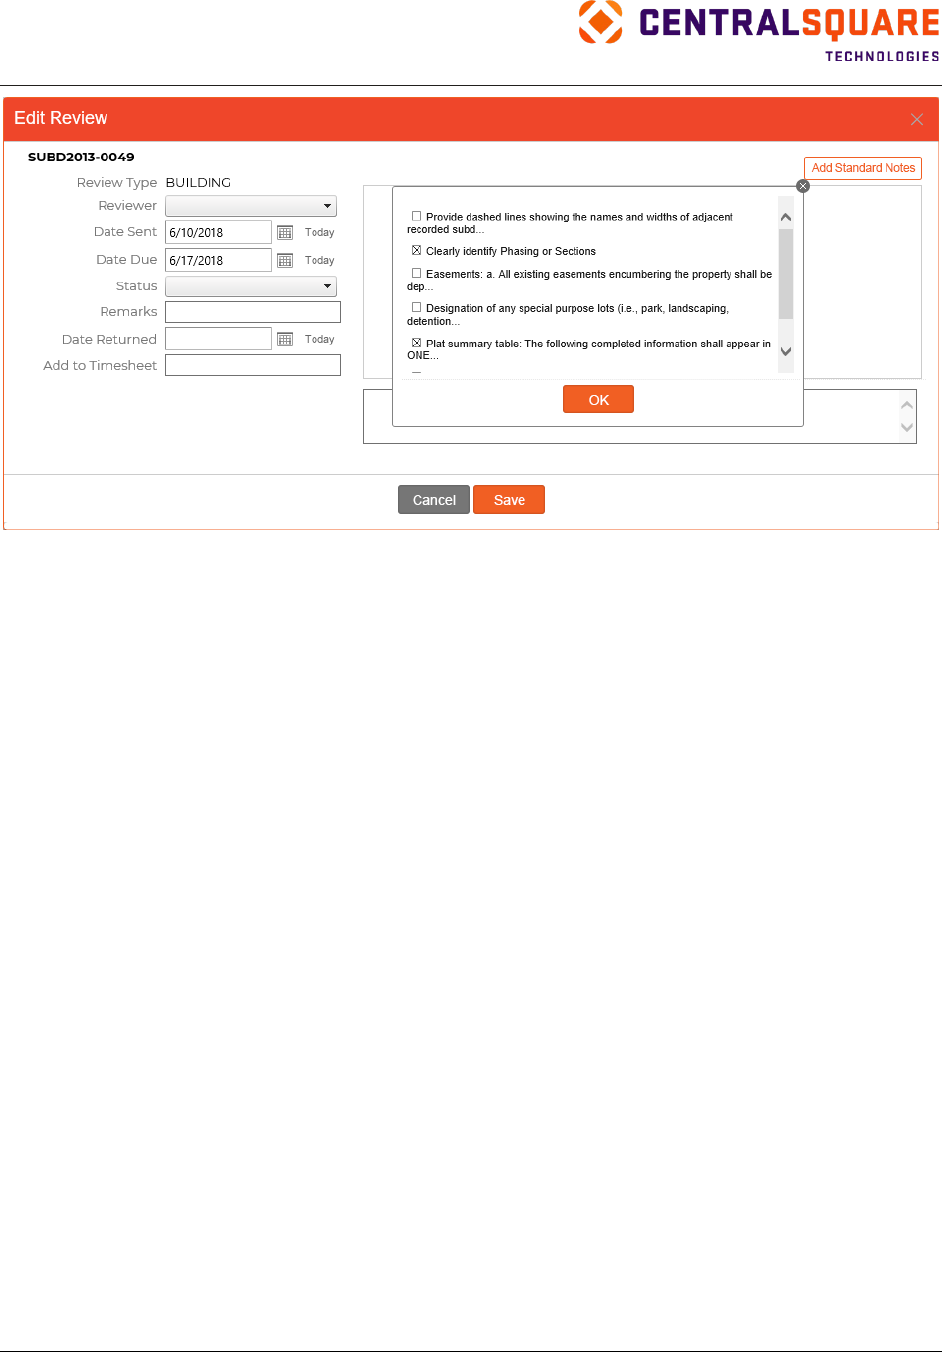
TRAKiT User Guide 18.1
Proprietary.
May not be reproduced or distributed without written permission of CentralSquare Technologies.
Copyright 2018 CentralSquare Technologies. All rights reserved.
20181212JC Page 149
6.
Click Save.
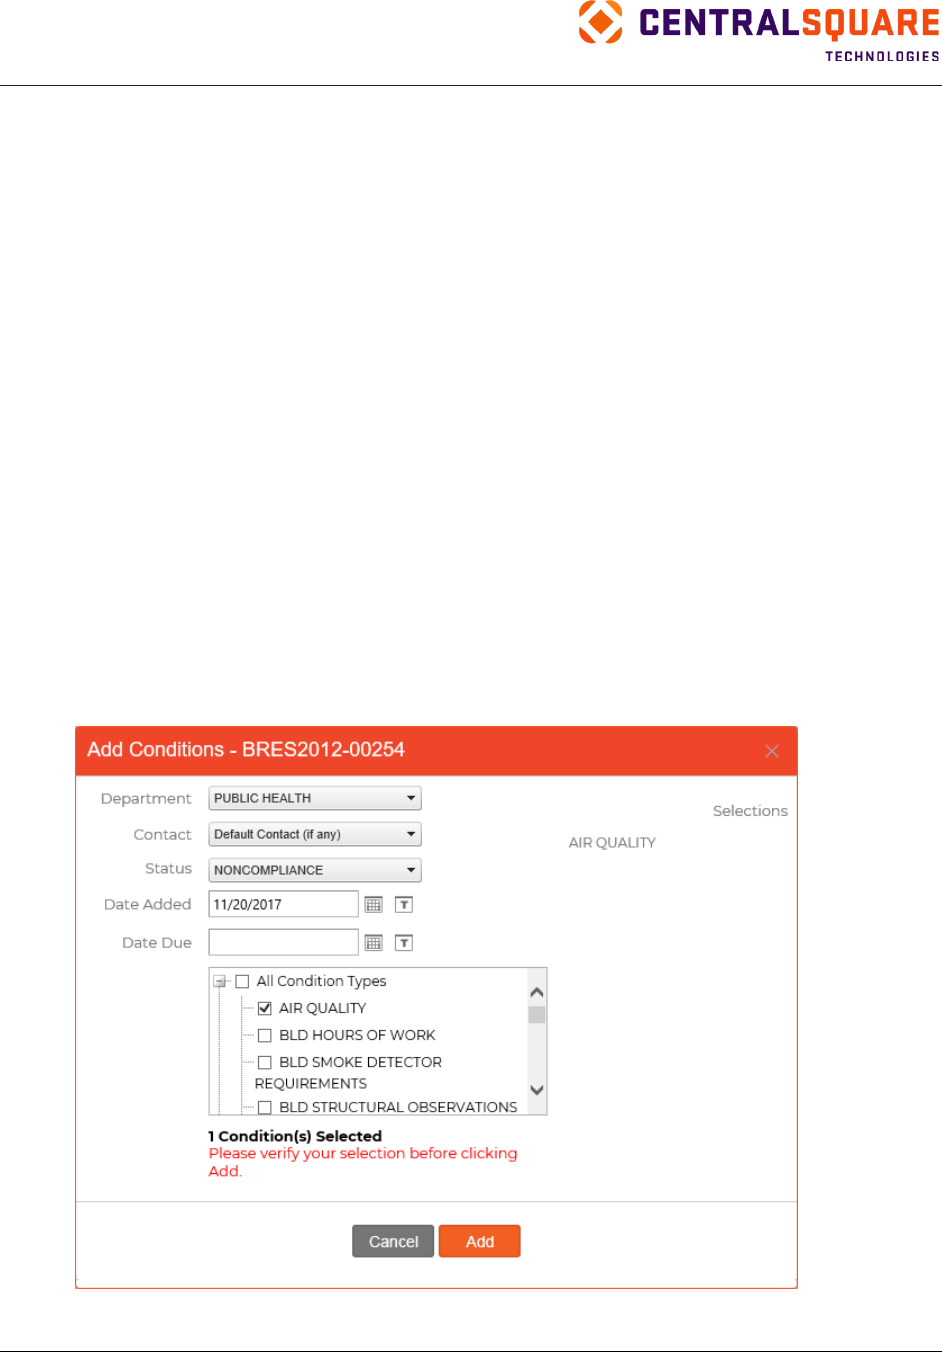
TRAKiT User Guide 18.1
Proprietary
May not be reproduced or distributed without written permission of CentralSquare Technologies.
Copyright 2018 CentralSquare Technologies. All rights reserved.
20181212JC Page 150
Conditions
Use the Conditions function to track conditions imposed on a PermitTRAK, ProjectTRAK, or
LicenseTRAK record.
Conditions can be entered manually or using standard text (standard text requires setup by a system
administrator) and can be edited for each record.
Notes as long as 8,000 characters can be added to conditions in PermitTRAK and ProjectTRAK.
Adding Conditions
To add a condition, locate the PermitTRAK, ProjectTRAK, or LicenseTRAK record and then complete the
following steps:
1.
Expand the Conditions pane.
2.
Click Add Conditions.
3.
Complete the fields:
a. Select a department.
b. Select a contact.
c. Select a status.
d. Enter the date the condition is being added.
e. Enter a due date.
f. Select one or more conditions.
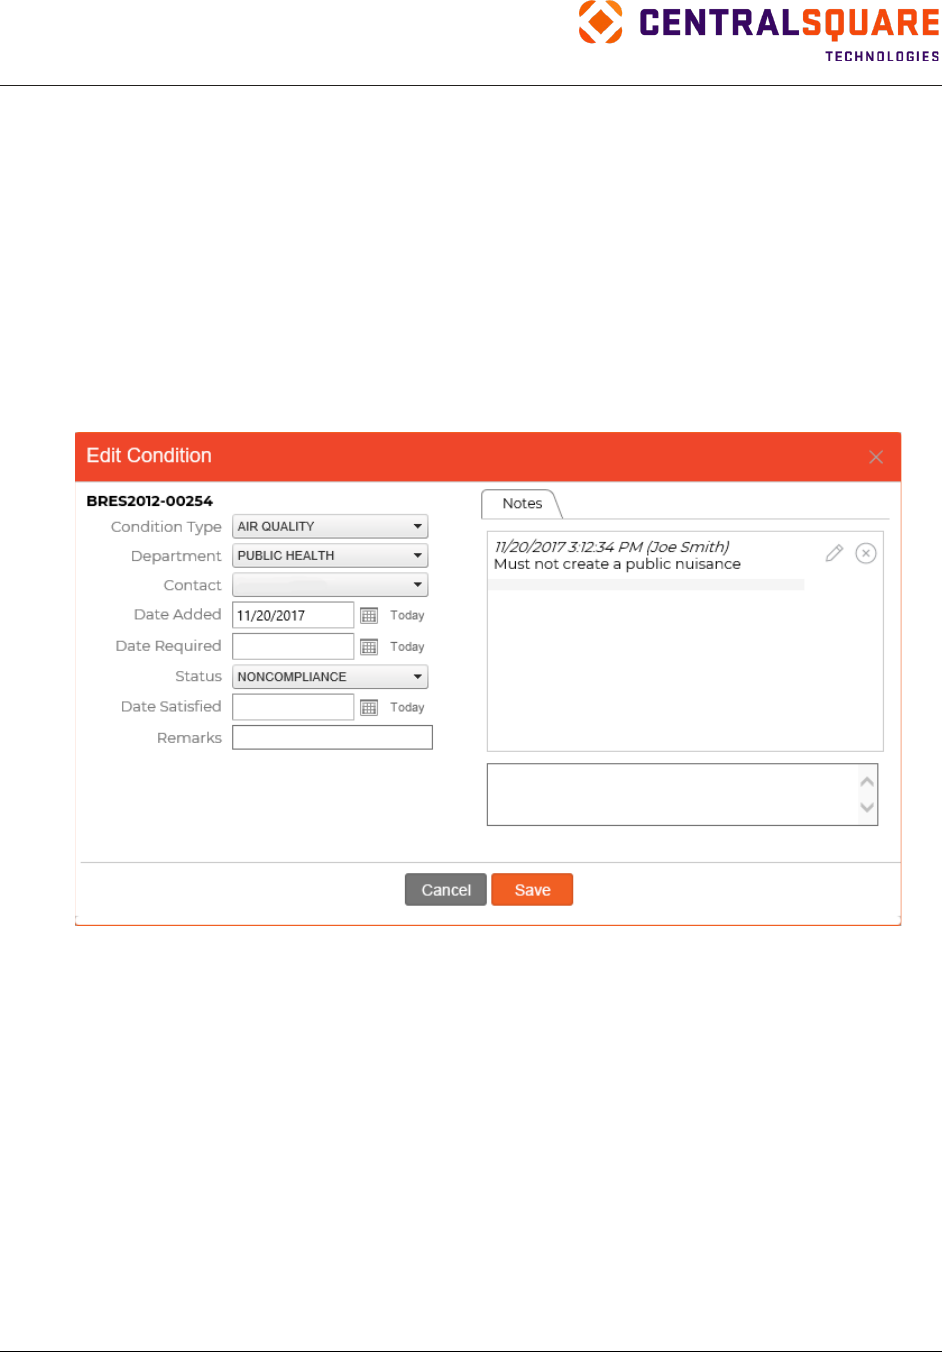
TRAKiT User Guide 18.1
Proprietary.
May not be reproduced or distributed without written permission of CentralSquare Technologies.
Copyright 2018 CentralSquare Technologies. All rights reserved.
20181212JC Page 151
4.
Click Add.
Note: If you set the Date Added or Date Due field to a date in the past, the action is logged in the
audit table and a message appears. Click OK to continue with the date you selected or click
Cancel to return to the dialog box and change the date.
Editing Conditions
To edit a condition, locate the PermitTRAK, ProjectTRAK, or LicenseTRAK record and then complete the
following steps:
1.
Expand the Conditions pane.
2.
Click Edit next to the condition you want to change.
3.
Enter or update information as needed.
4.
Click Save.
Note: If you set the Date Added or Date Due field to a date in the past, the action is logged in the
audit table and a message appears. Click OK to continue with the date you selected or click
Cancel to return to the dialog box and change the date.
Reordering Conditions
Use the Reorder Conditions feature to define the sequence of conditions listed on an activity record.
To reorder a set of conditions, locate the PermitTRAK, ProjectTRAK, or LicenseTRAK record and then
complete the following steps:
1.
Expand the Conditions pane.
2.
Click Reorder Conditions.
3.
Select a condition.
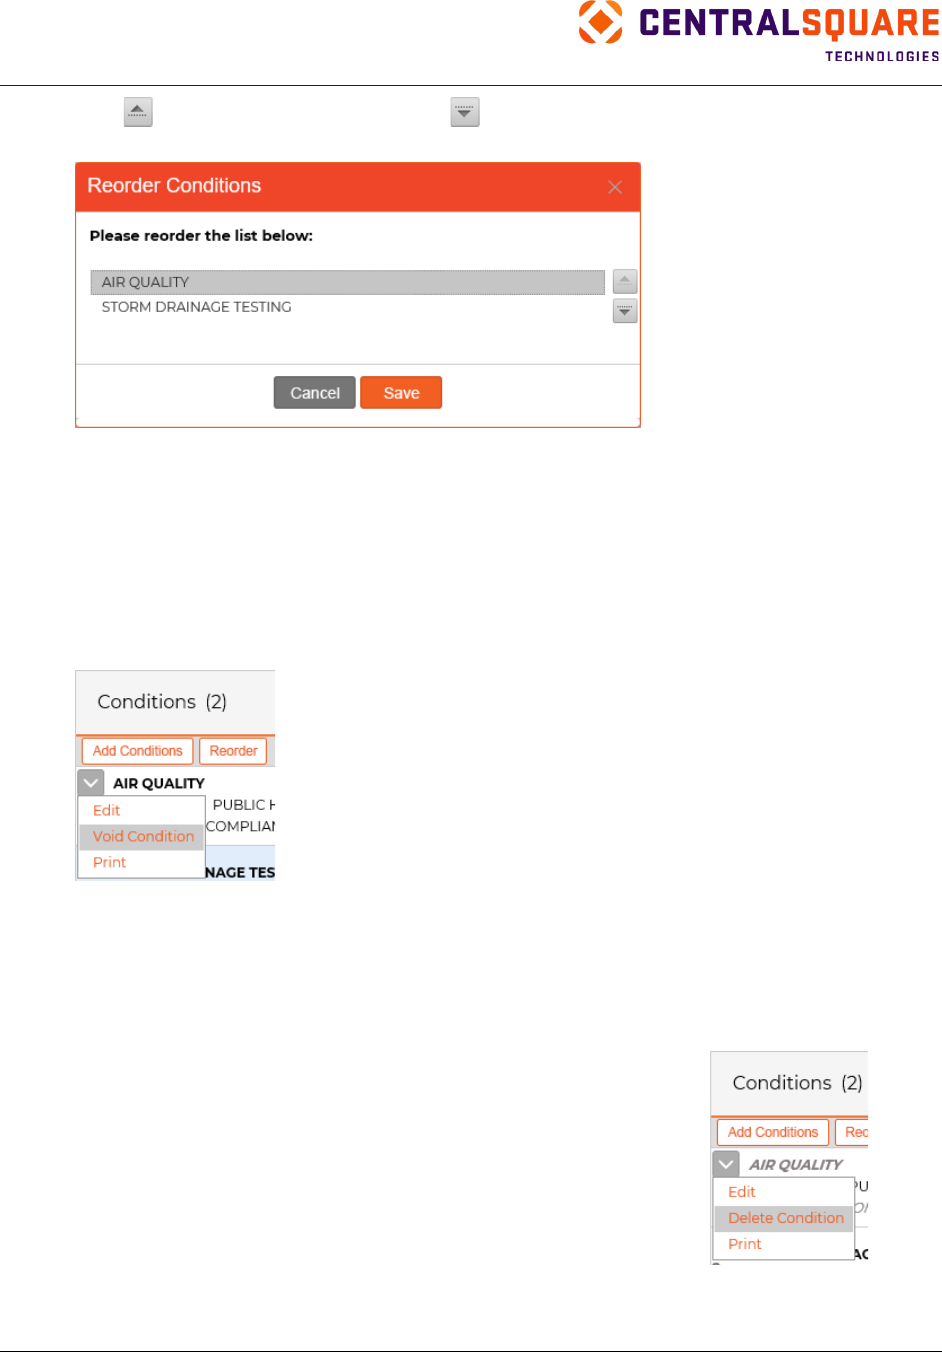
TRAKiT User Guide 18.1
Proprietary
May not be reproduced or distributed without written permission of CentralSquare Technologies.
Copyright 2018 CentralSquare Technologies. All rights reserved.
20181212JC Page 152
4.
Click
to move the condition up or click
to move the condition down. Repeat this step with
other conditions until all conditions are in the order you want.
5.
Click Save.
Voiding Conditions
Users who do not have the Can Delete Conditions privilege can void conditions but not delete them.
To void a condition, open the record in the module and complete the following steps:
1.
Expand the Conditions pane.
2.
Select Void Condition from the functions menu.
3.
Click Yes.
Deleting Conditions
Only system administrators or users with the Can Delete Conditions privilege can delete conditions. A
condition must be voided before it can be deleted.
To delete a condition, open the record in the module and complete the
following steps:
1.
Expand the Conditions pane.
2.
Select Delete Condition from the functions menu.
3.
Click Yes.
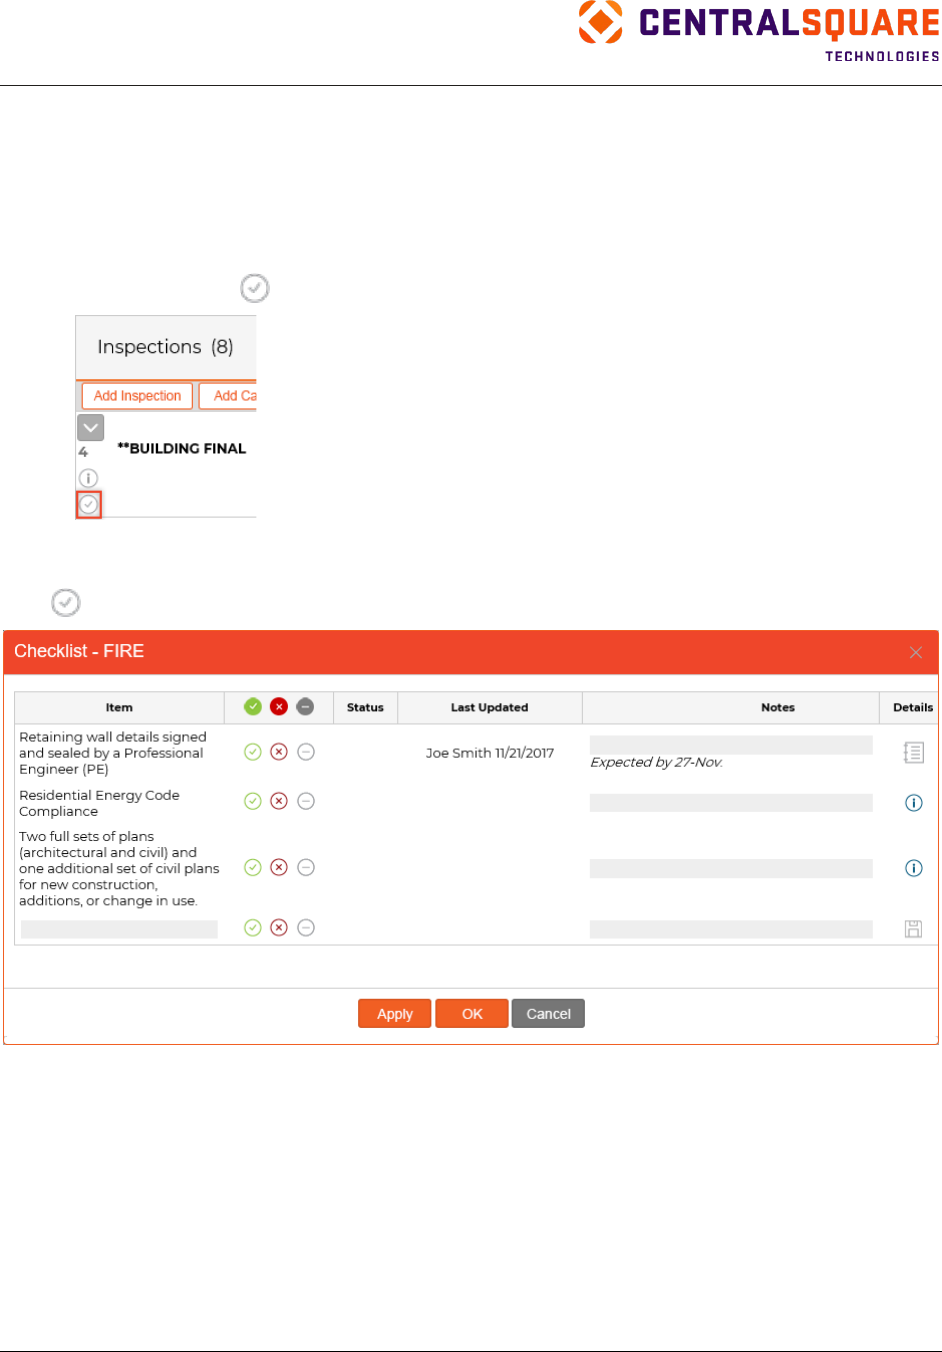
TRAKiT User Guide 18.1
Proprietary.
May not be reproduced or distributed without written permission of CentralSquare Technologies.
Copyright 2018 CentralSquare Technologies. All rights reserved.
20181212JC Page 153
TRAKiT Checklists
Use the Checklist feature to track the status of items that must be completed for an inspection or review.
Your system administrator must configure checklists in TRAKiT Web Utilities & Maintenance (WUM)
before the checklist can be used in TRAKiT. Refer to the TRAKiT System Administration Guide for more
details about setting up checklists.
Each review type and inspection type can have its own checklist or no checklist. If a checklist is attached
to an inspection or review,
appears in the Inspections or Reviews pane.
Using Checklists
Click
in the Inspections or Reviews pane to view the checklist.
The checklist includes the following columns:
•
Item—List of items to be completed. The items are set up by your system administrator in
TRAKiT Web Utilities & Maintenance (WUM). You can also add a custom item that applies to this
inspection or review only by typing an item in the last (blank) row in the listing.
•
Action—Available actions. Click the icon in a row to update one item. Click the icon in the header
to update all items that have no status to the status you select.
Note: You can apply a status to multiple items but you cannot remove or change the status for
multiple items. Statuses must be changed or removed for each item individually.
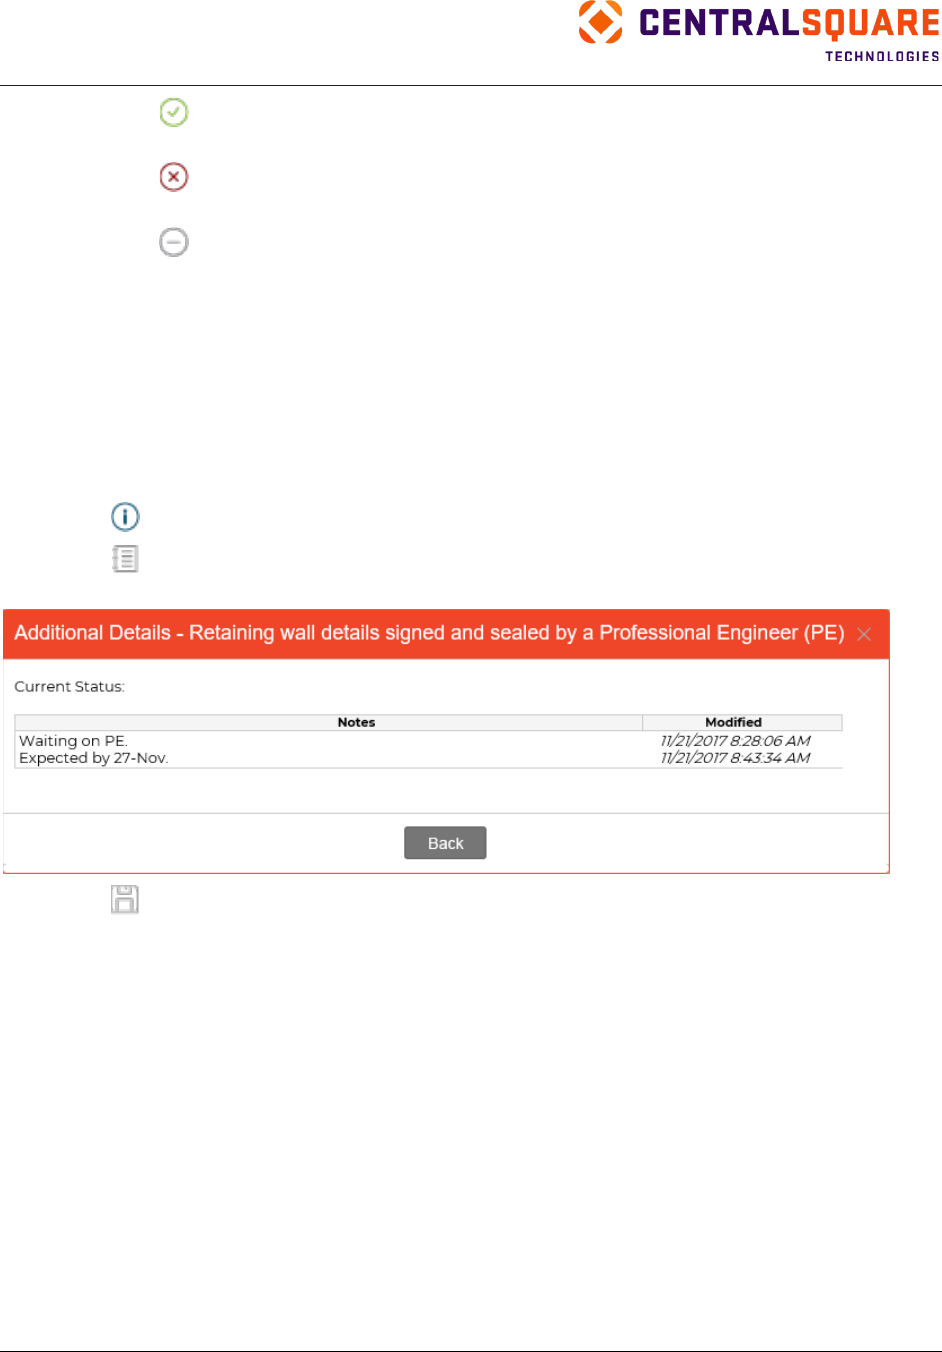
TRAKiT User Guide 18.1
Proprietary
May not be reproduced or distributed without written permission of CentralSquare Technologies.
Copyright 2018 CentralSquare Technologies. All rights reserved.
20181212JC Page 154
○
Click
when an item passes inspection/review. The Status column changes to Pass. Click
the icon again to remove the Pass status.
○
Click
when an item fails the inspection or review. The Status column changes to Fail.
Click the icon again to remove the Fail status.
○
Click
if an item is not applicable for this inspection or review. The Status column changes
to NA. Click the icon again to remove the NA status.
•
Status—This column is blank until the inspection or review occurs. After the inspection or review,
this column indicates your selection in the Action column.
•
Last updated—Shows the most recent date the checklist item was changed and the person who
made the change. This column is updated after you click Apply or OK.
•
Notes—Shows the most recent comment about the item and enables you to add an additional
comment. To add additional comments, type text in the box in this column and then click Apply.
•
Details—Contains one of the following icons:
○
—Click to view additional details. Click Back when you finish viewing.
○
—Click to view a list of all notes for this item and the modified date. Click Back when you
finish viewing.
○
—Click to save a custom item that you added.
After you update all the items, click Apply and then OK. Or, click Cancel to close the checklist without
saving your changes.
Checklist Features
The following features are available when using checklists:
•
When a reinspection or automatic next review is generated, checklists can be transferred
automatically from the previous inspection or review of the same type.
•
Certain actions are prevented when one or more checklist items are missing a status. For
example, if one or more items are missing a status, you might not be able to change the status of
the review.
•
Certain workflow actions are triggered when giving a status to all items in a checklist. For
example, if you update all items to Pass, the status of the inspection or review might be changed
automatically.
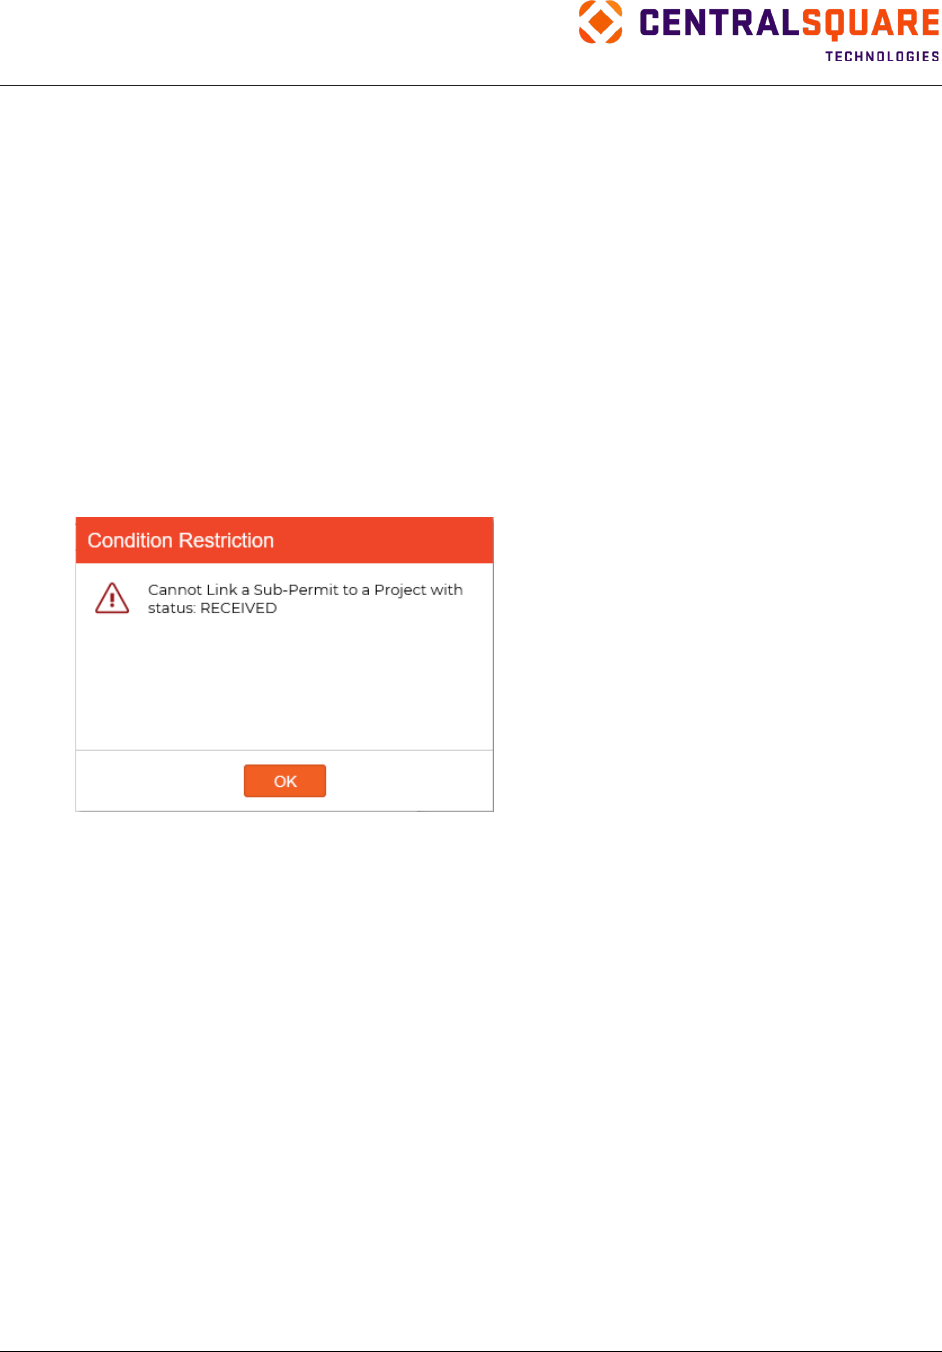
TRAKiT User Guide 18.1
Proprietary.
May not be reproduced or distributed without written permission of CentralSquare Technologies.
Copyright 2018 CentralSquare Technologies. All rights reserved.
20181212JC Page 155
ProjectTRAK Additional Features
In ProjectTRAK, you can set up triggers to prevent or enforce certain actions such as:
•
Prevent the addition of subpermits based on the status of the project
•
Prevent certain updates based on conditions
•
Require a message to appear based on conditions
You can also synchronize descriptions, details, and dates from a project to its subprojects.
Triggers
When this feature is enabled, users can enforce locked conditions and impose restrictions on the creation
of subprojects and subpermits based on the configuration of status conditions. You can set up restrictions
to:
•
Prevent the addition of subpermits based on status. For example, subpermits cannot be added to
a project that has a status of Received.
•
Lock the project status until specified conditions are satisfied. In this case, certain functions are
not available until the conditions are satisfied.
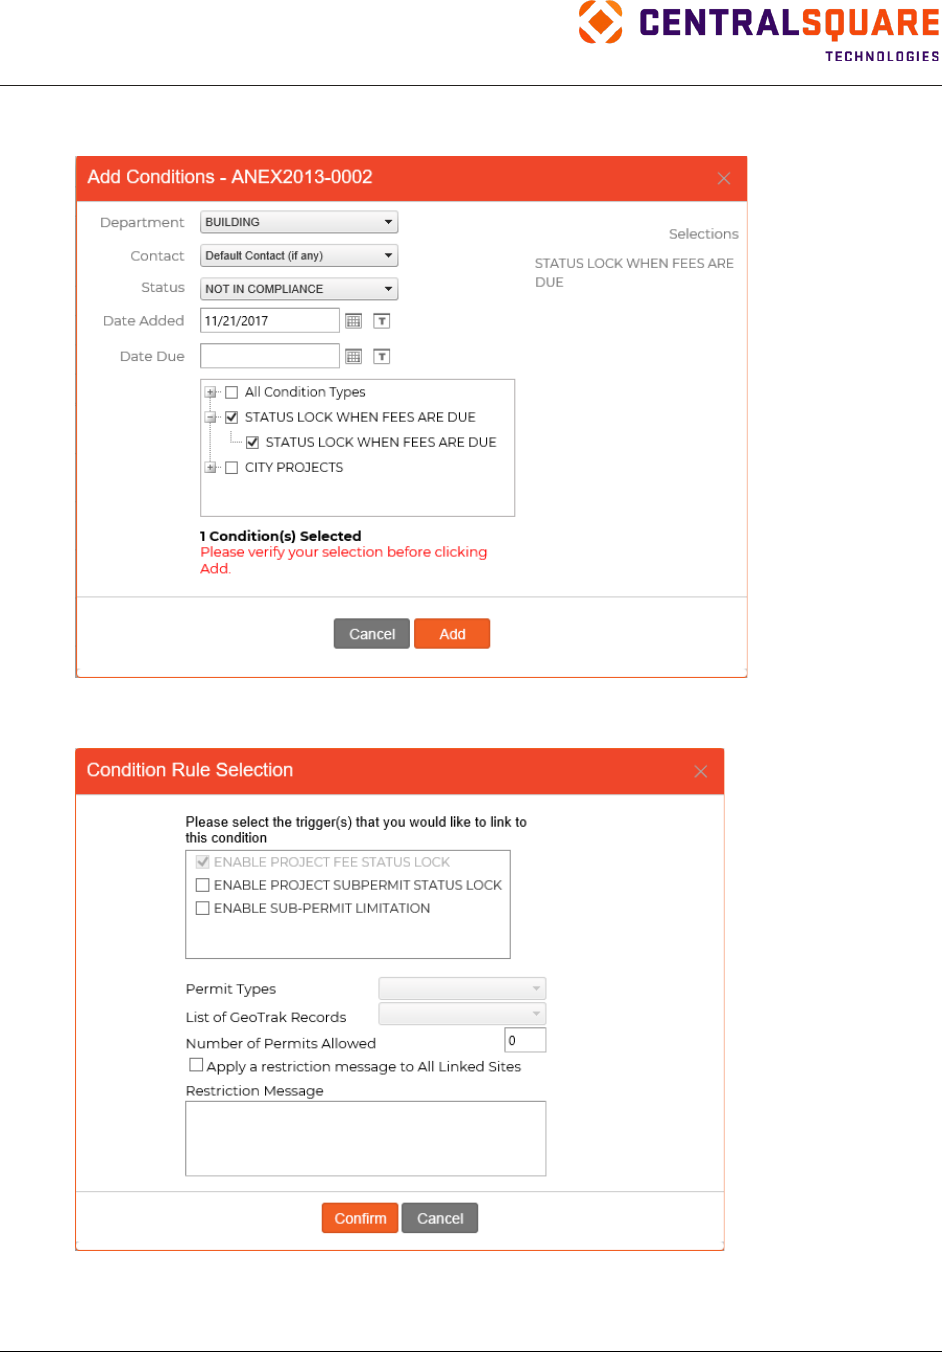
TRAKiT User Guide 18.1
Proprietary
May not be reproduced or distributed without written permission of CentralSquare Technologies.
Copyright 2018 CentralSquare Technologies. All rights reserved.
20181212JC Page 156
•
Lock the project fee status until specified conditions are satisfied. For example, you can add a
condition that prevents a status change when fees are due.
•
Lock a project’s subproject or subpermit status until specified conditions are met. In this case,
certain functions are not available until the conditions are satisfied.
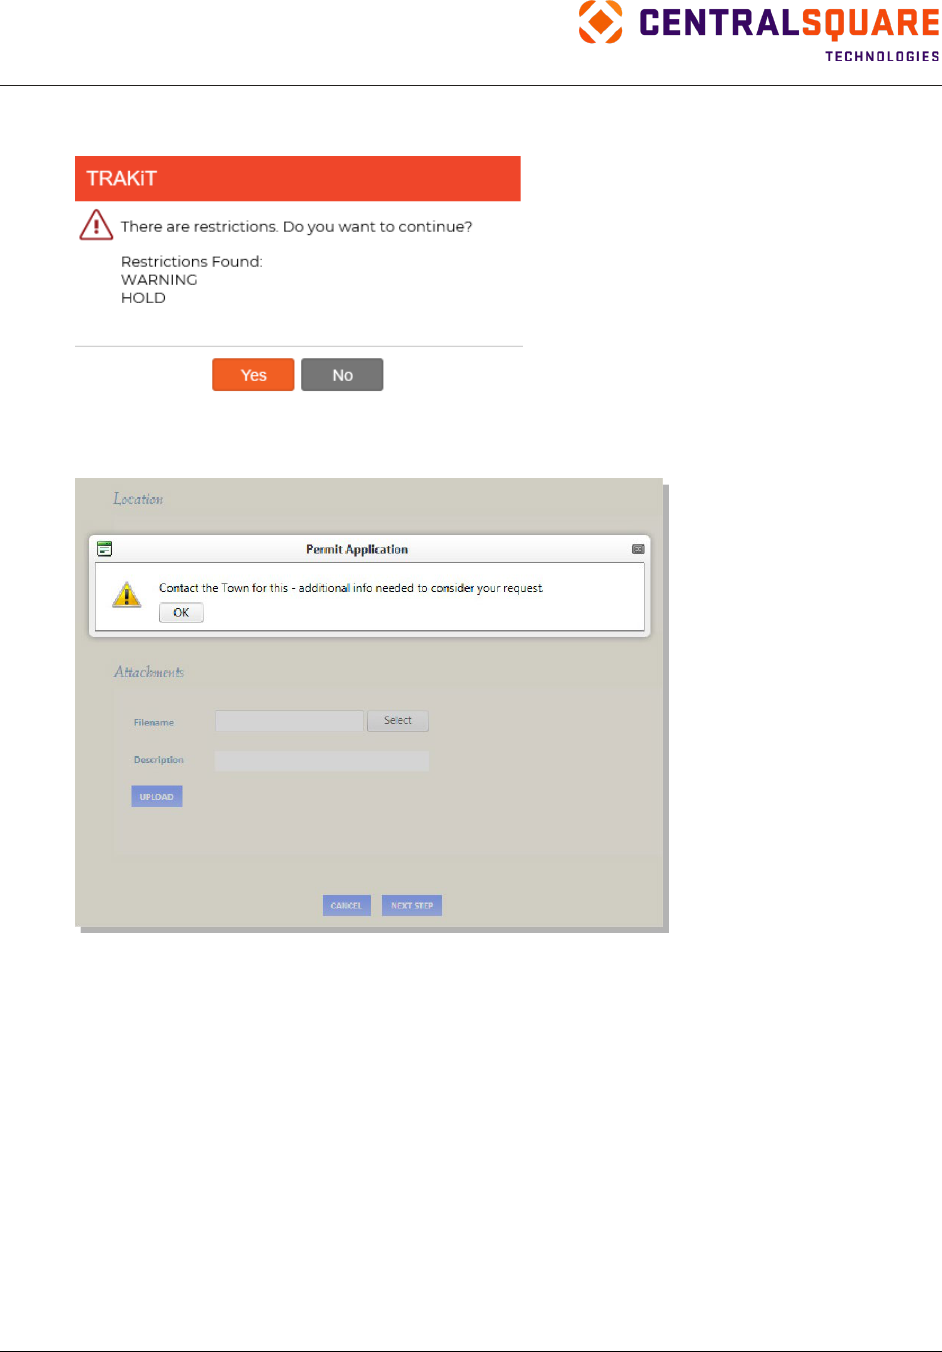
TRAKiT User Guide 18.1
Proprietary.
May not be reproduced or distributed without written permission of CentralSquare Technologies.
Copyright 2018 CentralSquare Technologies. All rights reserved.
20181212JC Page 157
•
Display a warning message to the user when a project’s subproject or subpermit is created on a
record with conditions.
•
In eTRAKiT, display a warning message when a permit is created on a project that has
conditions.
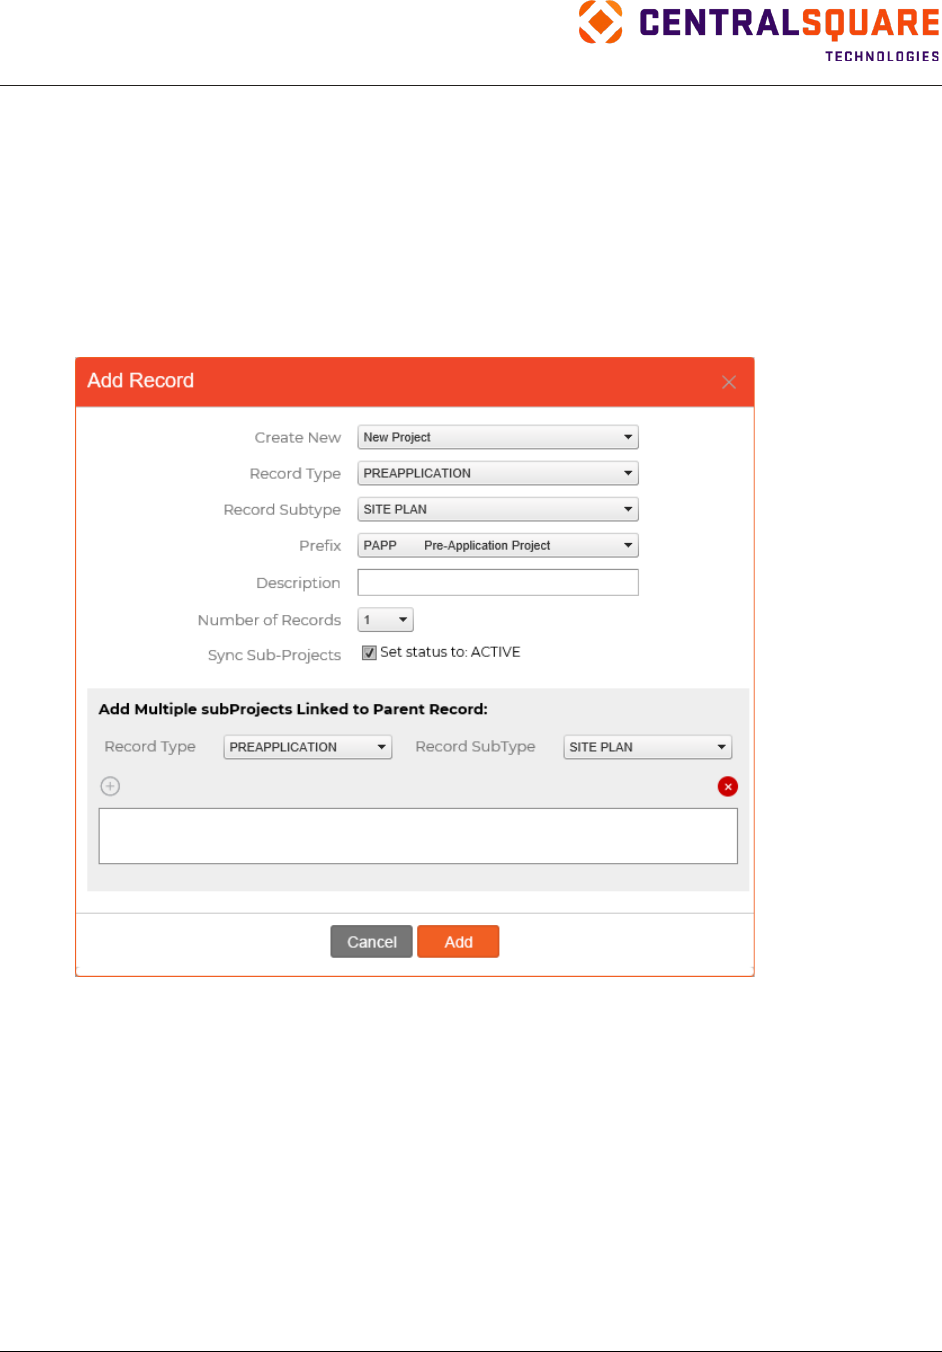
TRAKiT User Guide 18.1
Proprietary
May not be reproduced or distributed without written permission of CentralSquare Technologies.
Copyright 2018 CentralSquare Technologies. All rights reserved.
20181212JC Page 158
Synchronizing Project Details
When configured properly, you can add a project with linked subprojects and synchronized descriptions,
details, and dates.
Synchronizing Projects
When you add a project in ProjectTRAK, select the Sync Sub-Projects option to automatically update
subprojects with the description, details, and dates from the parent project. TRAKiT sets the status of the
subproject to SYNC to indicate that the subproject is linked to the parent project and will be updated when
the parent project is updated.
Use options in the lower area of the dialog box to add subprojects to the parent project.
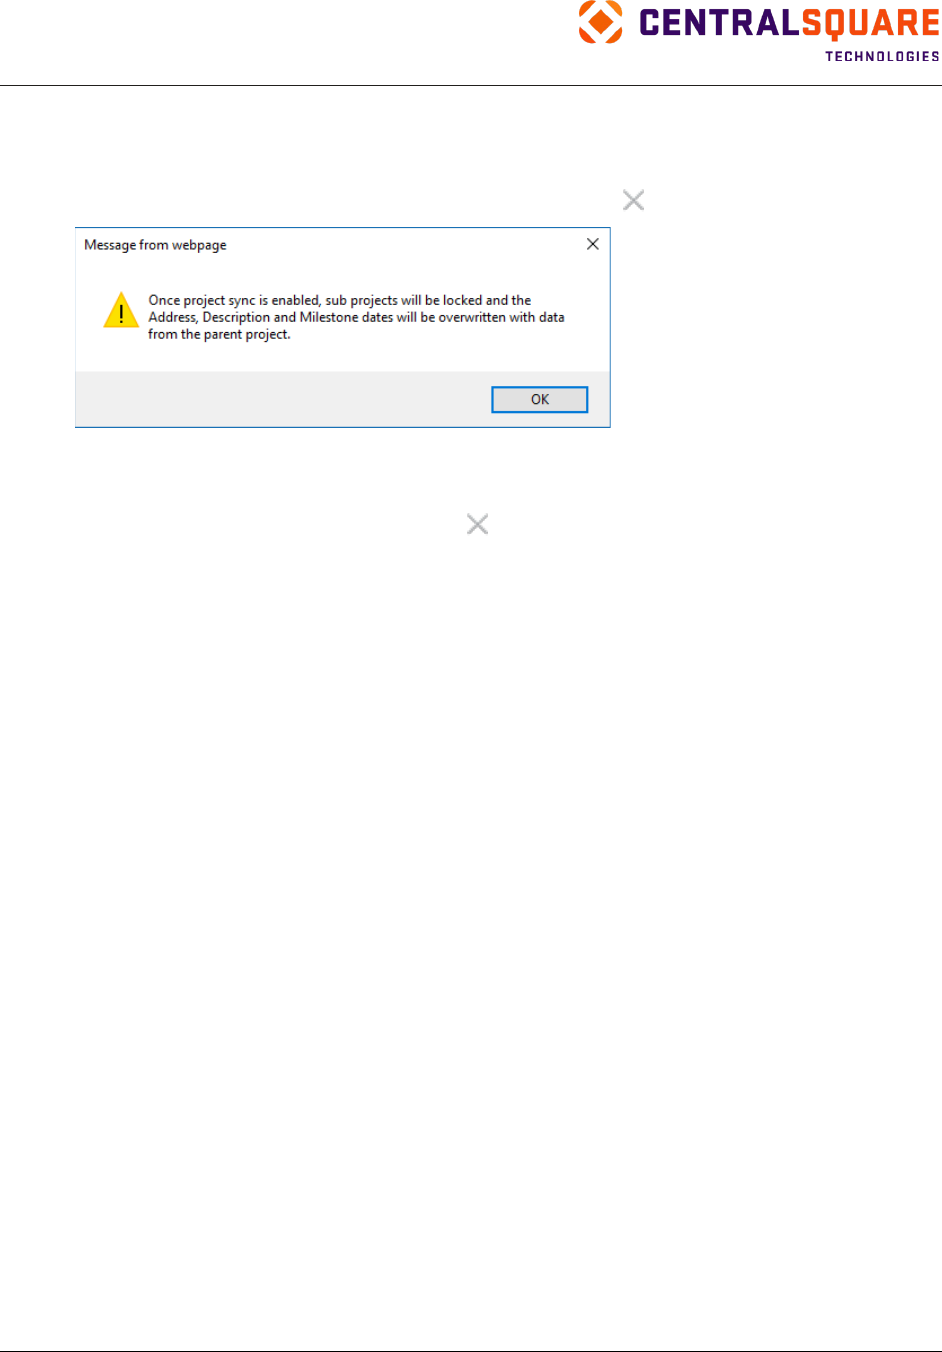
TRAKiT User Guide 18.1
Proprietary.
May not be reproduced or distributed without written permission of CentralSquare Technologies.
Copyright 2018 CentralSquare Technologies. All rights reserved.
20181212JC Page 159
Unsynchronizing Projects
If you decide that you want a synchronized subproject to have its own track to completion, you can
unsynchronize the subproject. To unsync a subproject, change its status to anything other than SYNC. A
warning message appears and you must click OK to continue or click
to discard your changes.
Note: If the subproject is later resynchronized, the descriptions, details, and dates from the parent
project will overwrite any existing data in those fields. Additional subproject information will be
retained but not copied to the parent project. The subproject is locked and a warning message
appears. You must click OK to continue or click
to discard your changes.
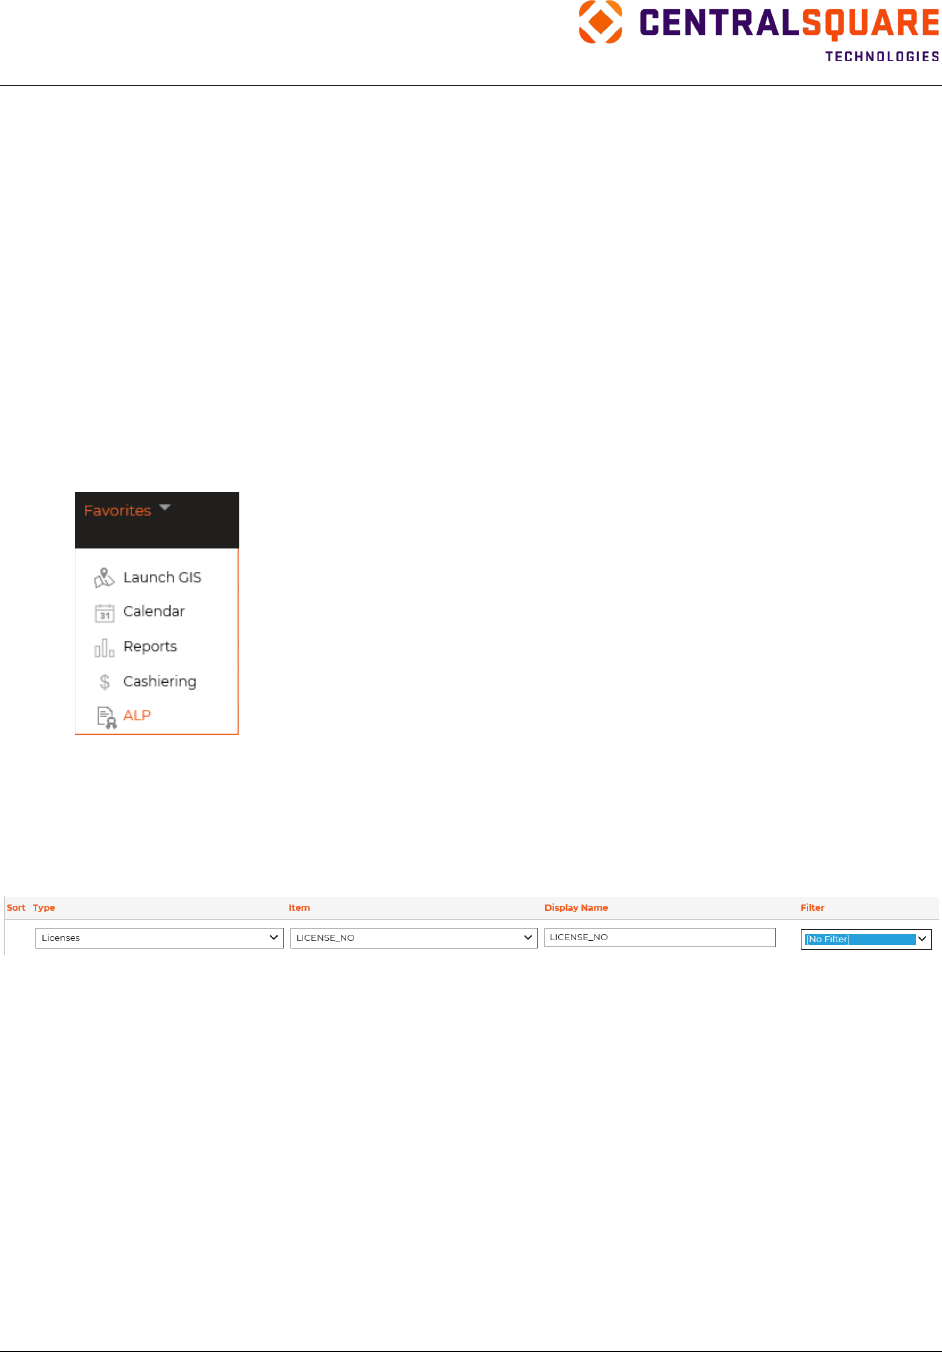
TRAKiT User Guide 18.1
Proprietary
May not be reproduced or distributed without written permission of CentralSquare Technologies.
Copyright 2018 CentralSquare Technologies. All rights reserved.
20181212JC Page 160
Advanced License Processing
Use Advanced License Processing (ALP) to specify and perform license operations such as late fee
assessment, automatic expiration, and email notification in bulk and unattended. Batch processes are set
up in TRAKiT Web Utilities & Maintenance (WUM) and run in TRAKiT, where you can also view the
resulting changes to LicenseTRAK records.
ALP is included with the purchase of LicenseTRAK.
Before you can use ALP in TRAKiT, your system administrator must configure ALP options in WUM.
Refer to the TRAKiT System Administration Guide for details about ALP configuration in WUM.
Accessing ALP for Batch Processing
To access ALP, first add ALP to your Favorites list. See “Favorites” for more information about adding
features to your Favorites list.
After you add ALP to your Favorites list, access ALP by pointing to Favorites and then clicking ALP.
Setting up Searches
ALP batch processing uses saved searches to build a list of licenses for possible inclusion in a batch. To
be available for ALP processing, the saved search must be shared and copied to the ALP search group.
Note: The saved search must include the LICENSE_NO item with the Filter column set to No Filter.
For more information about saving and sharing searches, refer to the following sections in this guide:
•
Saving Searches
•
Shared Searches Tab
Batch Processing
To perform batch processing in ALP, complete the following steps:
1.
Access ALP from the Favorites menu.
2.
In the left pane, select the options you want to use to find licenses to update.
3.
Click Select to see a list of licenses that meet your search criteria.
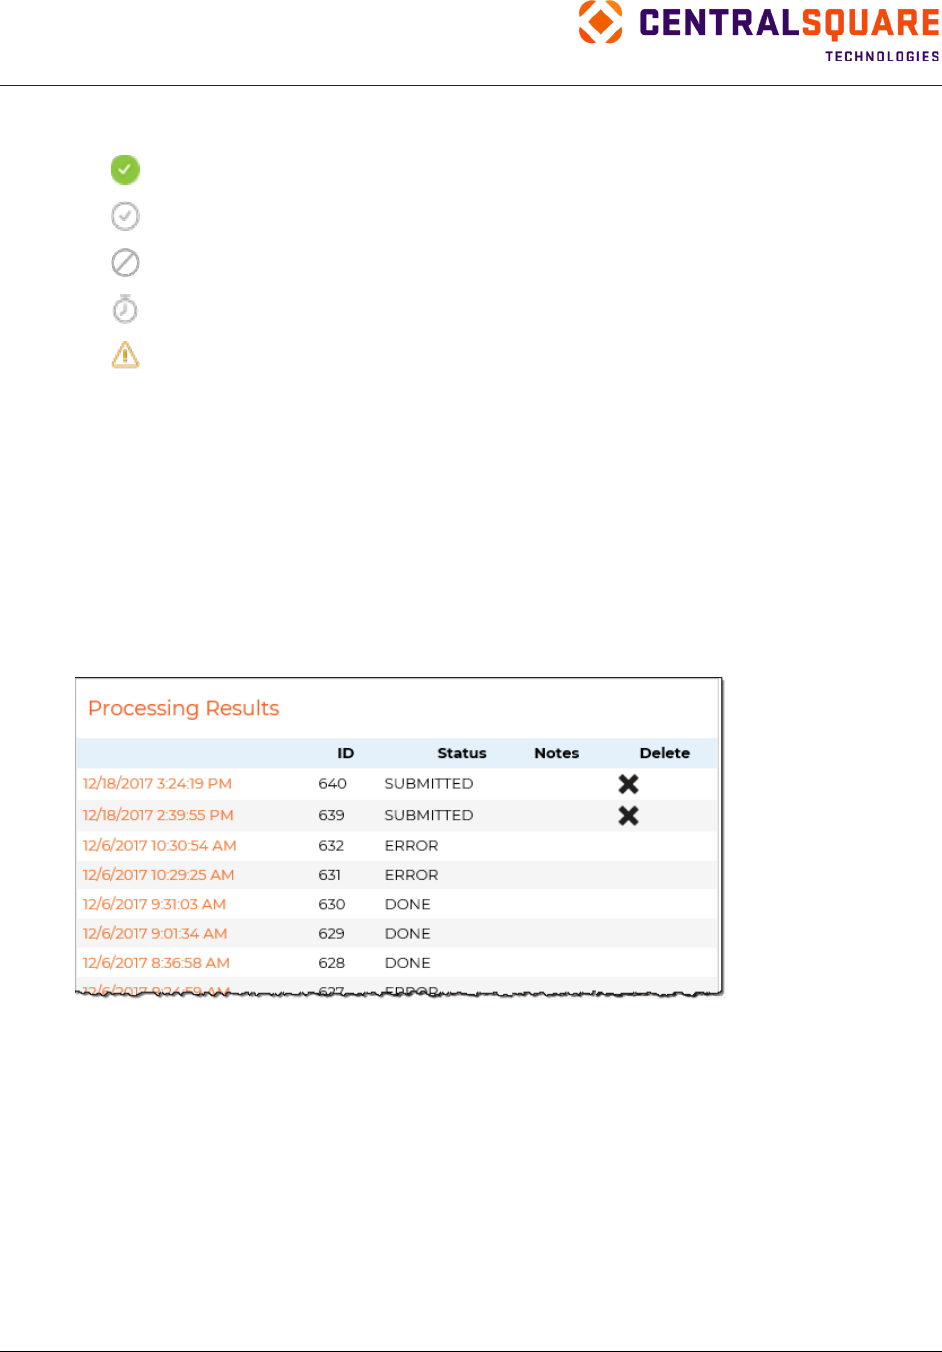
TRAKiT User Guide 18.1
Proprietary.
May not be reproduced or distributed without written permission of CentralSquare Technologies.
Copyright 2018 CentralSquare Technologies. All rights reserved.
20181212JC Page 161
4.
In the results listing, select the licenses you want to process. Information icons indicate whether
the license can be renewed. The following information icons can appear in the listing:
•
The license is ready to be renewed.
•
The license is not eligible for renewal based on the renewal period.
•
The license is not eligible for renewal based on user-supplied settings.
•
The license is queued for processing.
•
The license cannot be renewed because of a settings issue.
5.
Verify your selection for the Process Option field.
6.
Click Submit. The batch process appears in the Processing Results pane and batch processing
occurs offline.
Use the Processing Results pane to perform the following actions:
•
Review the status of a batch. The Processing Results pane displays the overall status of the
batch. Click a date and time link to open the Batch Operation Status window and view more
details about a batch process. In the Batch Operation Status window, you can click a link to
view more details about updates for a specific license.
•
Delete pending licenses in a submitted batch. To delete, click in the Delete column. If all
licenses in a submitted batch are deleted, the batch is also deleted.
Renewing a Single License
You can renew a single license in LicenseTRAK if the license meets the following criteria:
•
The license is not included in a batch that is being processed or is pending processing by ALP.
•
The date you renew the license is within the renewal period for the license type. This applies only
if license subtype settings are not established.
•
The date you renew the license is within the renewal period for the license subtype, if a renewal
period is set up for the license subtype. Note that subtype settings take precedence over type
settings if subtype settings are established.
•
The license was not renewed during the current renewal period.

TRAKiT User Guide 18.1
Proprietary
May not be reproduced or distributed without written permission of CentralSquare Technologies.
Copyright 2018 CentralSquare Technologies. All rights reserved.
20181212JC Page 162
Your system administrator sets up renewal periods in TRAKiT Web Utilities & Maintenance (WUM). Refer
to the TRAKiT System Administration Guide for details about ALP configuration in WUM.
To renew a single license in LicenseTRAK, locate the license in LicenseTRAK. Then, from the functions
menu, click Renew License.
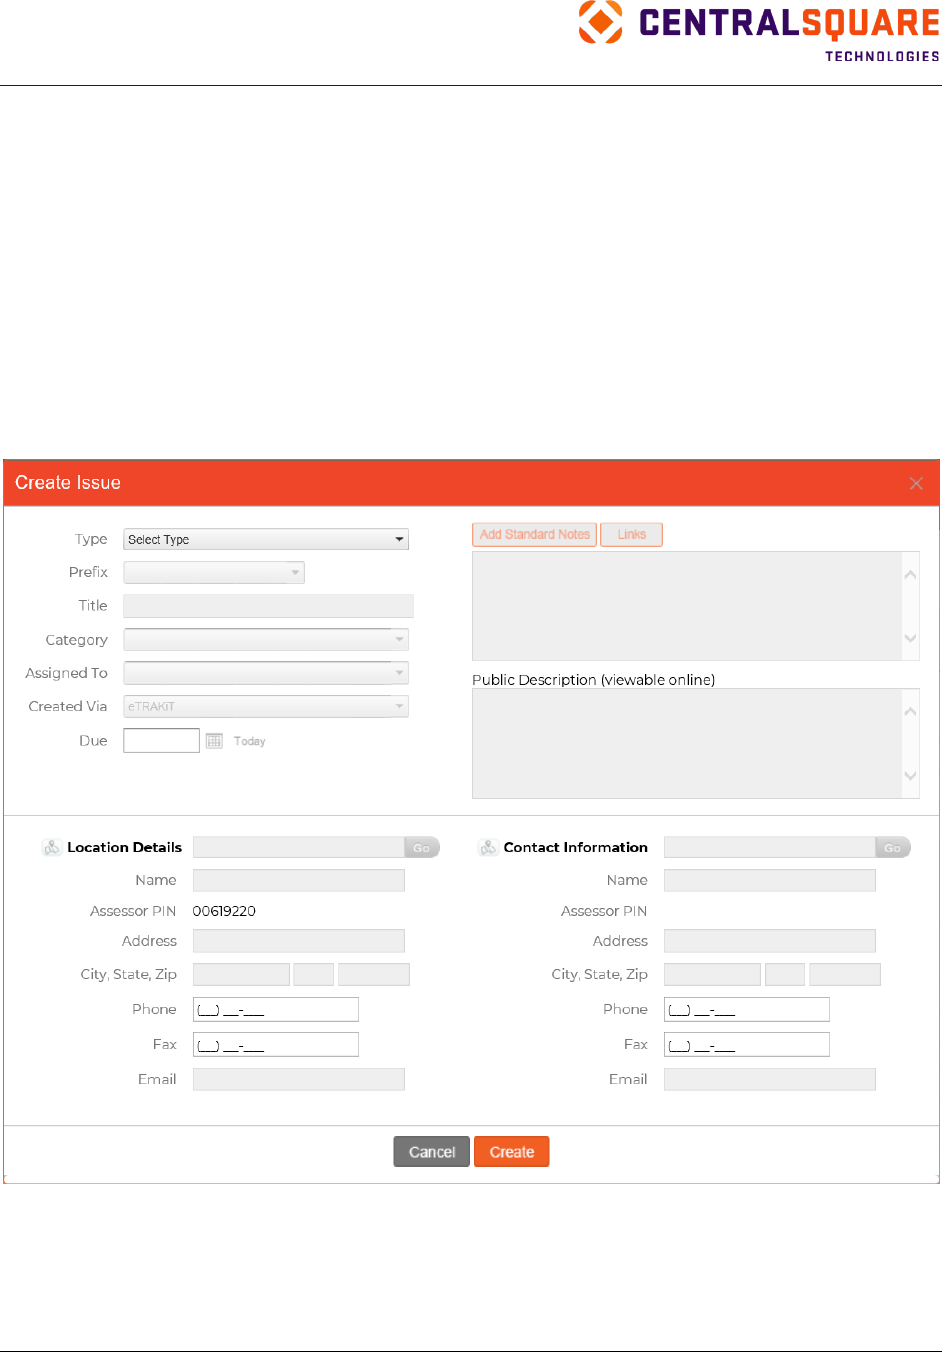
TRAKiT User Guide 18.1
Proprietary.
May not be reproduced or distributed without written permission of CentralSquare Technologies.
Copyright 2018 CentralSquare Technologies. All rights reserved.
20181212JC Page 163
CRM TRAK
CRM TRAK (Citizen Response Management) provides the tools to efficiently and effectively manage
citizen issues. CRM TRAK contains built‐in workflow tracking so you can monitor open or closed issues
and locations with recurring issues.
Adding Issues
To add an issue, complete the following steps:
1.
Open CRM TRAK.
2.
From the functions menu, select Add Record.
3.
In the Create New field, select Issue.
4.
Click Add.
5.
Complete the fields in the upper left area:
a. Type
b. Prefix (Note: Not required for all configurations)
c. Title

TRAKiT User Guide 18.1
Proprietary
May not be reproduced or distributed without written permission of CentralSquare Technologies.
Copyright 2018 CentralSquare Technologies. All rights reserved.
20181212JC Page 164
d. Category
e. Assigned to
f. Created Via—Select how the issue was received
g. Due date
6.
Enter customized notes, standard notes, or both.
7.
In the Public Description field, type a description. This description appears on your eTRAKiT
public website.
8.
In the Location Details section, search for a location or click
to select the location from a
map. When you select a location, the details for that location are added to this section. You can
type in additional details if available.
9.
In the Contact Information section, search for a location or click
to select the location from a
map. When you select a location, the details for the contact for that location are added to this
section. You can type in additional details if available.
10.
Click Create.
Log & History Pane
Use the Log & History pane to view history related to new issues and status changes and to add a log
entry.
To add a log entry, complete the following steps:
1.
Expand the Log & History pane.
2.
Click
.
3.
In the New Entry field, type the log entry.
4.
Click Add.
Description & Resolution Pane
Use the Description & Resolution pane to add, change, or view a description of the resolution to the
CRM issue. The left area of the pane contains the public description that appears on your public eTRAKiT
website. The right area of the pane contains resolution description for agency use only.
To view the description and resolution, expand the Description & Resolution pane.
To add the resolution, expand the Description & Resolution pane, click Edit, type the description and
resolution, and then click Save.
To change the resolution, expand the Description & Resolution pane, click Edit, modify the description
and resolution, and then click Save.
Linking an Issue to a GeoTRAK Record
To link an issue to a GeoTRAK record, complete the following steps:
1.
Locate the CRM record.
2.
Expand the General Information pane.
3.
In either the Location Information or Contact Information area, point to the functions menu
and then click Link to GeoTRAK.

TRAKiT User Guide 18.1
Proprietary.
May not be reproduced or distributed without written permission of CentralSquare Technologies.
Copyright 2018 CentralSquare Technologies. All rights reserved.
20181212JC Page 165
4.
Search for the GeoTRAK location by entering the address of either the issue location or
complainant location and then clicking Go.
5.
Click the link in the Record # column to select the GeoTRAK record you want to link to.

TRAKiT User Guide 18.1
Proprietary
May not be reproduced or distributed without written permission of CentralSquare Technologies.
Copyright 2018 CentralSquare Technologies. All rights reserved.
20181212JC Page 166
Reports
TRAKiT includes many standard reports that you can produce using TRAKiT reporting or AnalyticsNow.
Reports in TRAKiT are dynamic, enabling you to select and change parameter values to change the
reported records. Reports are organized by activity or application.
Additionally, you can create custom reports using SQL Server Reporting Services (SSRS).
To access reports, point to Favorites and then click Reports. Alternatively, if you use AnalyticsNow, point
to Favorites and then click Cognos Reports.
Note: Before you can access the Reports feature, you must add Reports to your Favorites list.
Before you can access the Cognos Reports feature, you must be set up as a Cognos user and you
must add Cognos Reports to your Favorites list.
See “Favorites” for more information about adding features to your Favorites list.
Whether you use the Reports feature or the Cognos Reports feature, the process is similar: access the
reports list, select a report, set search parameters, and select a report format. Refer to the following
sections for more details:
• Using TRAKiT Reporting
• Using AnalyticsNow
• Reports List
Using TRAKiT Reporting
When you use the Reports feature, you select the report to produce and the applicable parameters. The
report appears in a separate browser tab or window. From the browser, you can navigate through the
report and use tools to complete other actions such as finding a specific word or exporting the report to a
different format.
Note: Before you can access reports, you must add Reports to your Favorites list. See “Favorites”
for more information about adding features to your Favorites list.
Producing Reports
To produce a report, access Reports from your Favorites list and then complete the following steps:
Note: See “Using AnalyticsNow” for details about using Cognos to produce TRAKiT reports.
1.
Point to Favorites and then click Reports.
2.
Expand the category for the report you want to produce.
3.
Select the report.
Tip: Click Add to Favorites to add the selected report to your Favorites list.
4.
Click Create. A separate browser tab opens and displays either the report or parameter
selections:
• If the report does not require parameter selections, the report appears. Skip the remaining
steps in this procedure.
• If the report requires parameter selections, the fields appear so you can select parameter
values. Complete the remaining steps to select parameter values and generate the report.
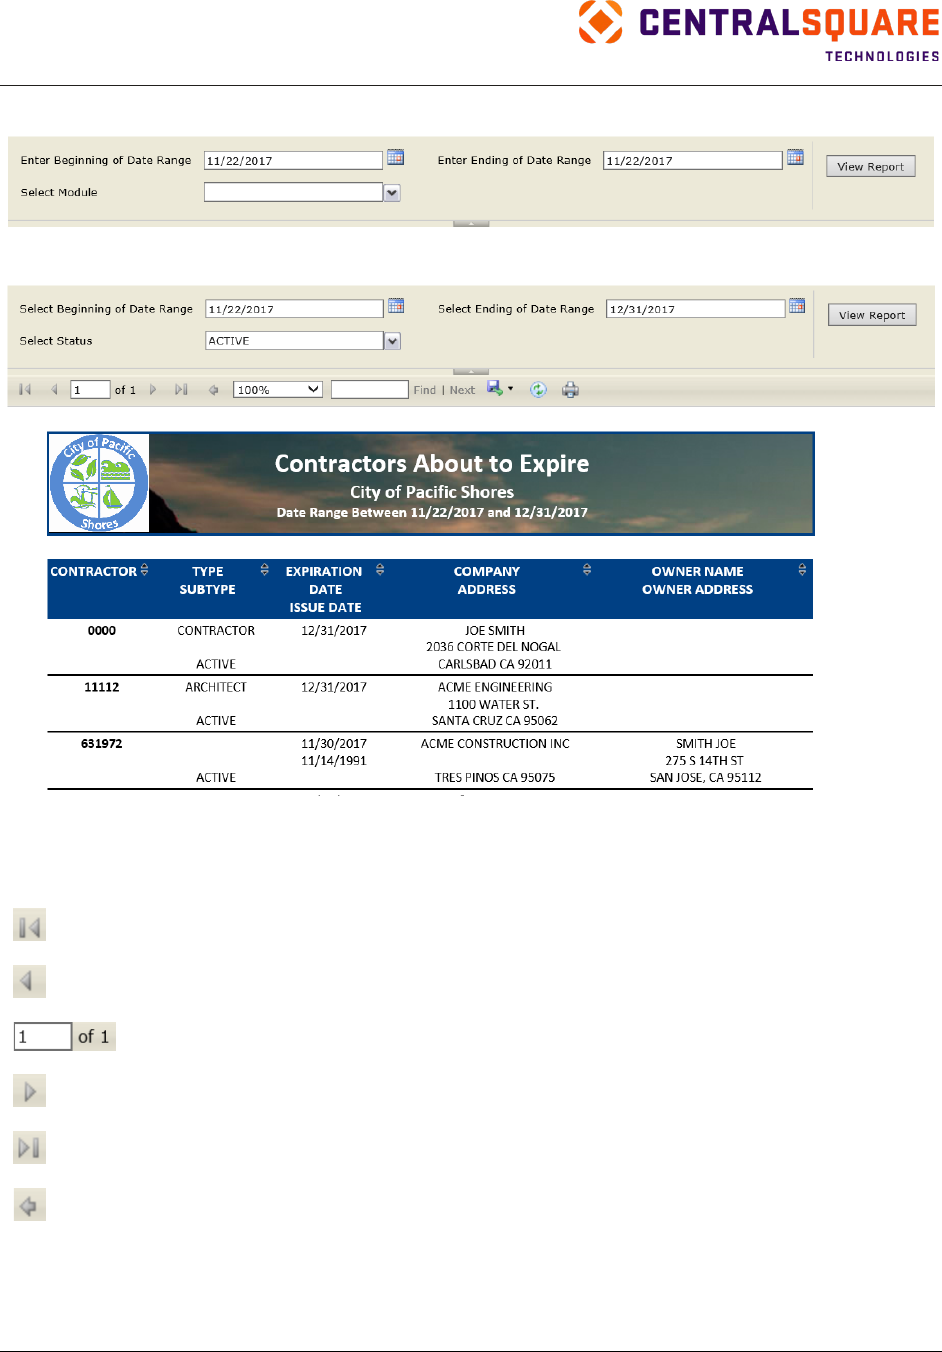
TRAKiT User Guide 18.1
Proprietary.
May not be reproduced or distributed without written permission of CentralSquare Technologies.
Copyright 2018 CentralSquare Technologies. All rights reserved.
20181212JC Page 167
5.
Select the parameter values. Parameters vary by report.
6.
Click View Report. The report appears in the current window below the parameters.
Navigating in Reports
Use the toolbar to scroll through a long report. The following navigation tools are available:
Click to view the first page of the report.
Click to view the previous page of the report.
Type the page number and then press Enter to go to a specific page of the report.
Click to view the next page of the report.
Click to view the last page of the report.
Click to view the parent report.
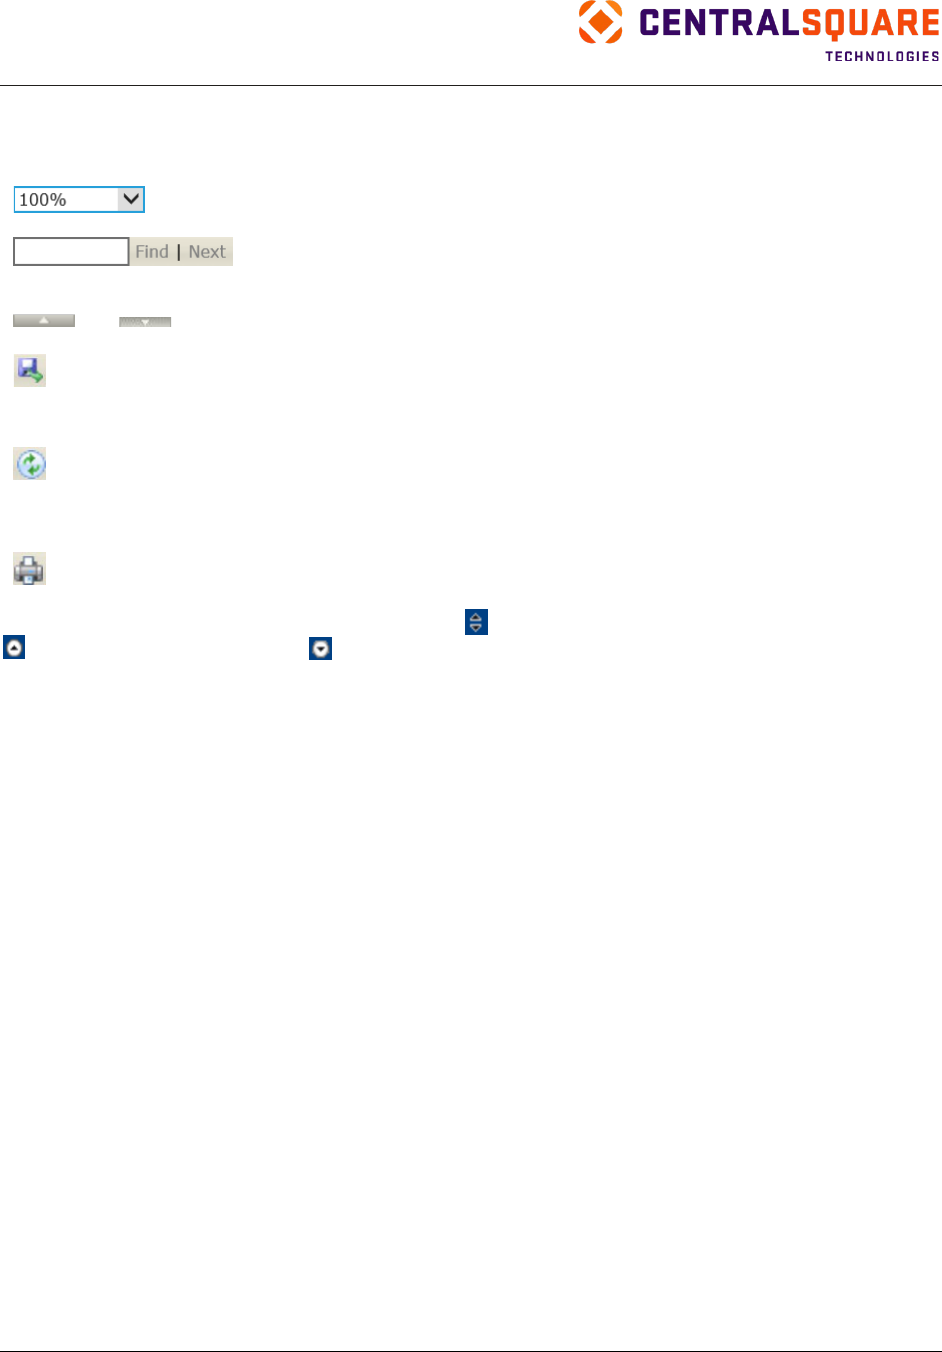
TRAKiT User Guide 18.1
Proprietary
May not be reproduced or distributed without written permission of CentralSquare Technologies.
Copyright 2018 CentralSquare Technologies. All rights reserved.
20181212JC Page 168
Additional Tools
The toolbar includes the following additional tools:
Enter a magnification setting to view the report larger or smaller.
Type a word or phrase you want to search for and then click Find. Click
Next to scroll through the search results.
and Click to hide or show the report parameters.
Click to export the report data to another file format. Select the file type from
the list. TRAKiT generates the report in the specified format and opens the
file.
Click to refresh the report data using the same parameters.
Note: To generate the report using different parameters, change the
parameters and then click View Report.
Click to print the report.
You can sort the report by any report heading. Click
in the column header to sort by that column.
indicates the sort is ascending.
indicates the sort is descending. Click the arrow to change the sort
order.
Using AnalyticsNow
When you use AnalyticsNow/Cognos reporting, you select the report to produce, the applicable
parameters, and the format for the report. Depending on the format you select, the report is downloaded
or appears in a separate browser tab.
Note: Before you can access reports using Cognos, you must be set up as a Cognos user and you
must add Cognos Reports to your Favorites list. See “Favorites” for more information about adding
features to your Favorites list.
You must be logged in to Cognos to produce reports. If you are not logged in, the Cognos
Authentication dialog box appears when you try to access the Cognos Reports feature. Enter your
Cognos user ID and password and then click Sign In. The Cognos dialog box appears and you can work
with reports.
Producing Reports with Cognos
To produce a TRAKiT report using Cognos, complete the following steps:
1. Point to Favorites and click Cognos Reports.
2. Log in to Cognos if you are not already logged in.
3. In the Cognos dialog box, select the report you want to produce.
The result depends on whether the selected report requires parameter selections:
• If the selected report does not require parameter selections, the report opens in HTML format
in the IBM Cognos Viewer in a separate browser tab. Skip the remaining steps in this
procedure.
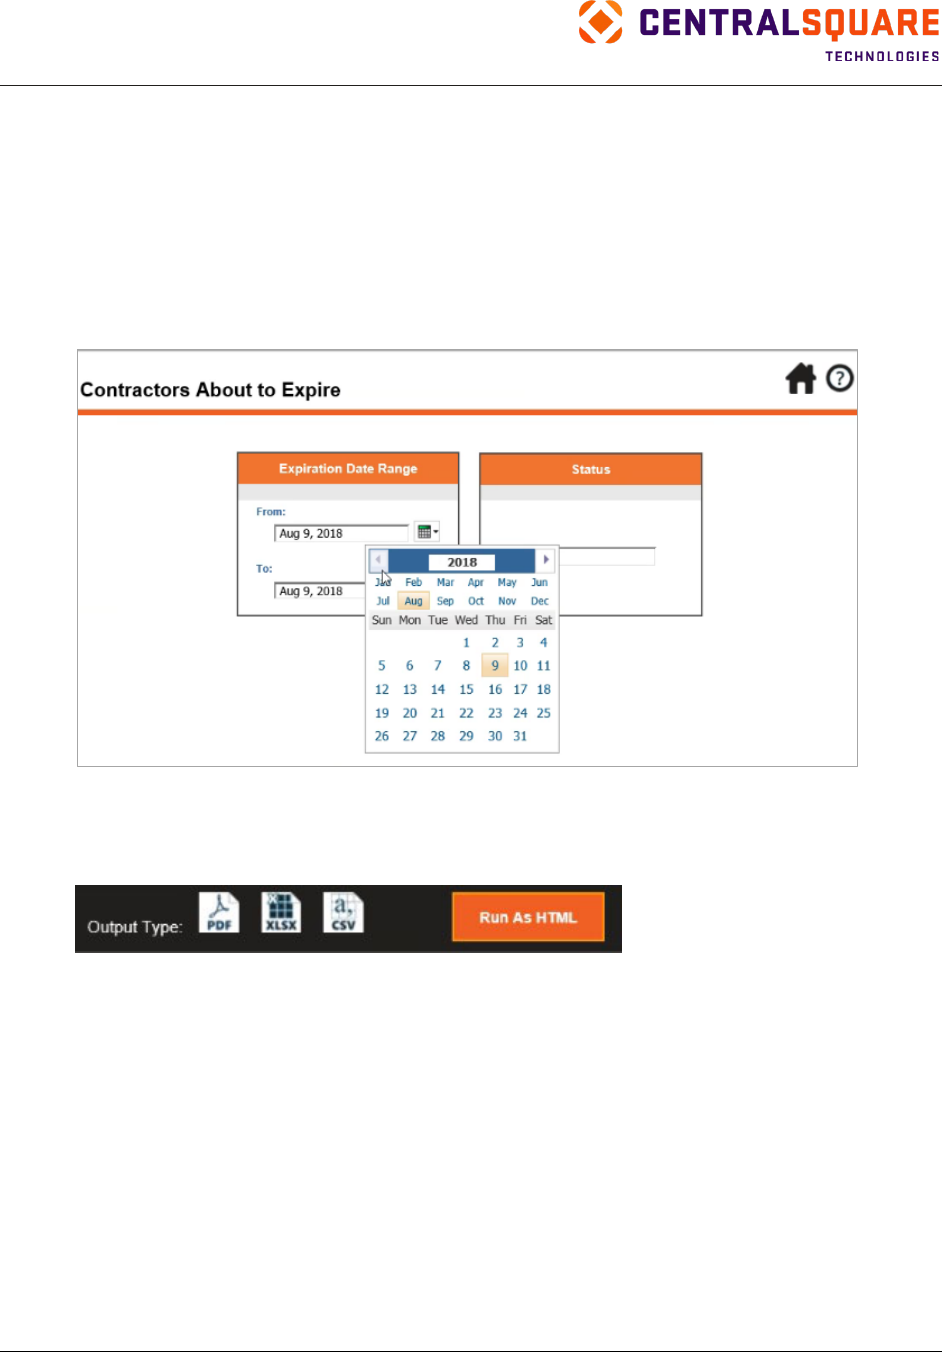
TRAKiT User Guide 18.1
Proprietary.
May not be reproduced or distributed without written permission of CentralSquare Technologies.
Copyright 2018 CentralSquare Technologies. All rights reserved.
20181212JC Page 169
• If the selected report requires parameter selections, a separate browser tab opens and
displays parameter options for the report. The new browser tab also includes the following
buttons:
— Click the home button to close the report tab and return to TRAKiT.
— Click the help button to open a report-specific help document.
Complete the remaining steps in this procedure to select parameter values and generate the
report.
4. Select the parameter values. Parameters vary by report.
5. Select an output type. Available formats are PDF, XLSX, CSV, or HTML. The default format is
HTML. When you select a format, the Run As button changes to indicate the selected format. For
example, if you select PDF, the button changes to Run As PDF. Format buttons appear for
formats that are not selected.
6. Click Run As. Depending on the output type you selected, the report is downloaded or opens in
the IBM Cognos Viewer in the browser.
Note: Refer to Cognos documentation for details about the options available in the IBM Cognos
Viewer.

TRAKiT User Guide 18.1
Proprietary
May not be reproduced or distributed without written permission of CentralSquare Technologies.
Copyright 2018 CentralSquare Technologies. All rights reserved.
20181212JC Page 170
Reports List
TRAKiT includes the following reports, which can be produced using TRAKiT Reports or AnalyticsNow:
AEC TRAK
• All Contractors
• All Contractors - Mailing Labels
• Contractors About to Expire
• Contractors History Report
• Contractors Unpaid Fees
• Contractors with Permits Issued
• Contractors with Selected Subtypes
• Contractors with Selected Types
Bonds
• Bonds Expiring but not Released
Charts
• Fees Paid by Month
• Inspections Completed or Requested by Inspector
• Permit Applied for by Type
• Permit Issued for by Type
• Project Applied for by Type
• Project Approved for by Type
CodeTRAK
• Active Cases
• Active Cases by Officer
• Cases Closed by Officer
• Cases Closed by Type
• Cases Opened by Officer
• Cases Opened by Type
• Cases Opened by Type and Officer
• Cases Opened by Type Summary
• Cases to be Followed Up
• Chronology by Case and Action Type
• Chronology by Officer and Action Type
• Closed Cases by Duration and Type
• Violation by Case Number
• Violation by Violation Type

TRAKiT User Guide 18.1
Proprietary.
May not be reproduced or distributed without written permission of CentralSquare Technologies.
Copyright 2018 CentralSquare Technologies. All rights reserved.
20181212JC Page 171
CRM TRAK
• Advance Issue Query
• All Issues - Address
• All Issues - Complainant
• All Issues Closed - Prefix
• All Issues Opened
• All Issues Opened by Type Subtype and Prefix
• All Outstanding Issues by User
Financial
• Account Activity by Module
• Account Activity for Permits
• Account Activity Summary
• Account Activity Summary Excluding Refunds
• Detailed Payments
• Fees Paid by Module by Account
• Outstanding Case Fees
• Outstanding License Fees
• Outstanding Permit Fees
• Outstanding Project Fees
• Payments by Account and Prefix
• Payments by Account by Module
• Payments by Cashier
• Payments by Cashier Excluding Refunds
• Payments by Pay Method
• Payments by Receipt Number
• Payments by Record Number
• Permit Payments of Selected Fee
• Refunds by Date
• Summary of Case Fees Paid by Account
• Summary of Permit Fees Paid by Account
• Summary of Project Fees Paid by Account
GeoTRAK
• GeoTRAK Update Activity Log
Inspections
• All Inspections Not Yet Completed
• Average Inspection Duration
• Average Inspection Duration - Inspector

TRAKiT User Guide 18.1
Proprietary
May not be reproduced or distributed without written permission of CentralSquare Technologies.
Copyright 2018 CentralSquare Technologies. All rights reserved.
20181212JC Page 172
• Inspection Activity-History Report
• Inspection Result Log
• Inspection Results by Inspection Type
• Inspection Totals by Inspector
• Inspection Totals Completed by Type
• Inspections Not Yet Completed
• Inspections Requested
• Inspections Requested (Sort)
• Inspections Requested by Inspector
LicenseTRAK
• Active Licenses
• Active Licenses by Type
PermitTRAK
• CA SMIP Commercial Summary
• CA SMIP Residential Summary
• Outstanding Permit Reviews
• Permit Routing Report - Selected Contacts
• Permit Routing Report - Selected Review Types
• Permits About to Expire
• Permits About to Expire - Type
• Permits Applied
• Permits Applied But NOT Approved
• Permits Applied with Aging
• Permits Approved But NOT Issued
• Permits Expiring But NOT Finaled
• Permits Finaled
• Permits Finaled with Fees and Values
• Permits Issued
• Permits Issued - Additional Info
• Permits Issued - Prefix
• Permits Issued - Status
• Permits Issued - Summary by Type
• Permits Issued - Summary by Values
• Permits Issued But NOT Yet Finaled or Expired
• Permits Issued with Contacts
• Permits Issued with Fees and Values
• Permits Issued with Fees Values and Addresses

TRAKiT User Guide 18.1
Proprietary.
May not be reproduced or distributed without written permission of CentralSquare Technologies.
Copyright 2018 CentralSquare Technologies. All rights reserved.
20181212JC Page 173
Plan Locations
• Plan Location Assigned but Finaled
• Plan Location by Address
• Plan Location by Location Number
ProjectTRAK
• All Inactive Projects
• Outstanding Project Reviews
• Parent and Sub Projects
• Project Detail by Planner Status Date
• Project Routing Report
• Projects About to Expire
• Projects Approved
• Projects Approved by Prefix
• Projects Approved by Status
• Projects by Planner and Status
• Projects by Status and Date
• Projects by Type and Date
• Projects by Type and Status
• Projects by Type Status and Date
• Projects with Chronology Actions
• Projects with Selected Action Type
• Projects with Selected Action Type - Detail
System
• Activity Summary
• All User Privileges
• Fee Audit History
• Fee Schedule Report
• Inspection Schedule Report
• Type More Info Setup Report
• Type Setup Report
• User Name Report
TimeTRAK
• All Postable Hours by User Name
• Billable Hours by Record Number
• Billable Hours by User Name
• Timesheet Overview by Record Number
• Timesheet Overview by User Name
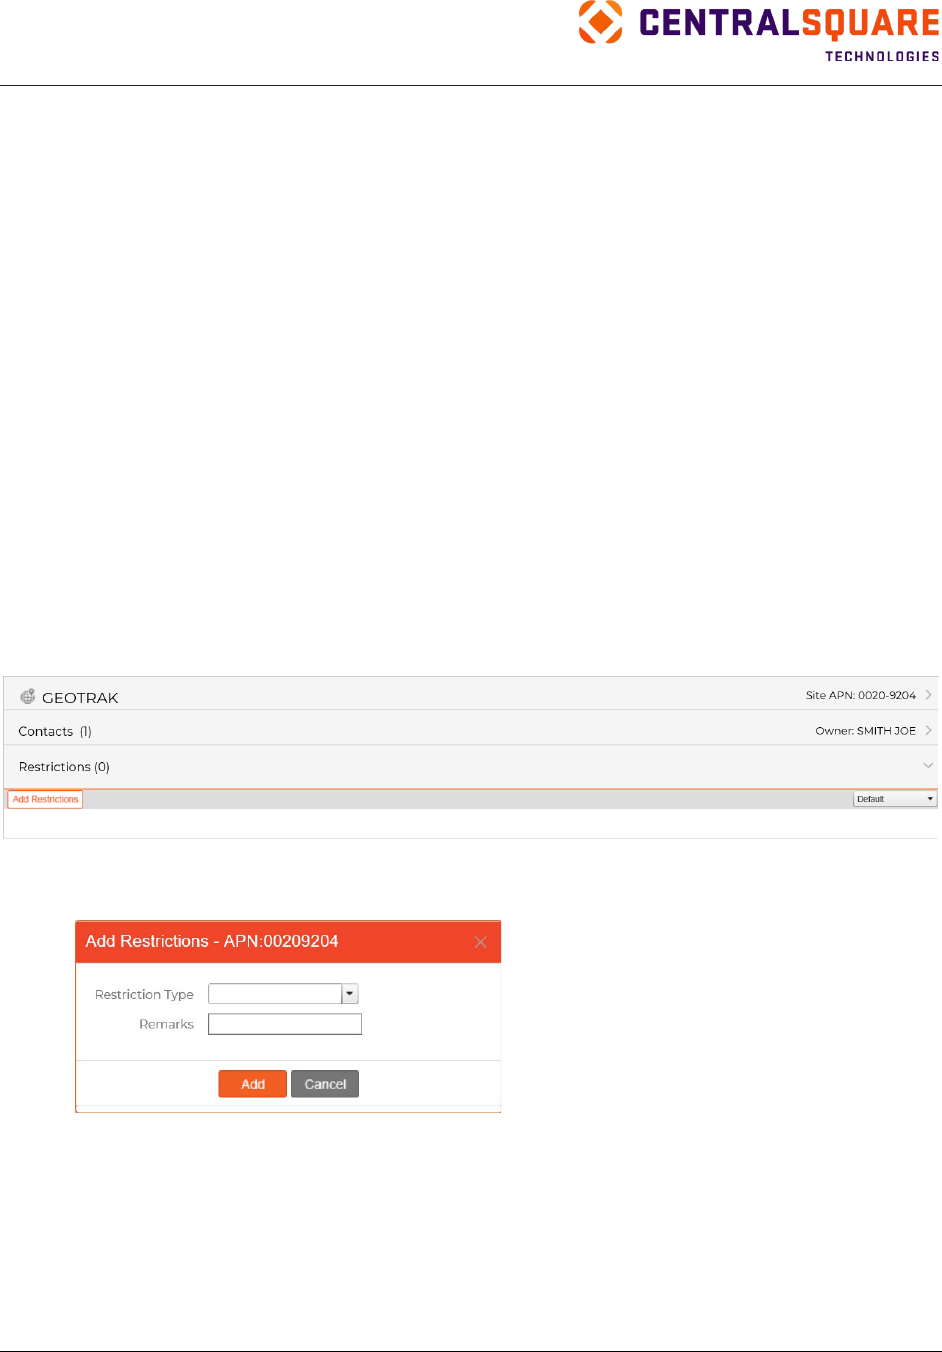
TRAKiT User Guide 18.1
Proprietary
May not be reproduced or distributed without written permission of CentralSquare Technologies.
Copyright 2018 CentralSquare Technologies. All rights reserved.
20181212JC Page 174
Supporting Features and Functions
The following features and functions support multiple applications and screens in TRAKiT:
•
Restrictions
•
TimeTRAK
•
Trust Accounts
•
Internet and Imaging Links
Restrictions
The Restrictions function flags essential property information in multiple TRAKiT applications. This feature
enables other departments to view important information (such as whether a property is in a flood zone,
on a fault line, or in a historical district) before issuing a permit, project, case, or license. Restrictions can
be configured by the system administrator to display either single or multiple restrictions.
Adding Restrictions to a Property Record
To add a restriction to a property record, complete the following steps:
1.
Locate the property in GeoTRAK.
2.
Expand the Restrictions pane.
3.
Click Add Restrictions.
4.
Select the restriction type.
5.
Enter remarks.
6.
Click Add.
Editing Restrictions on a Property Record
To change restrictions on a property record, complete the following steps:
1.
Locate the property in GeoTRAK.
2.
Expand the Restrictions pane.
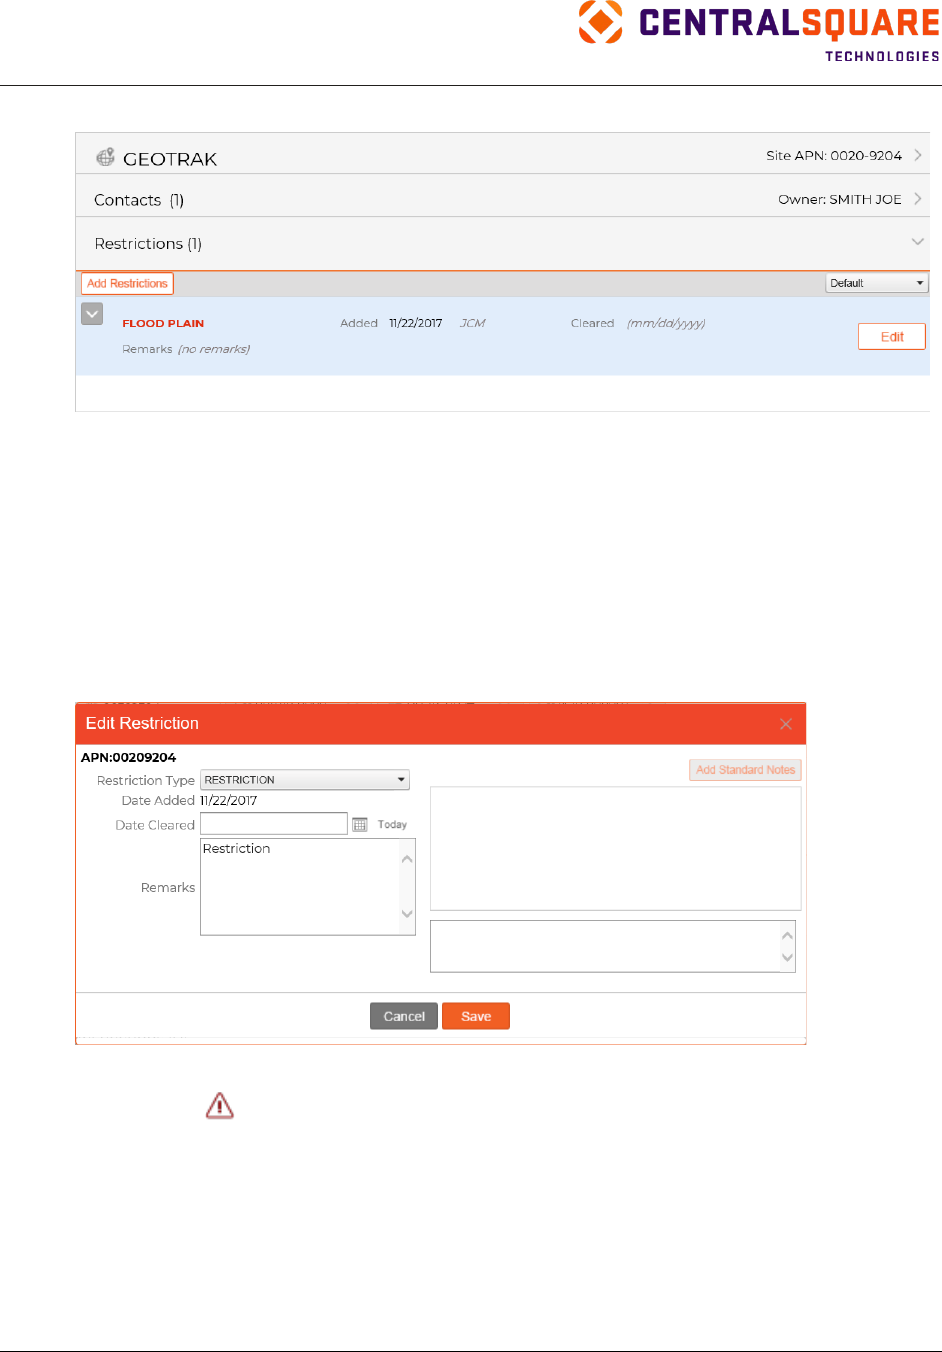
TRAKiT User Guide 18.1
Proprietary.
May not be reproduced or distributed without written permission of CentralSquare Technologies.
Copyright 2018 CentralSquare Technologies. All rights reserved.
20181212JC Page 175
3.
Click Edit next to the restriction.
4.
Update the following fields:
a. Restriction Type—Select a restriction type.
Note: The date the restriction was added appears but cannot be changed.
b. Date Cleared—To remove the restriction from all attached activity records, enter a date. The
restriction remains on the GeoTRAK record, but it is not visible from the related activity
records. To keep the restriction visible on related records, leave this field blank.
c. Remarks—Add or change remarks related to the restriction.
d. Notes—Add notes related to the restriction. You can add standard notes, custom notes, or
both.
5.
Click Save.
A restrictions indicator
appears on the GeoTRAK main pane and on any permit, project, code,
business, and issue records that are linked to the property record. In addition, a message appears when
you open a record that is linked to a GeoTRAK record with restrictions.
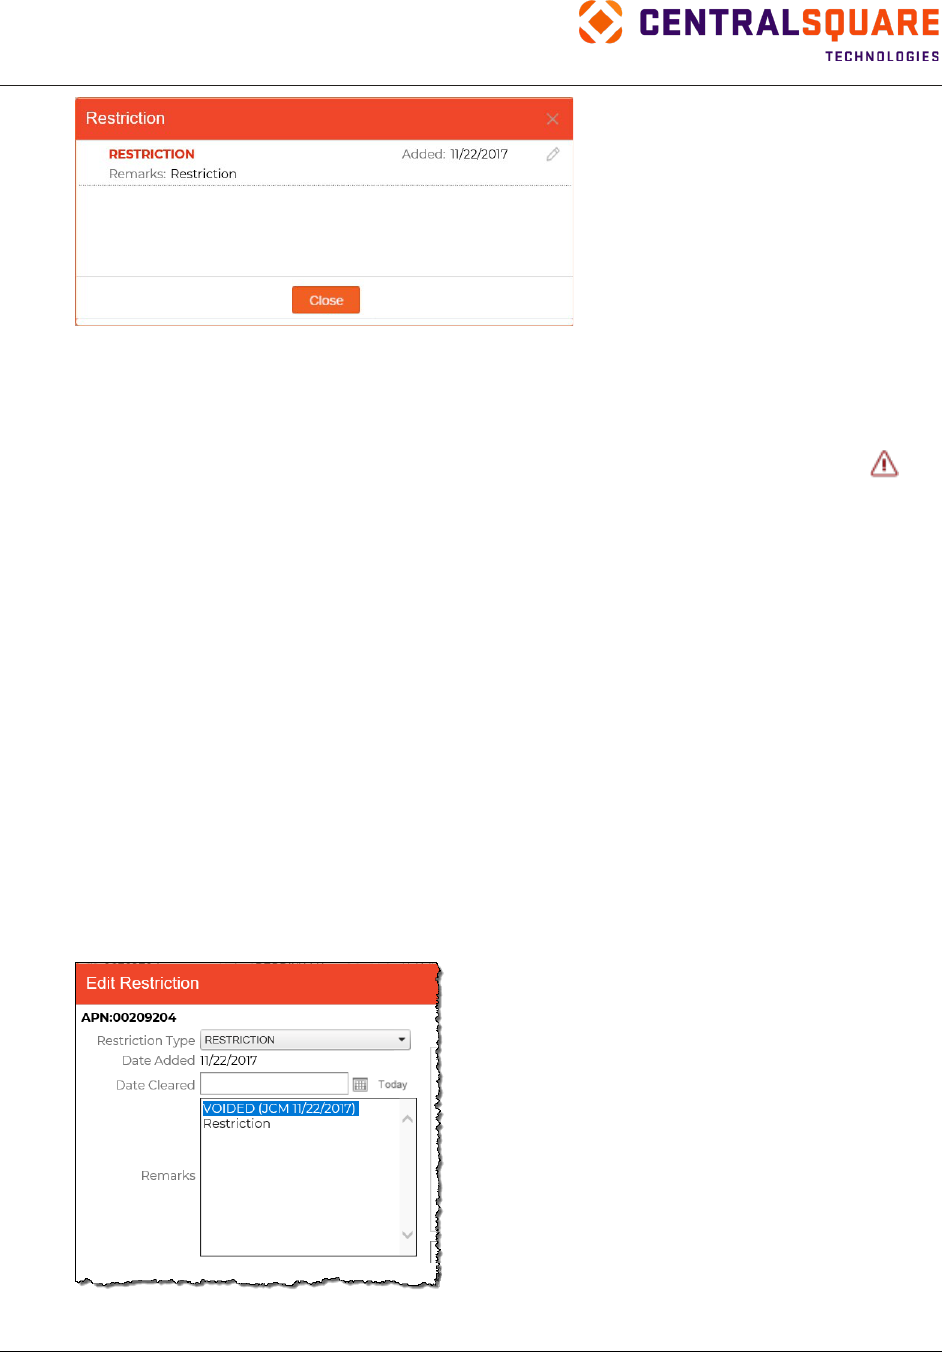
TRAKiT User Guide 18.1
Proprietary
May not be reproduced or distributed without written permission of CentralSquare Technologies.
Copyright 2018 CentralSquare Technologies. All rights reserved.
20181212JC Page 176
Viewing Restrictions
When you open a record that is linked to a GeoTRAK record with restrictions, a message appears listing
the restrictions. Click Close to close the message window.
While working in the activity record, you can view restrictions on a property at any time by clicking
on
the record's information pane. A message appears listing the restrictions. Click Close to close the
message window.
Removing Restrictions
You can remove restrictions by:
•
Clearing the restriction. The restriction remains on the GeoTRAK record, but it is not visible from
the related activity records. Use the Edit function to clear a restriction. See “Editing Restrictions
on a Property Record” for more details.
•
Voiding a restriction. The restriction remains on the GeoTRAK record, but it is not visible from the
related activity records.
Users who do not have the Can Delete Restrictions privilege can void restrictions but not delete
them. Only system administrators or users with the Can Delete Restrictions privilege can delete
restrictions.
To void a restriction, point to the functions menu in the Restrictions pane and select Void
Restriction. Click Yes to confirm.
To remove the void indicator, edit the restriction and remove the line in Remarks that shows the
restriction was voided.

TRAKiT User Guide 18.1
Proprietary.
May not be reproduced or distributed without written permission of CentralSquare Technologies.
Copyright 2018 CentralSquare Technologies. All rights reserved.
20181212JC Page 177
•
Deleting a restriction. The restriction is removed from the GeoTRAK record.
Only system administrators or users with the Can Delete Restrictions privilege can delete
restrictions. A restriction must be voided before it can be deleted.
To delete a restriction, point to the functions menu in the Restrictions pane and select Delete
Restriction. Click Yes to confirm.
TimeTRAK
TimeTRAK provides the capability to record the amount of time spent on a review, inspection, or activity
and assess a fee based on the user’s established rate for that activity.
The TimeTRAK process includes:
1.
Entering time for an activity.
2.
Validating recorded entries.
3.
Posting activities.
Entering Time
To enter time for an activity, complete the following steps:
1.
Locate the activity and the inspection, review, or chronology item you want to add time to.
2.
Click Edit in the row for the inspection, review, or chronology item.
3.
In the Add to Timesheet field, enter the amount of accumulated time spent on the activity (for
example, 1, 1.25, 2.5, 8). Type numeric values with no more than two decimal places.
4.
Click Save.
Tip: Only one TimeTRAK entry is allowed per activity.
Validating Time Entries
To validate recorded entries, use the Timesheet feature. Complete the following steps:
1.
Point to Favorites and click Timesheet.
Note: Before you can access Timesheet, you must add Timesheet to your Favorites list. See
“Favorites” for more information about adding features to your Favorites list.
2.
Select the week you want to view. The default setting is the current week.
3.
Review the entries.
4.
Add comments to each entry, if needed.
5.
Add entries, if needed. To add an entry:
a. Click Add Time.
b. Search for the record. In the search results, click the link in the Record # column.
c. Select the task.
d. Select the date.
e. Type the time spent on the activity, in hours.
f. Add comments.
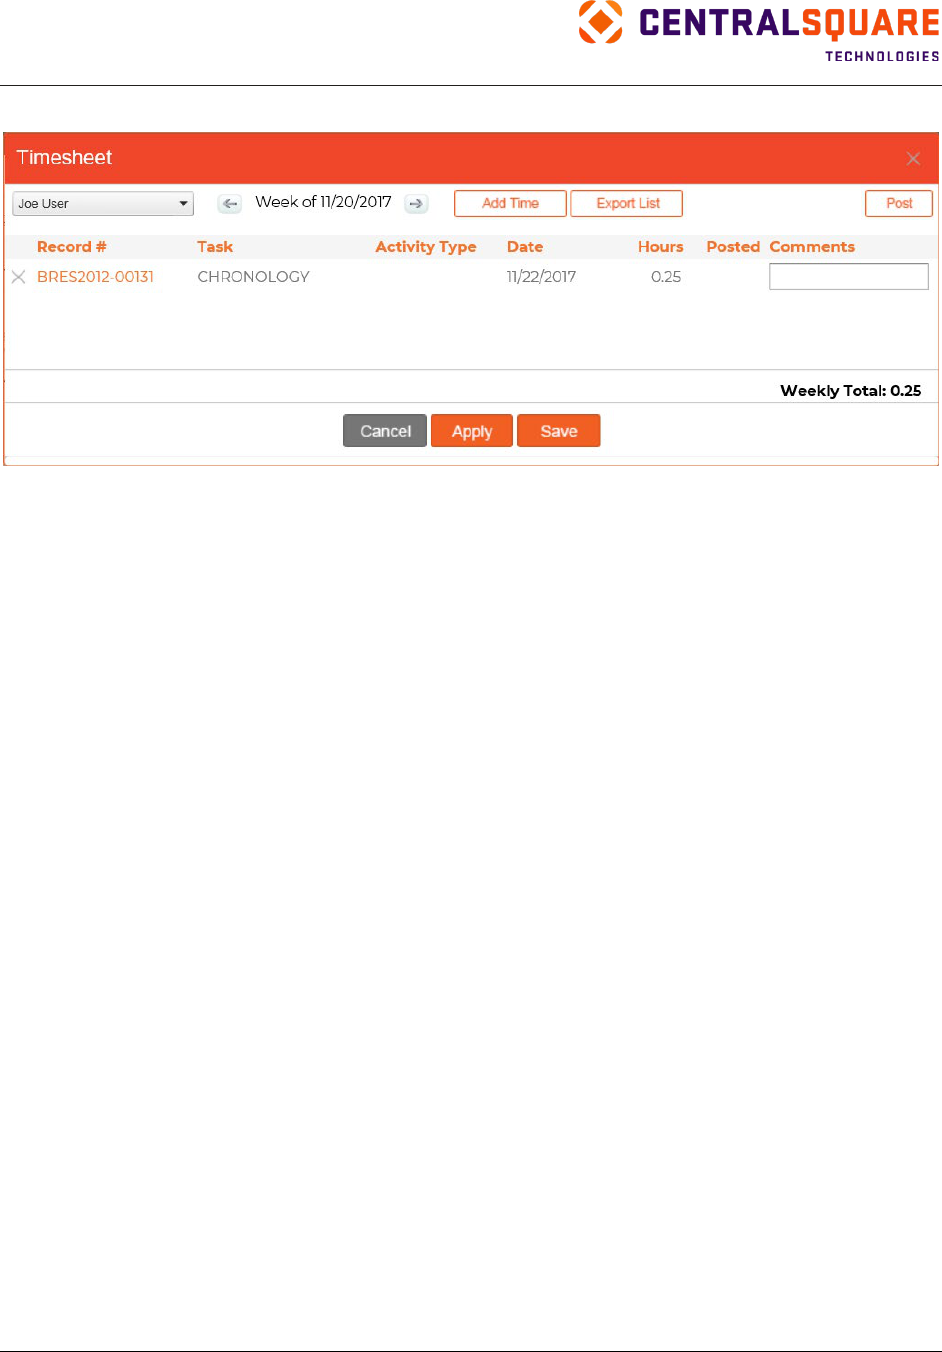
TRAKiT User Guide 18.1
Proprietary
May not be reproduced or distributed without written permission of CentralSquare Technologies.
Copyright 2018 CentralSquare Technologies. All rights reserved.
20181212JC Page 178
6.
Verify that each entry is correct.
7.
Click Save.
Tip: You cannot modify an existing entry. Instead, delete the entry and add it again to your timesheet.
To post time entries, use the Timesheet feature. In the Timesheet dialog box, click Post.
Note: Users can post their own timesheet only. System administrators can post timesheets for all
user accounts.
Trust Accounts
Trust Accounts are an additional payment source that can be created for an AEC TRAK record. The
feature enables a company or individual to place on deposit a sum of money that can be used to pay fees
in any TRAKiT module.
Note: If cashiering is disabled in your database, you cannot add funds to a trust account.
To deposit money into a trust account, complete the following steps:
1.
Locate the AEC TRAK record.
2.
Expand the Trust Account pane.
3.
Click Add Items.
4.
Enter the transaction details:
•
Paid By—Type the name of the company or person making the deposit.
•
Amount—Type the amount of the transaction.
•
Pay Method—Select the payment method. Additional fields appear depending on the
payment method. For example, for payment by check, a check number field appears.
•
Date—Enter the transaction date.
•
Receipt #—Enter the receipt number for the transaction from a point‐of‐sale (POS) system or
receipt book.
•
Description—Enter a description of the transaction.
5.
Click Add.
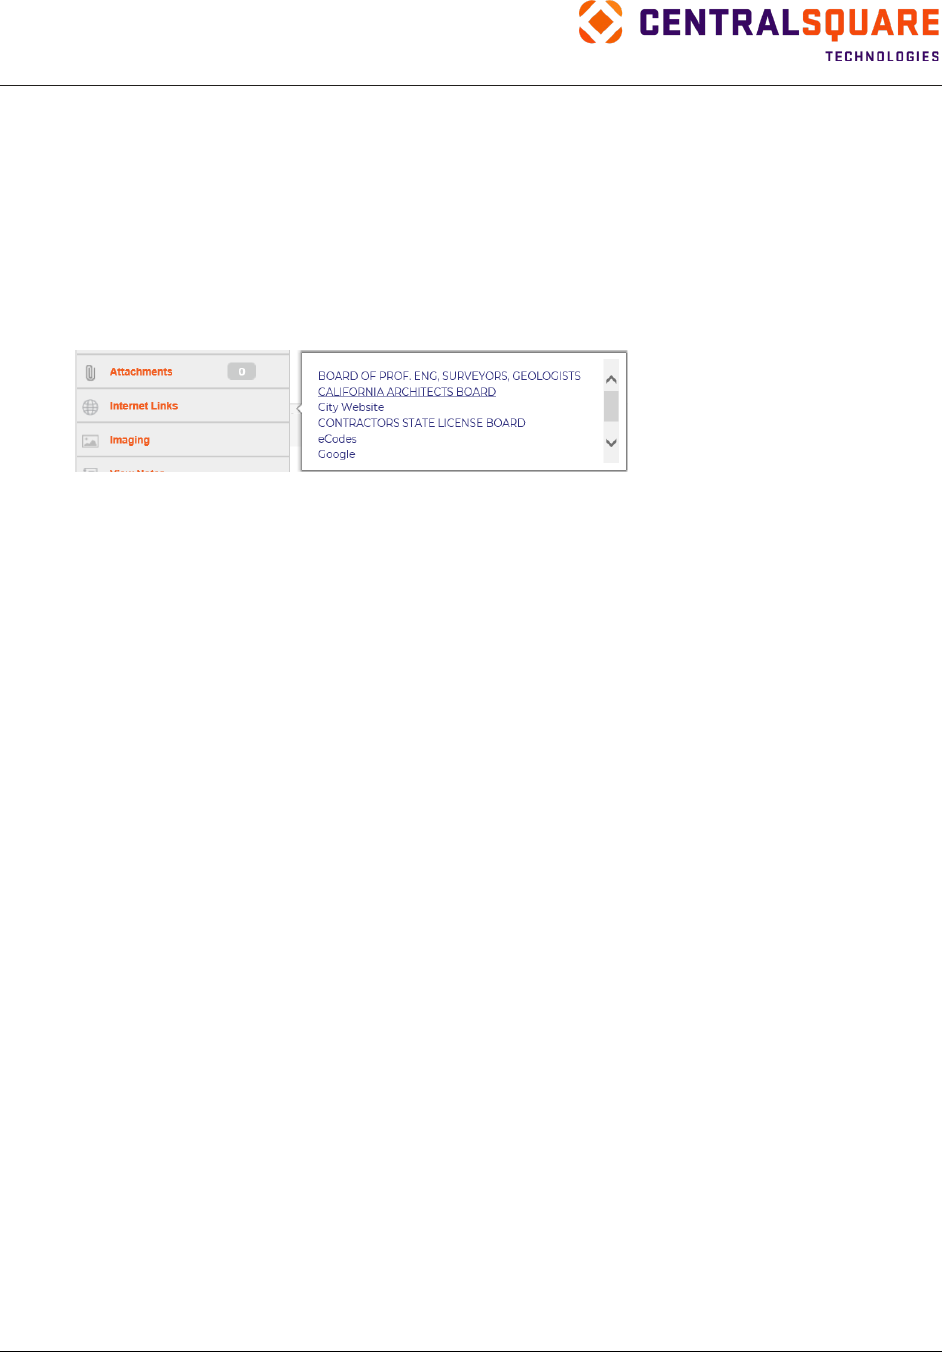
TRAKiT User Guide 18.1
Proprietary.
May not be reproduced or distributed without written permission of CentralSquare Technologies.
Copyright 2018 CentralSquare Technologies. All rights reserved.
20181212JC Page 179
Internet Links and Imaging
Links to frequently used websites such as contractor licensing, building codes, state or county
ordinances, or document imaging systems can be accessed directly from TRAKiT by clicking Internet
Links or Imaging. Default agency web links must be set up by a system administrator. Users can define
their own favorite unique web links.
To access internet links, click Internet Links in the Relationships pane.
To access imaging links, click Imaging in the Relationships pane.
The pop-up window includes default agency web links and user-defined web links.
Click a link to open the website in a new browser tab.
Tip: Imaging Links allow access to web‐enabled Document Imaging Systems (for example,
Laserfiche).

TRAKiT User Guide 18.1
Proprietary
May not be reproduced or distributed without written permission of CentralSquare Technologies.
Copyright 2018 CentralSquare Technologies. All rights reserved.
20181212JC Page 180
Glossary
A
Activity: An activity is a departmental function or procedure that is represented by a single TRAKiT
record (a permit, project, or case). Activities might occur on a property, and fees and TimeTRAK entries
might be charged toward activities.
APN: Assessor Parcel Number (APN) is the number used by the county tax assessor to identify a parcel
of land.
Autogen number: Autogen numbers are unique, numerical identifiers that are automatically generated
for tracking purposes (for example, receipt numbers, permit numbers, citation numbers).
C
Child: A child is a record lower in the hierarchical structure than the parent record to which it is linked. For
example, a building permit (parent) might have a subpermit (child) for electrical work.
Custom Screens: Custom screens contain data that is unique to each agency. These screens are
designed by system administrators.
F
Filter: A filter enables you to search the database for records that meet specified criteria. Using filters
provides more targeted search results.
I
IVR: Interactive Voice Response (IVR) provides an automated telephone interface to the TRAKiT
database that is available to citizens and staff 24 hours per day, 7 days per week. CentralSquare partners
with several IVR vendors to offer this service.
M
Merge documents: Merge documents are Microsoft Word document templates into which you can merge
data from TRAKiT records. You can use merge documents to generate documents such as inspection
cards, notification letters, and certificates of occupancy.
P
Parcel: A parcel is a section of land or a property lot that has one owner and has a definite boundary.
Parent: A parent is a record higher in the hierarchical structure than the child record to which it is linked.
For example, a building permit (parent) might have a subpermit (child) for electrical work.

TRAKiT User Guide 18.1
Proprietary.
May not be reproduced or distributed without written permission of CentralSquare Technologies.
Copyright 2018 CentralSquare Technologies. All rights reserved.
20181212JC Page 181
Parent‐child relationship: A parent‐child relationship is a way of linking records in a hierarchical
organization. The parent record is the higher record and the child record is the lower record in the
hierarchy. For example, a building permit (parent) might have a subpermit (child) for electrical work.
Permit, project, and case records can be linked in parent‐child relationships.
Plan Location: Plan Location manages and tracks the physical location of all plan items that are
associated with a record in PermitTRAK, ProjectTRAK, CodeTRAK, or LicenseTRAK.
Privilege: Privileges, or access rights, enable TRAKiT users to add, modify, or view specific data and
perform specific functions in TRAKiT. Privileges are assigned to each user by a system administrator.
S
Standard Notes: Standard notes are a predefined list of frequently used comments for inspections and
reviews that can speed up data entry. Standard notes are configured in the Reviews and Inspections
control tables and used in the Notes function on Review and Inspection screens in TRAKiT applications.
Standard Remarks: Standard remarks are a list of standard comments from which a user can select one
when batch scheduling reviews or inspections. They are configured in the Reviews and Inspections
control tables.
T
Trust accounts: Trust accounts are deposited funds that are held by the agency on behalf of anyone
doing business with the agency (for example, a contractor). The contractor can draw on these funds to
pay fees assessed on activities in PermitTRAK, ProjectTRAK, CodeTRAK, LicenseTRAK, and AEC
TRAK.
Type: Type is a classification that groups together related kinds of records within a given TRAKiT
application. For instance, permit types might include Commercial, Residential, or Electrical.
U
Unique business identifier: A unique business identifier is either the business name or business tax ID,
depending on your TRAKiT setup. Whenever a new business is created, TRAKiT checks the unique
business identifier against the existing business records to verify that the business is not already in the
system.
W
Wildcard: A wildcard is a special symbol that stands for one or more characters. In TRAKiT, the percent
sign (%) is the wildcard for any number of occurrences of any character and the underscore ( _ ) is the
wildcard for any single character. Use a wildcard to search for multiple records with similar properties.
